
Non-fungible tokens, more commonly known as NFTs, are the new big trend in the crypto and blockchain industry. NFTs were all over the news in the last few months, with stories of digital art using the technology selling for millions of dollars.
With NFTs, we can uniquely identify and represent the ownership of assets using the blockchain. We can also use NFTs to trade these assets and implement sophisticated contracts like royalty payments. We’re still in the early days of this technology but we’re already seeing a wide wide range of applicability in virtual worlds, domain names, collectibles, and art.
Putting aside all the hype around the price of some of these digital assets, the goal of this tutorial is to give you a practical introduction to NFTs. To do this, we will start in section 1 with a short introduction to blockchain, Ethereum, and smart contracts. In section 2, we will go deeper into the technology covering its history, landscape and, tools; and understanding the steps for making an NFT on the Ethereum blockchain. In section 3, we will go hands-on with the creation of a digital asset and the deployment of an NFT that represents our creation on the Ethereum blockchain. In section 4, we will create a physical object that represents our asset and we will look at some of the limitations of NFTs.
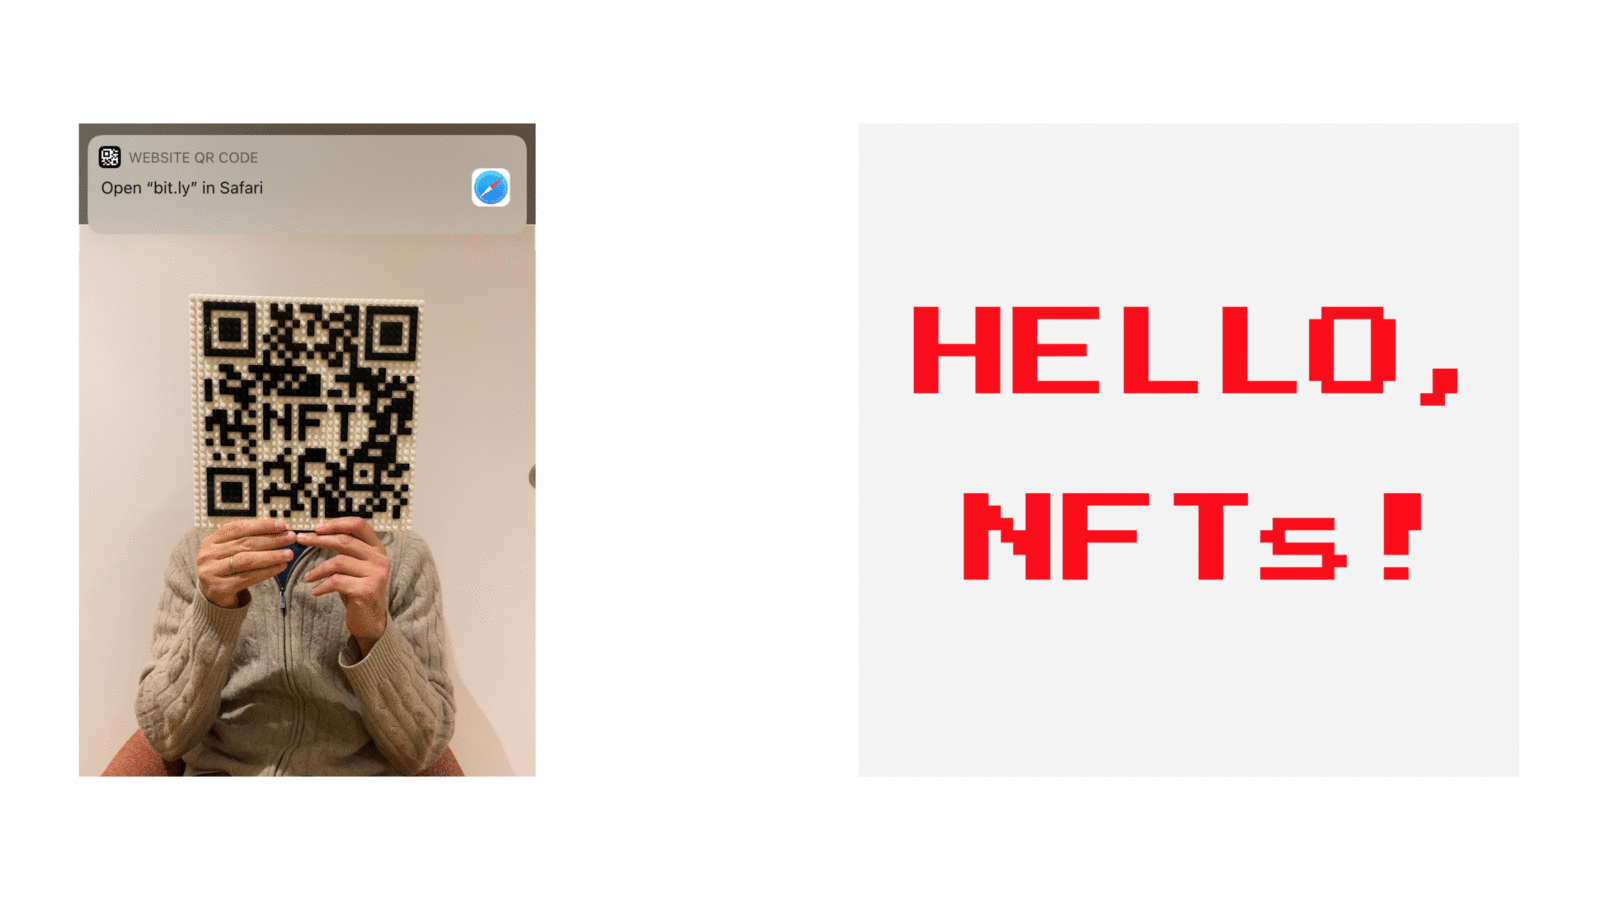
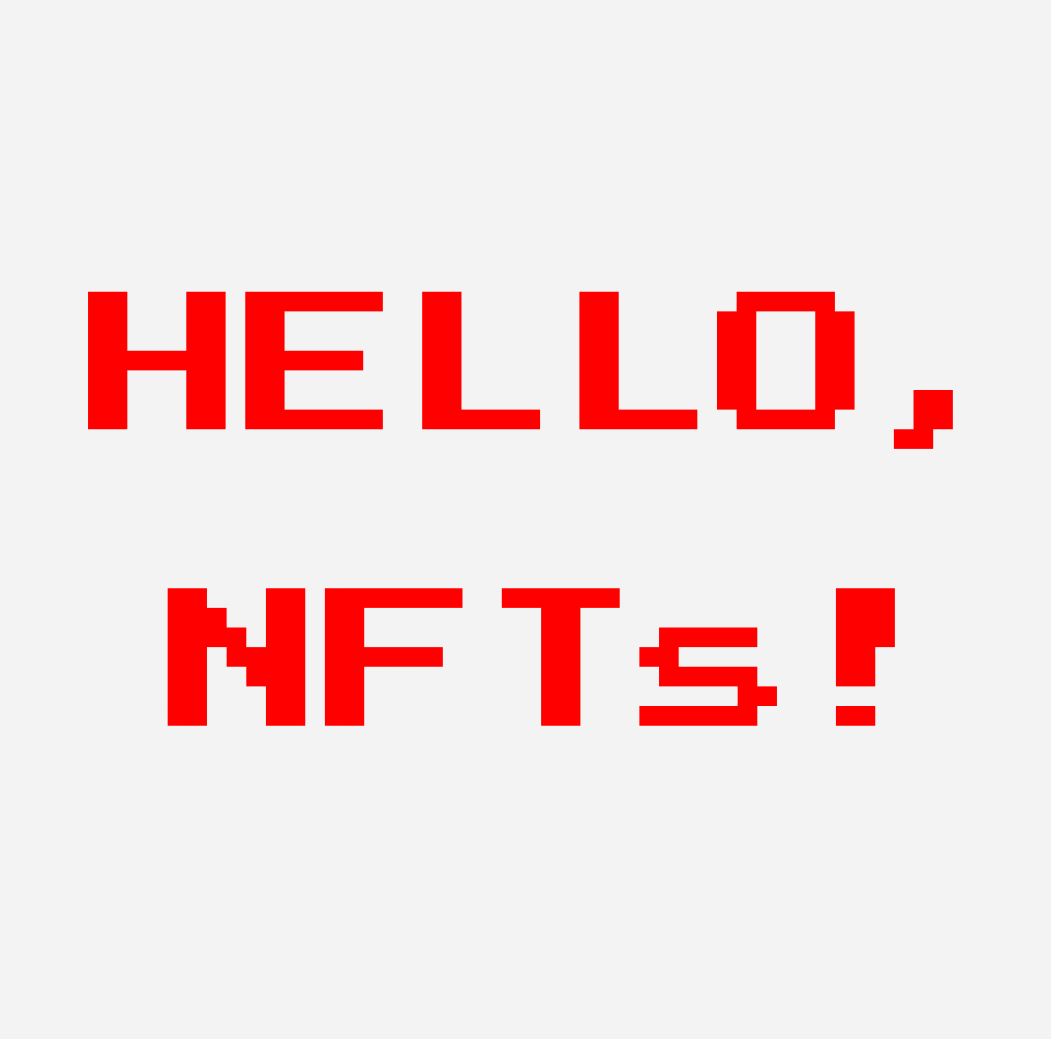
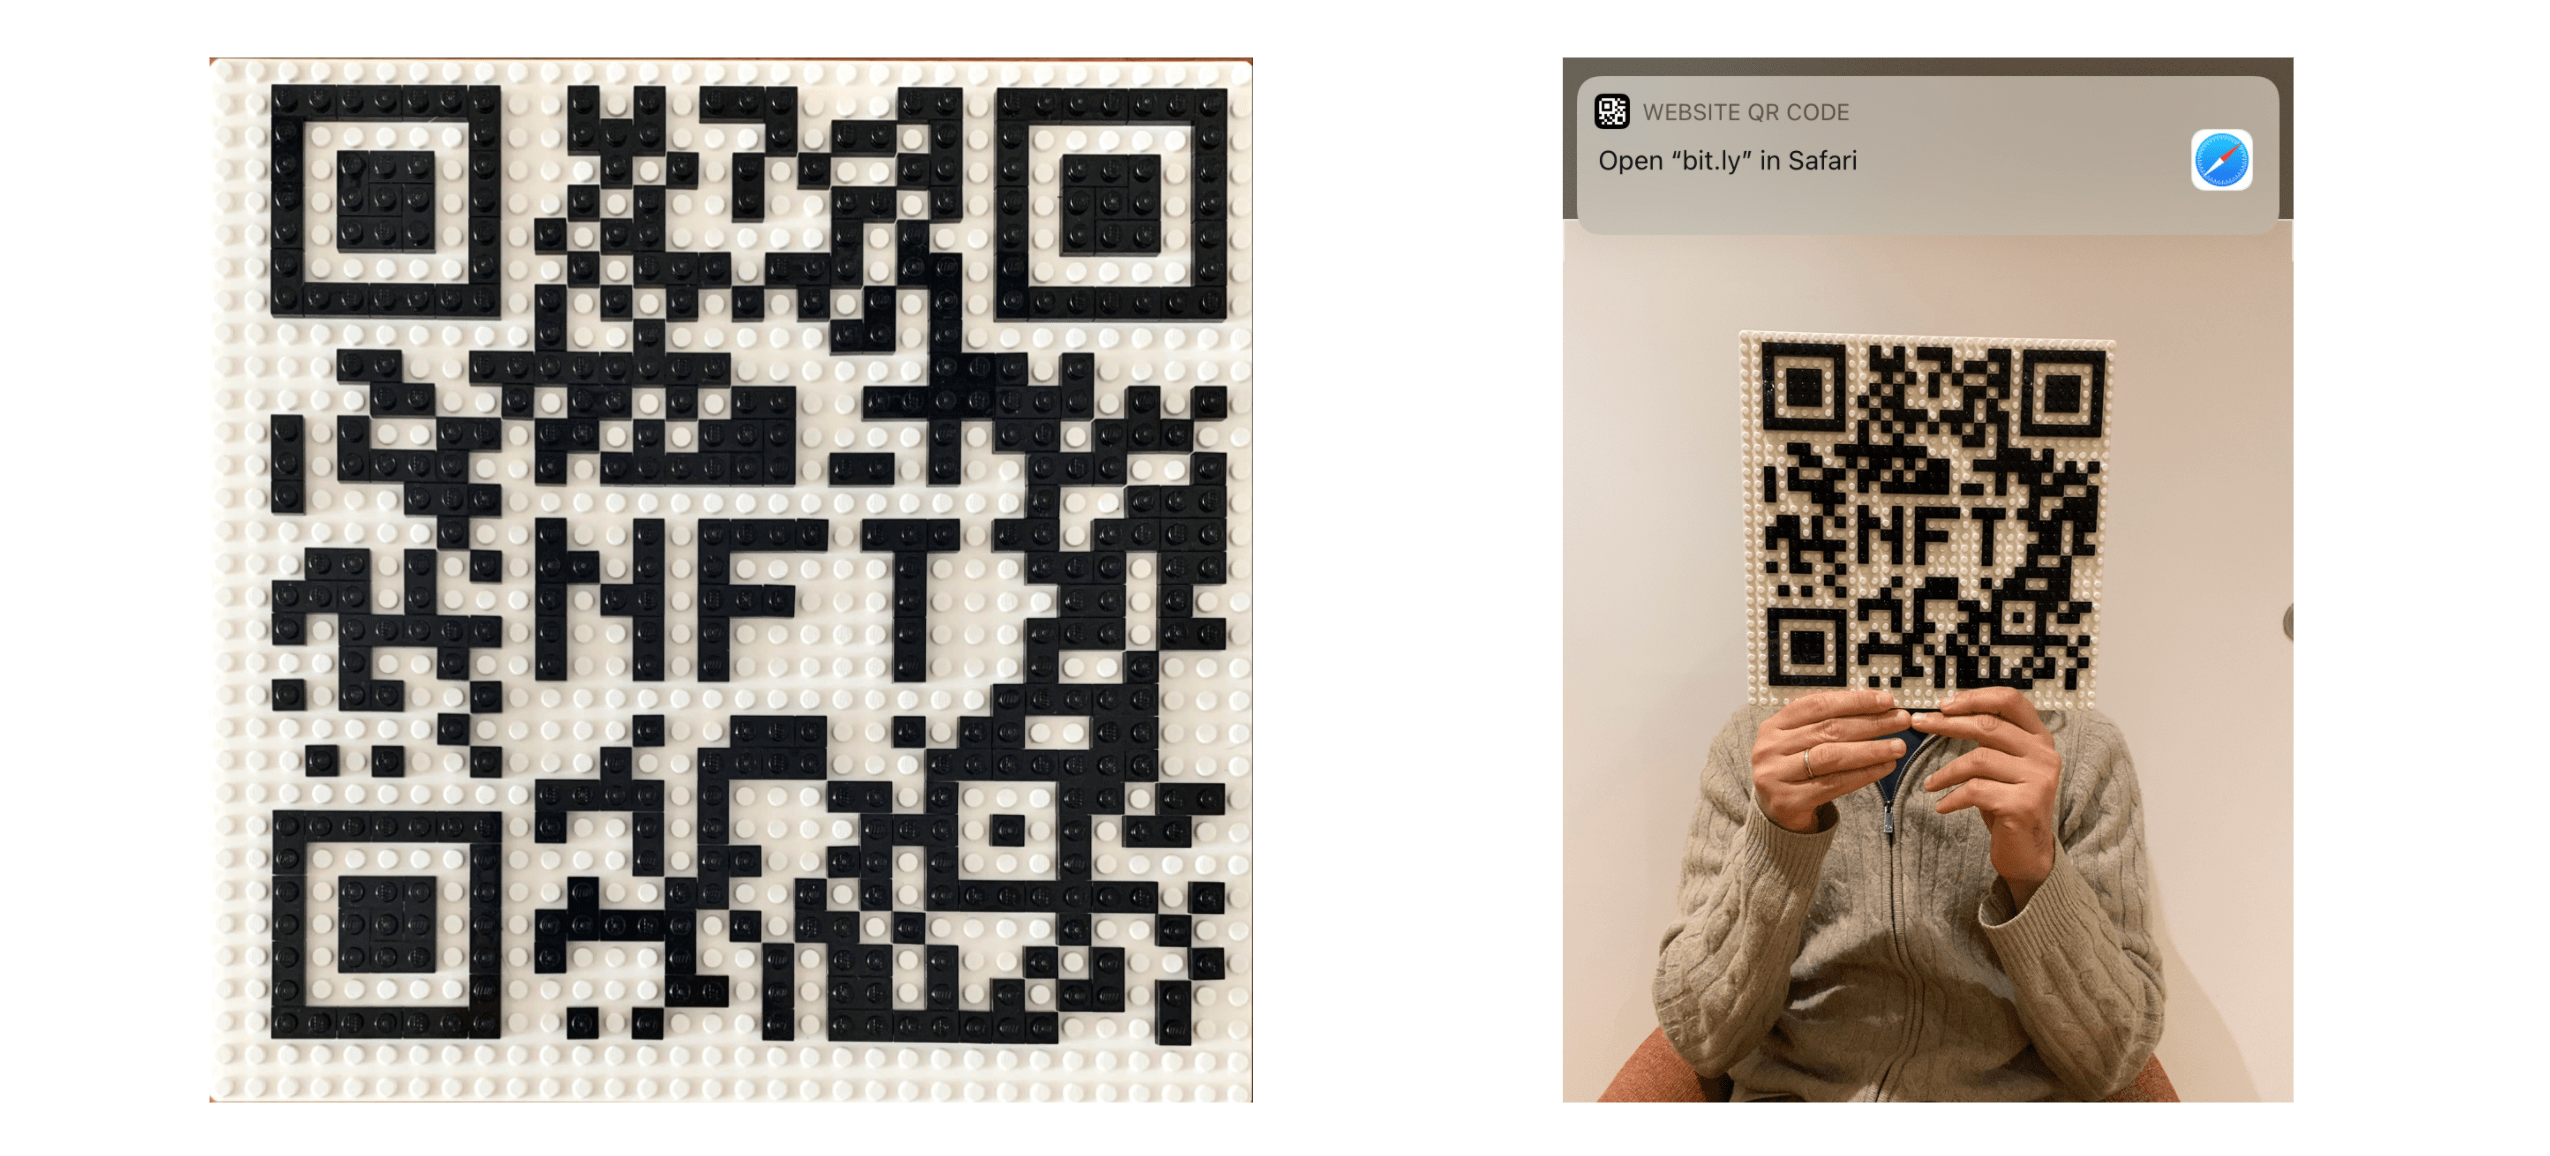
Following the tradition of using “Hello, World!” programs to introduce new topics in programming, I created the GIF below of an animated text that says: “Hello, NFTs!”. We will create an NFT that represents our newly created GIF and we will deploy it on the Ethereum blockchain. To make this tutorial more interesting and understand the limitations of NFTs, I created the physical object below which is a LEGO-based QR code that is linked to a webpage that shows information about our NFTs and our new digital asset.
You can find the source code for this tutorial in this github repository.
1. A Short Introduction to Blockchain, Ethereum, and Smart Contracts
1.1. What is Blockchain Technology?
A blockchain is an immutable distributed ledger that allows direct transactions between two parties without the need for a central authority.
- By “immutable”, we mean that the blockchain can be changed in an append-only fashion. In other words, transactions can only be added to the blockchain but cannot be deleted or modified. This means that once a transaction is added, no one can tamper with it.
- By “distributed”, we mean that the ledger is replicated across several computers, rather than being stored on a central server. Any computer with an internet connection can download a full copy of the blockchain. This means that anyone can check all transactions that have been executed on the blockchain.
Transactions on the blockchain are facilitated through digital currencies that are called: Cryptocurrencies. The blockchain uses cryptography and sophisticated consensus mechanisms to make sure that the transactions and the ledger are secure. I recommend this blog post if you want to go deeper into the technical details of blockchains.
The first and the most popular blockchain is the Bitcoin blockchain. The cryptocurrency that is used on the Bitcoin blockchain is bitcoin. Since its launch in January 2009, Bitcoin’s market cap at the time of this writing has surpassed 1 trillion dollars which makes it the most valuable cryptocurrency.
Bitcoin is an incredible product and is arguably one of the most disruptive technologies since the inception of the Internet. Having said that, it was primarily designed to be a digital currency which limits its scope of applicability to some financial use cases.
1.2. Ethereum and Smart Contracts
In late 2013, a programmer by the name of Vitalik Buterin released a white paper introducing the idea of a new blockchain called Ethereum. The main idea behind Ethereum is to go beyond the digital currency use case and to be a general-purpose blockchain that can be used for a wider range of applications. To do this, Ethereum introduced the concept of smart contracts. A smart contract is a computer program that is intended to automatically execute, control, or document legally relevant events and actions according to the terms of a contract or an agreement [1]. Ethereum smart contracts are designed to be programmed and executed on top of the Ethereum blockchain and as a result, can benefit from the main advantage of blockchains: The ability to have direct transactions between 2 parties without the need for trusted intermediates. To program the smart contracts, the Ethereum team introduced a new programming language called Solidity. Since the launch of the Ethereum network in July 2015, there have multiple use cases leveraging smart contracts. For example:
- Development of new cryptocurrencies on top of Ethereum
- Initial Coin Offerings (ICOs)
- Decentralized apps (DApps)
- DeFi applications
- Non-fungible tokens (NFTs)
2. A Deep Dive into NFTs
In this section, we will go deeper into NFTs. We will start by defining what NFTs are. We will then cover the history of the technology and some of its popular applications. We will also go over the steps for making and deploying an NFT on the Ethereum blockchain, and we will close the chapter by looking into the NFT landscape and tools.
2.1. What are NFTs?
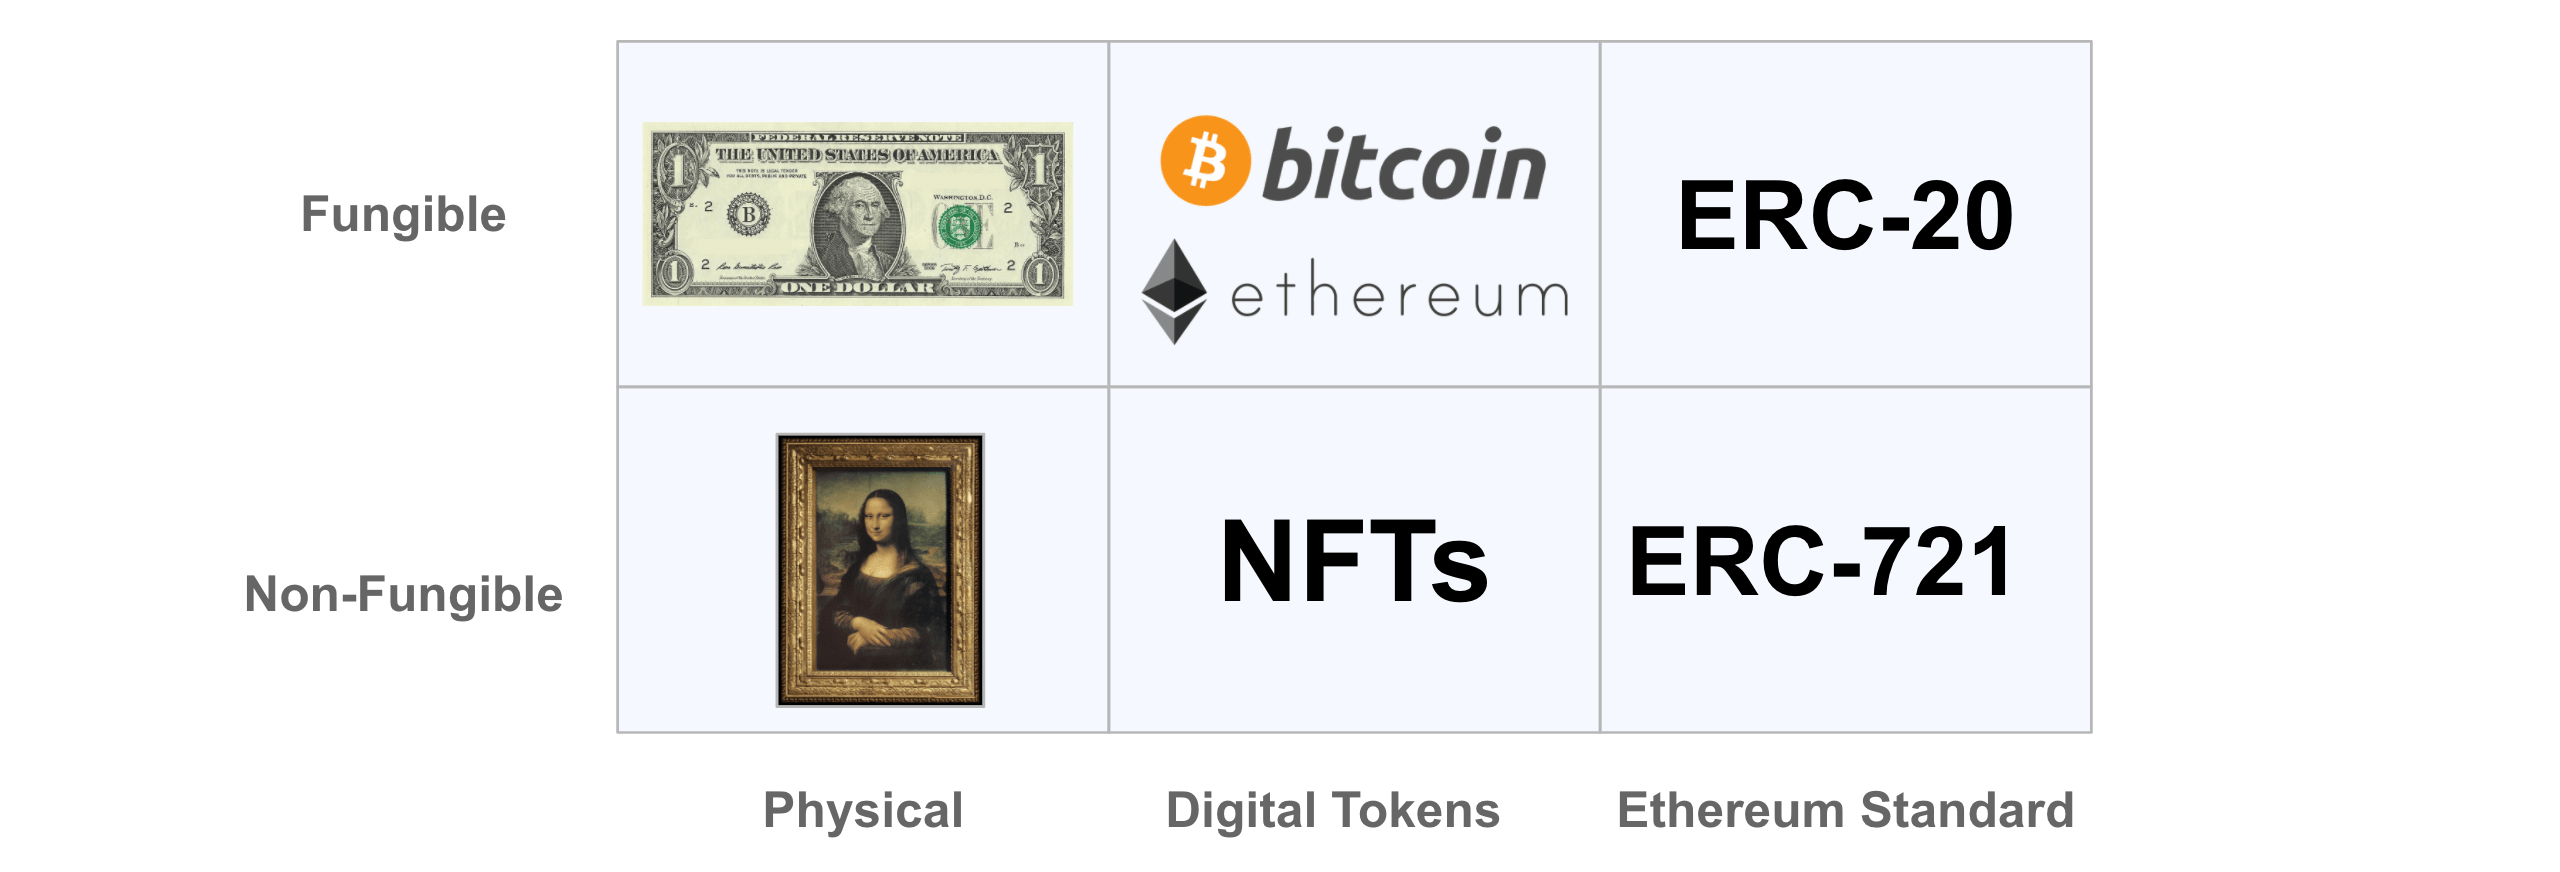
NFTs stands for non-fungible tokens. A fungible good is a good whose individual units are essentially interchangeable [2]. A currency, for example, is fungible since every 2 units of any currency are interchangeable. A non-fungible good is a good that is unique and can't be replaced with something else. A non-fungible token is a unit of data on a blockchain, that represents a unique item. NFTs can represent any digital file or digital assets such as items in virtual worlds, domain names, collectibles, and digital art, just to name a few. NFTs can also represent objects in the physical world, but this is more complex to implement than representing digital assets. The Ethereum blockchain is the most popular blockchain used for NFTs, but it’s not the only one.
Why is there much hype around NFTs?
At its core, an NFT is a proof of ownership stored on a blockchain. This simple yet powerful concept makes it possible to create digital assets that have the following properties:
- Proof of authenticity: We can easily verify who’s the creator of an NFT by looking at the transaction that minted that NFT to the blockchain.
- Proof of ownership: We can easily verify the ownership history of an NFT by looking into all the associated transactions.
- Immutability: Once an NFT is added to a blockchain, we can’t delete or tamper with any of the transactions related to it.
- Scarcity: Since an NFT represents a unique asset, we can create digital assets that are unique or in limited supply.
- Transferability: It’s very easy to transfer an NFT from a blockchain address to another one.
- Utility: We can add some utility to an NFT, such as giving the NFT holder some privileges.
By leveraging all the characteristics above, it became possible for the first time to create digital collectibles, easily monetize digital art and create new marketplaces for trading digital assets. Some creators and companies took full advantage of the technology and created NFTs that sold for millions of dollars. Some of these stories were all over the news and introduced NFTs to the mainstream.
2.2. A short history of NFTs
In 2012, Yoni Assia published an article titled “bitcoin 2.X (aka Colored Bitcoin) — initial specs”. In the article, he introduced the concept of Colored Coins which are tokens associated with real assets and managed by the Bitcoin blockchain. Even though he didn’t use the word “non-fungible token” in the article, colored coins are considered to be the first NFTs.
In 2014, 3 developers (Robby Dermody, Adam Krellenstein, and Ouziel Slama) launched Counterparty which is a financial platform for creating peer-to-peer financial applications on the bitcoin blockchain. [3][4] Counterparty can be used to create new digital tokens that represent any asset. There have been a few interesting NFT applications built on top Counterparty, most notably:
- Spells of Genesis in 2015: Spells of Genesis is a mobile game mixing the collection and strategic aspects of Trading Card games with the addictiveness of Arcade games. The game uses the bitcoin blockchain to facilitate the trading of game items within and outside the app. [3]
- Rare Pepes in 2016: People started using Counterparty to publish and trade Rare Pepes which are illustrations of Pepe the Frog [5], a very popular meme created by Matt Furie in 2005. [6]
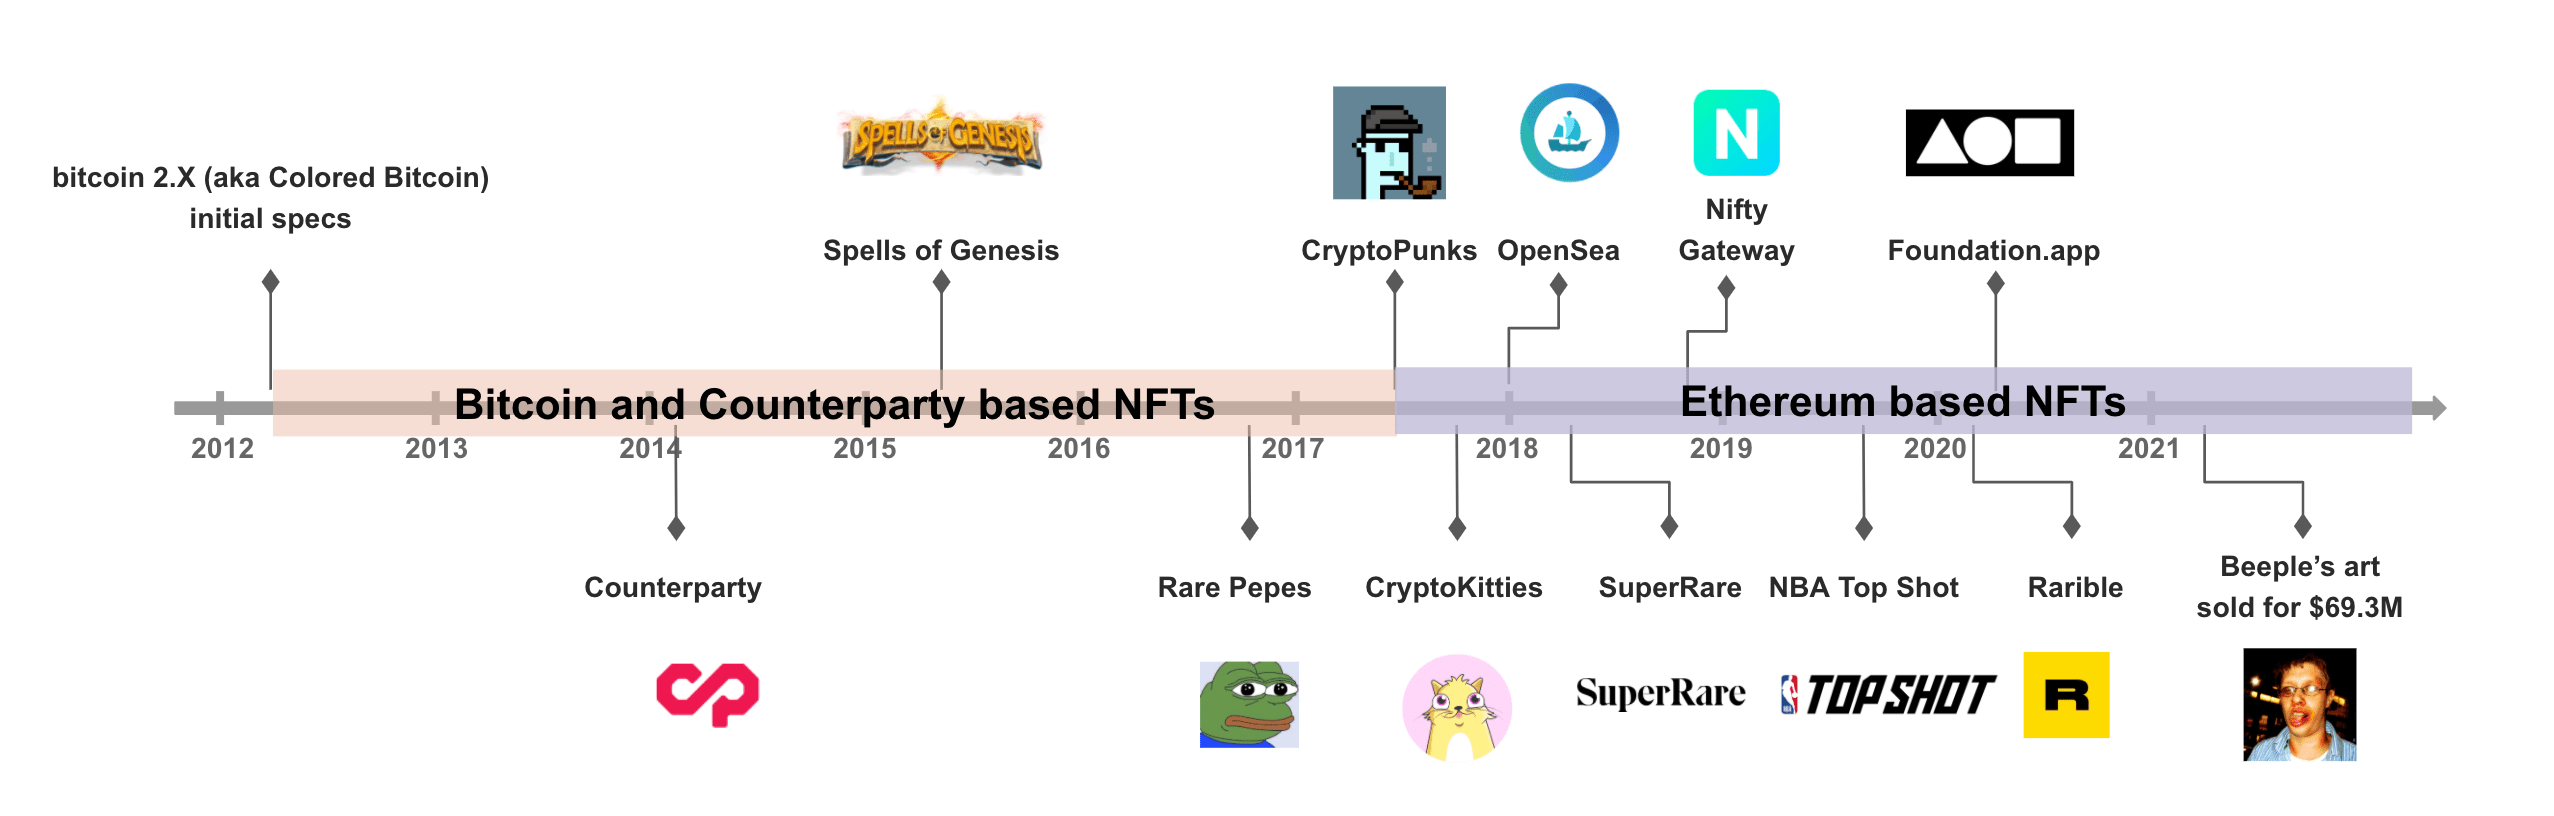
In June 2017, Larva Labs, a two-person team consisting of Matt Hall and John Watkinson released CryptoPunks. CryptoPunks are 10,000 unique collectible characters with proof of ownership stored on the Ethereum blockchain. This project is one of the most influential NFT projects and was an inspiration for the ERC-721 standard for NFTs and the modern crypto art movement. [7][8]
In October 2017, The Canadian studio Dapper Labs unveiled a test version of CryptoKitties. CryptoKitties is a blockchain-based virtual game that allows players to purchase, collect, breed, and sell virtual cats.
From 2018, there has been a lot of development in the infrastructure and marketplaces for creating, buying, and selling NFTs. This development reduced the barrier of entry and allowed creators with different technical skills to easily create digital assets and trade them as NFTs on these new marketplaces. As a result, there has been a boom in the NFT market starting from late 2020 and the beginning of 2021.
In July 2019, the NBA and Dapper Labs formed a joint venture to create NBA Top Shot. NBA Top Shot is a blockchain-based platform that allows fans to buy, sell, and trade numbered versions of specific, officially licensed video highlights. [10] Since the platform opened to the public in October 2020, it did over USD 400M+ in sales.
In March 2021, Christie's, one of the oldest and most prestigious auction houses, sold its first NFT that represents a digital art called “Everydays: the First 5000 Days” for USD 69.3M paid in Ether. This digital art was created by Mike Winkelmann, known professionally as Beeple. [11]
2.3. Steps for making an NFT on the Ethereum blockchain
The process of adding an asset to the Ethereum blockchain is called minting the NFT. We can mint NFTs by coding a smart contract using Solidity programming language and deploying it on the Ethereum blockchain, or by using one of the multiple platforms that facilitate the minting process. Some of these platforms also provide a marketplace that we can use to sell our NFTs. The Ethereum standards for creating and exchanging NFTs are ERC-721 and ERC-1155. Although ERC-1155 has some additional benefits, ERC-721 remains the most popular standard at the time of this writing. All NFTs should follow one of these standards to make sure that the created NFTs are compatible with the different marketplaces and the NFT ecosystem.
Creating an NFT goes as follows:
- Step 1 (one-time effort): Setting up an Ethereum wallet
- Step 2: Adding some Ether to your Ethereum wallet
- Step 3: Creating or selecting an asset that you want to link to an NFT
-
Step 4: Minting the NFT. This can be done by either:
- Coding and deploying to the Ethereum blockchain a smart contract that follows the ERC-721 ERC-1155 standard
- Using one of the minting platforms
-
Step 5 (Optional): Put your NFT in one of the marketplaces
2.4. NFT Landscape and Tools
The NFT landscape is very dynamic with new tools, platforms, and marketplaces being released at a very fast pace. It’s quite challenging to keep track of all new releases and understand the nuances that each product offers. Having said that, in this section, we will focus on the most popular and important ones:
-
Ethereum Wallets:
- Metamask: Metamask is the most popular Ethereum wallet. It can either be used as a web browser extension or as a mobile app. Once installed, you can use MetaMask to interact with the Ethereum blockchain, access DApps, and store your cryptocurrencies and NFTs. There are other Ethereum wallets, but Metamask is by far the most popular one.
-
Minting Platforms and marketplaces:
-
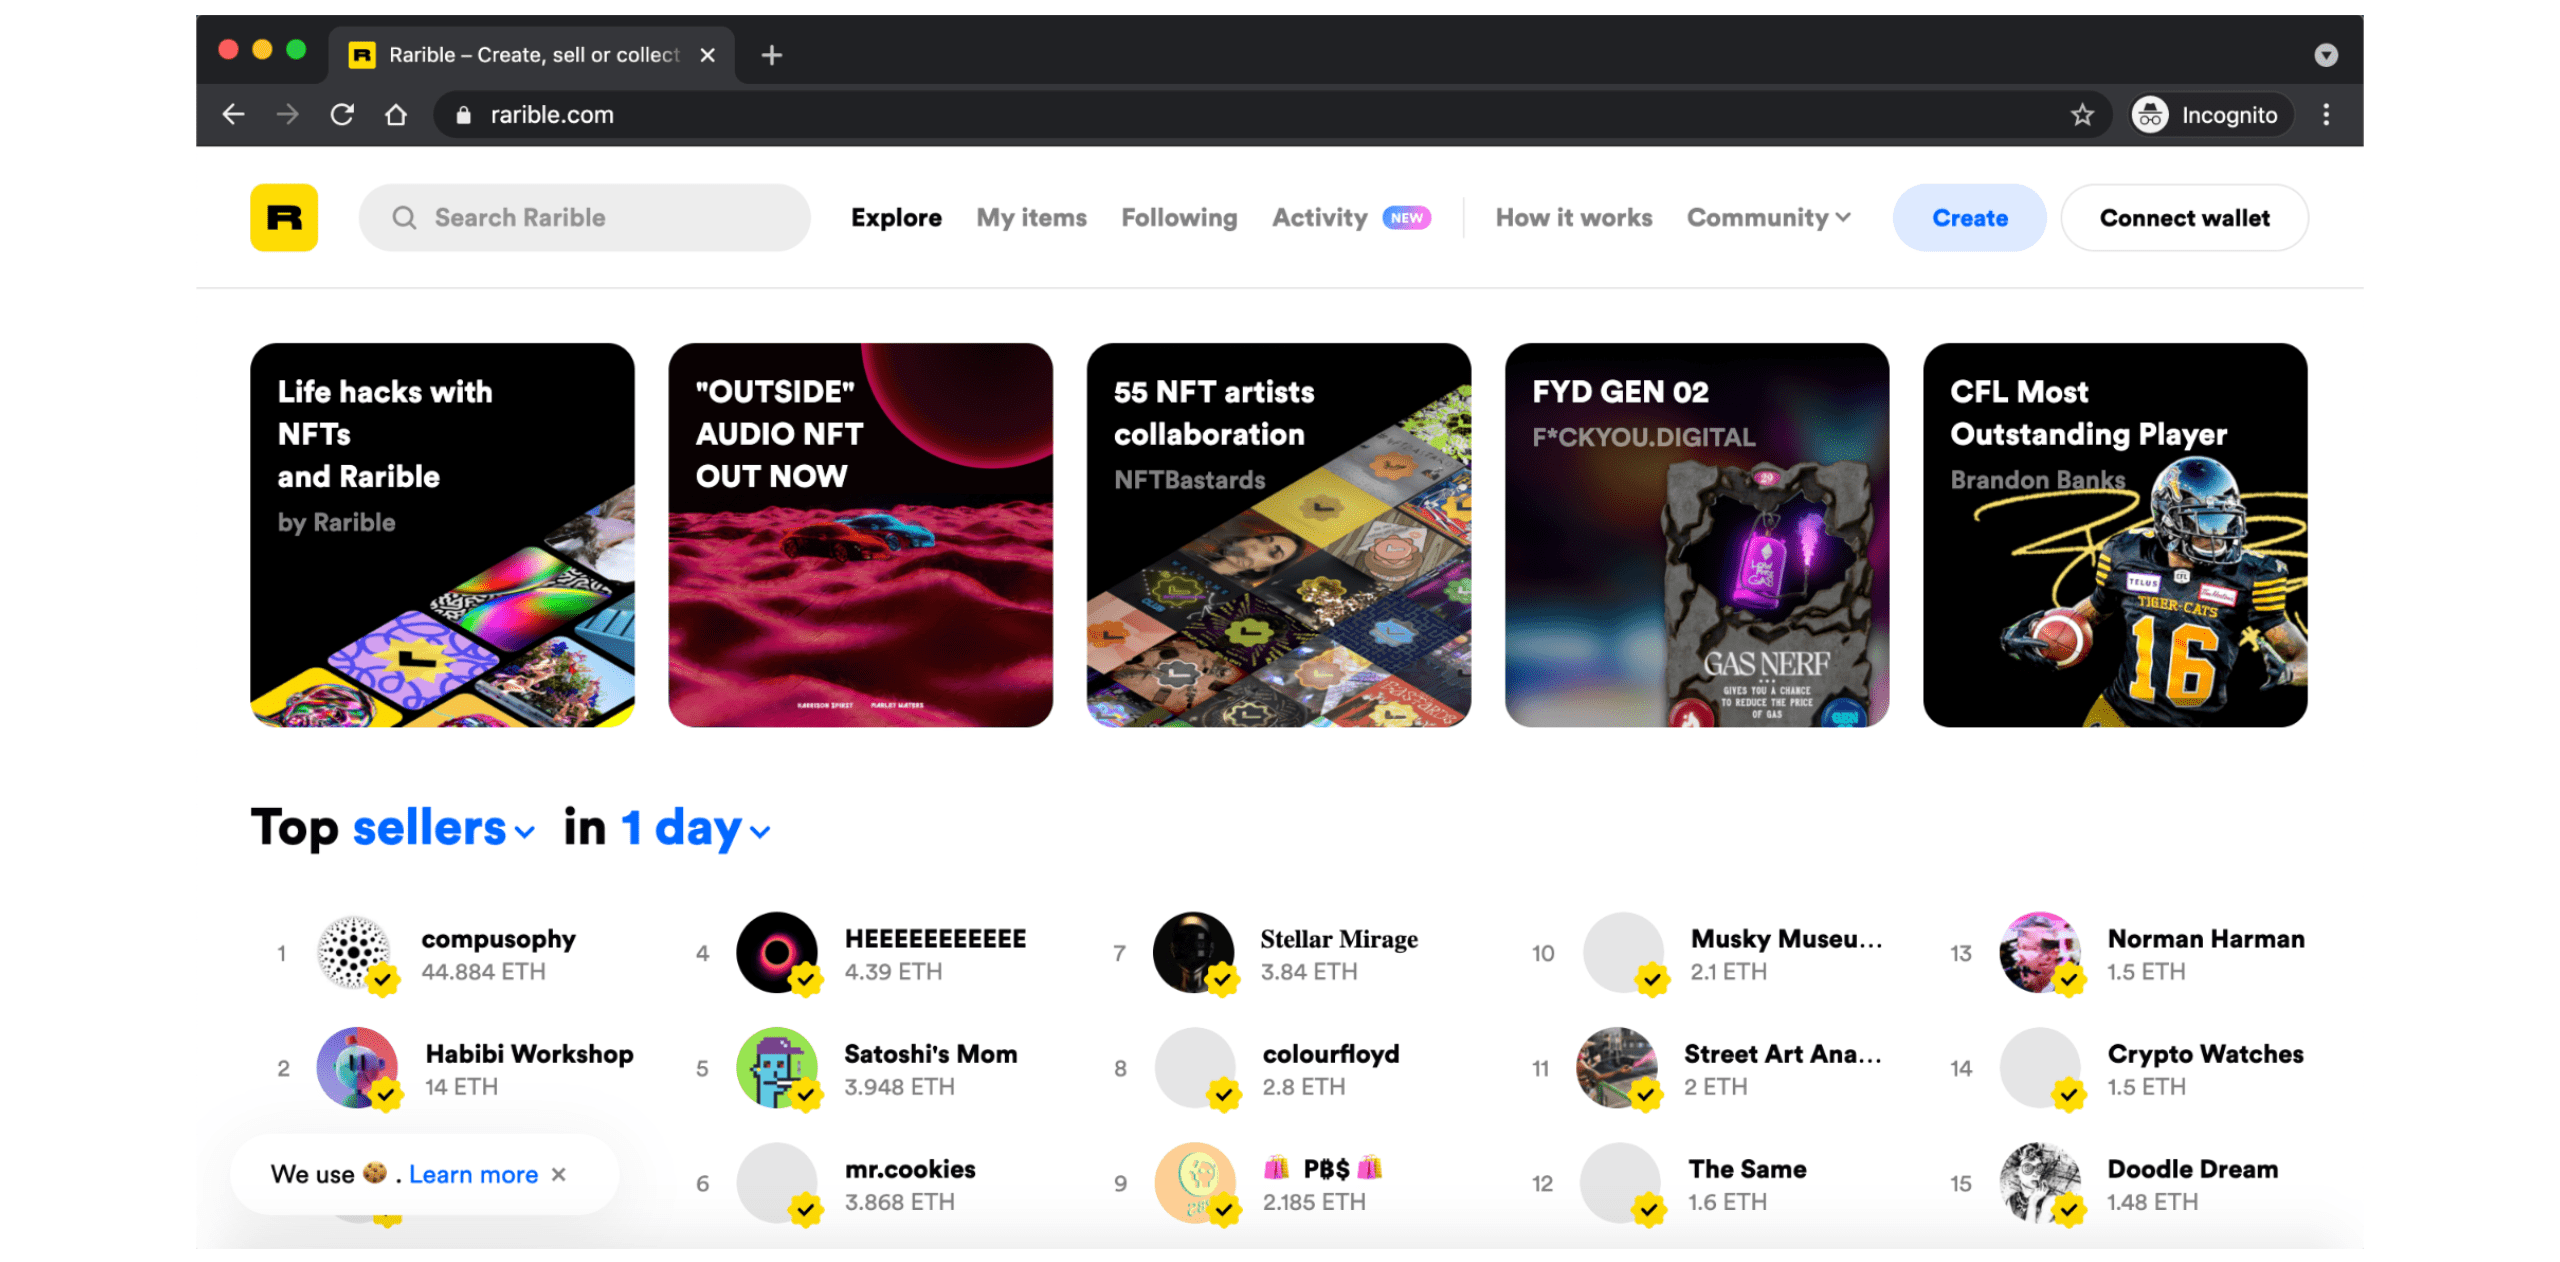
Open platforms: These platforms are open to everyone and allow you to mint NFTs and sell them directly on a marketplace. The most popular open platforms are: Rarible and OpenSea.
-
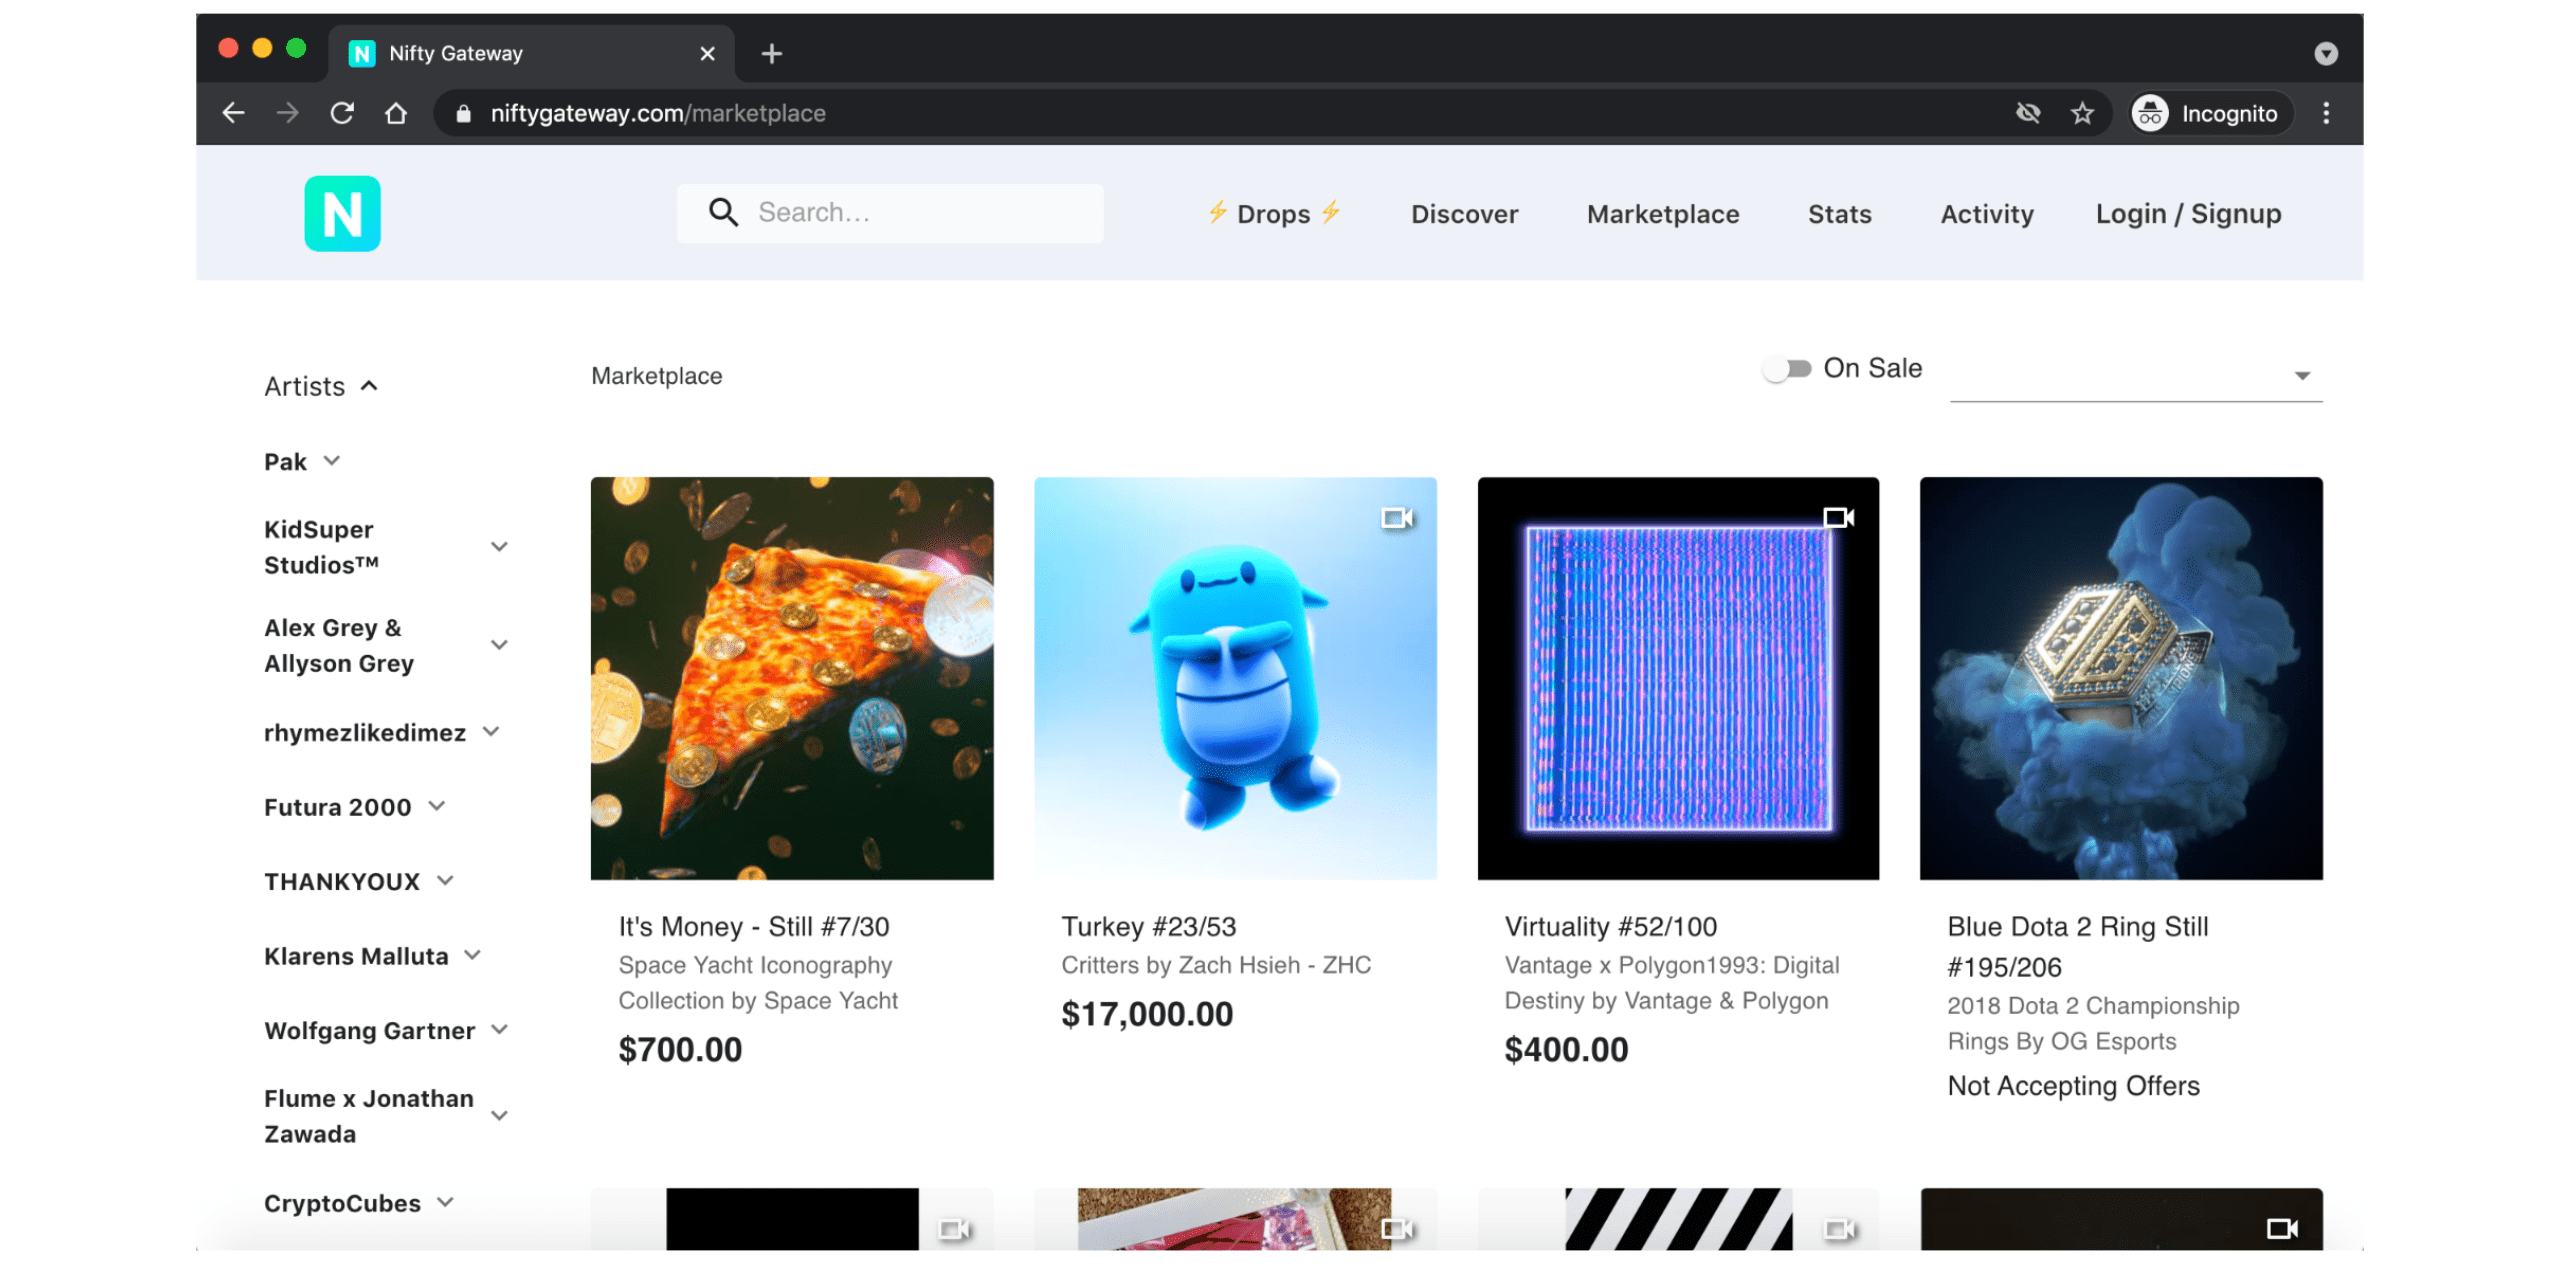
Exclusive Platforms: These platforms are invite-only and work with selected creators. Some of these platforms allow users to buy NFTs using fiat currencies. The most popular exclusive platforms are: Nifty Gateway, SuperRare, and Foundation.
-
Narrow Marketplaces: These marketplaces are restricted to a specific NFT use case. The most popular narrow marketplaces are: Cryptopunks, Cryptokitties, and NBA Top Shot.

-
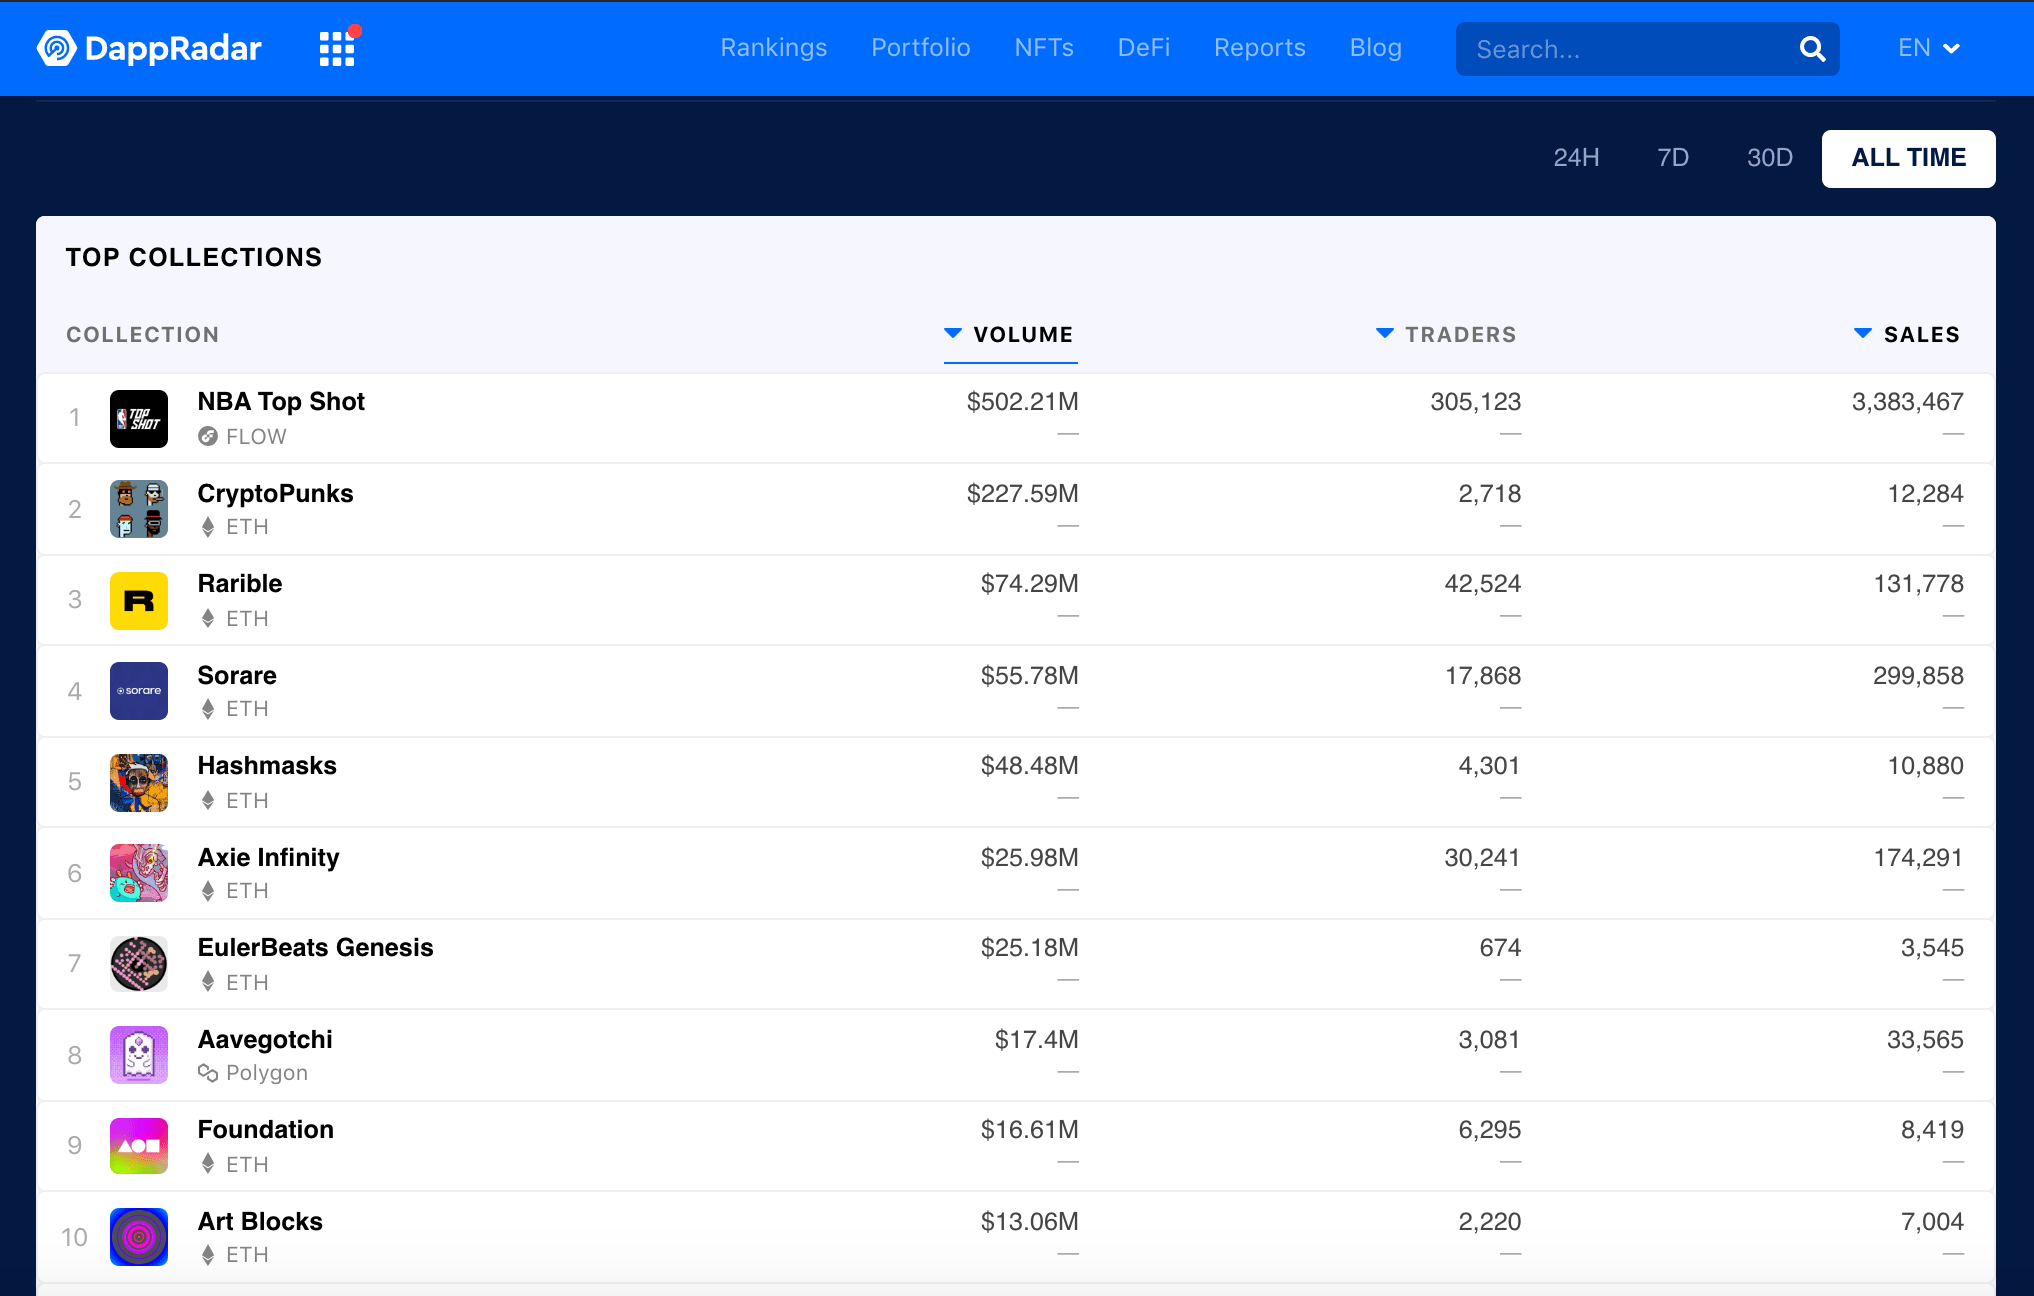
Analytics Platforms: These platforms are used to analyze, discover and rank NFT collections from different marketplaces. I recommend you using: DappRadar, and Etherscan.
-
3. Hands-on Tutorial
In this section, we will build and deploy an Ethereum smart contract that we can use to mint NFTs. We will start by generating an Ethereum wallet and setting up our local environment, we will then develop and test our smart contract locally before deploying it to both the Ethereum testnet and mainnet. We will close the chapter, by showing how to mint the NFT and putting it for sale on OpenSea
3.1. The Use Case
Following the tradition of using “Hello, World!” programs to introduce new topics in programming, we will create an NFT that represents the animated GIF below. I created this GIF using Google Drawings and GifMaker.
To make this tutorial more interesting and understand the limitations of NFTs, I created the physical object below which is a LEGO-based QR code that is linked to a webpage that shows information about our NFT and our new digital "piece of art".
3.2. Tools
For this tutorial, we will need to following tools:
- MyEtherWallet: MyEtherWallet is a website used for generating Ethereum wallets and for interacting with the Ethereum blockchain.
- Metamask: Metamask is an Ethereum wallet.
- VSCode with Solidity Extension: IDE for developing smart contracts using Solidity programming language.
- Node.js: Node.js is a JavaScript runtime environment that is used for executing JavaScript code outside a web browser.
- Truffle: Truffle is the most popular development framework for Ethereum.
- Ganache: Ganache is a personal Ethereum blockchain that can be used for developing and testing smart contracts locally.
- OpenZeppelin Contracts: OpenZeppelin Contracts are standard, tested, community-reviewed smart contracts. We will be using the ERC-721 OpenZeppelin implementation.
- Infuria: Infura API suite provides instant access over HTTPS and WebSockets to the Ethereum network.
3.3. Creating an Ethereum Wallet
To start with, we need an Ethereum Wallet and some Ether in it. There are different types of wallets and ways to create new accounts. In this tutorial, I’m proposing 2 ways:
- MyEtherWallet (MEW)
- Metamask
To create a wallet using MEW, go to this link and follow the instructions. MyEtherWallet provides 3 ways for creating Ethereum Wallets:
- MEW wallet (Mobile App)
- By Keystore File
- By Mnemonic Phrase
The first option is the most secure one, but it’s the least flexible since we can’t have direct access to the wallet’s private keys. The 3rd option is the most flexible one as we can use the mnemonic phrase in the development environment to deploy the smart contract to the mainnet.
To create a wallet using Metamask, go to this link, install the web browser extension and follow the instructions to create a new wallet. Once you have Metamask installed, you can also import previously generated wallets including MyEtherWallet wallets.
It’s very important that you understand how wallets, private keys, and mnemonic phrases work. Please follow all the security recommendations and keep your private keys safe. If you lose your keys or your accounts got hacked, you won’t be able to recover your funds. You should also use different wallets, for example, a Hardware wallet to store most of your funds, and MyEtherWallet with only the necessary amount of Ether for deploying the smart contracts.
Once you have your wallet set, you should add some ether to it. You can buy Ether from one of the platforms like Coinbase or Binance and transfer it to your wallet. The cost of deploying smart contracts to the Ethereum blockchain varies depending on the usage. You can check this website to get a real-time estimate of the cost.
3.4. Setting Up a Local Development Environment
We start by installing Node.js, Truffle, Ganache, and VSCode with Solidity Extension:
- To install Node.js, go to this link and follow the installation instructions. Once installed you can check the node.js version by opening a terminal and executing the following command:
node -v. I used v14.16.0 in this tutorial. - To install Truffle, execute the following command from a terminal:
npm install -g truffle@5.1.65. - To install Ganache, go to this link and download the corresponding version to your operating system. Once installed, you can open the application and check Ganache’s GUI.
- To install VSCode, go to this link and download the corresponding version to your operating system. Once installed, you should add the Solidity extension.
3.5. Developing the Smart Contract
Now that we have our development environment ready, we can work on our project. From a terminal, we create our project folder by executing the following:
mkdir hello-nfts-tutorial
cd hello-nfts-tutorial
Next, we initiate our Truffle project by executing the following:
truffle init
This creates all the necessary folders and files for developing and deploying our smart contract:
-
contracts/: Directory for Solidity contracts
- Migrations.sol
-
migrations/: Directory for scriptable deployment files
- 1_initial_migration.js
-
test/: Directory for test files for testing your application and contracts
- truffle-config.js: Truffle configuration file
Next, we do some cleaning. We delete Migrations.sol file, we add a new file for our smart contract HelloNFTContract.sol, we initialize git for version control and we add a .gitignore file.
rm contracts/Migrations.sol
touch contracts/HelloNFTContract.sol
git init
touch .gitignore
Next, we install OpenZeppelin Contracts:
npm install @openzeppelin/contracts@3.4.0
Next, we add the hello-nfts-tutorial folder to VSCode.
Before starting to code, let’s open OpenZeppelin’s ERC721 and understand the implementation. You can find ERC721 source code under node_modules/@openzeppelin/contracts/token/ERC721/ERC721.sol.
- Line 93: We have the constructor that initializes the contract. It requires a name and a symbol that will be used for the token collection.
- Line 308: We have the minting function
_safeMint. It takes as input an Ethereum address and a token Id, and it safely mints a new token and transfers it to the specified address. - Line 411: We have the function that sets the token’s URI. The URI should point to a JSON file that contains information about the asset we’re linking to the NFT. For example: Name, Description, and Location.
- ERC721 also implements multiple functions that can be used to check the tokens and transfer them to new addresses.
Now that we understand the basics of the ERC721 standard, we can start implementing our smart contract. We open the file contracts/HelloNFTContract.sol and copy in it the code below. The code below is adapted from [12].
// SPDX-License-Identifier: MIT

pragma solidity \0.6.2;

import "../node_modules/@openzeppelin/contracts/token/ERC721/ERC721.sol";
import "../node_modules/@openzeppelin/contracts/utils/Counters.sol";

contract HelloNFTContract is ERC721 {
   using Counters for Counters.Counter;
   Counters.Counter private _tokenIds;

   constructor() public ERC721("Hello NFT", "HNFT") {}

   function mintNFT(string memory tokenURI) public returns (uint256) {
       _tokenIds.increment();
       uint256 newItemId = _tokenIds.current();
       _safeMint(msg.sender, newItemId);
       _setTokenURI(newItemId, tokenURI);
       return newItemId;
   }

}
Below are the main points to understand our code:
- We start by declaring the Solidity version that we will be using for our smart contract.
-
We import from OpenZeppelin the files that we need:
ERC721.sol: OpenZeppelin’s ERC721 implementation.Counters.sol: OpenZeppelin’s implementation of a counter. This will help us keep track of our token Ids.
-
We define our smart contract that we name:
HelloNFTContract. We also specify that our contract is an ERC721 contract. -
Inside the
HelloNFTContractcontract:- We define a variable
_tokenIds. - We call the ERC721’s constructor. We need to specify the name and the symbol for our token collection. In this case, we choose:
Hello NFTas the name, andHNFTas the symbol. - Finally, we define the minting function. This function defines
newItemIdwhich is the id of the new item that we will mint, set the token URI and safely mint our token.
- We define a variable
3.6. Compiling and Deploying the Smart Contract Locally
Now that we have the code for our smart contract, we can compile and deploy our smart contract locally.
Compiling the Smart Contract
We start by specifying the Solidity version that truffle should use to compile our smart contract. To do that, open truffle-config.js and modify lines 82 to 95 as follows.
 // Configure your compilers
 compilers: {
   solc: {
     version: "0.6.2",    // Fetch exact version from solc-bin (default: truffle's version)
     // docker: true,        // Use "0.5.1" you've installed locally with docker (default: false)
     // settings: {          // See the solidity docs for advice about optimization and evmVersion
     //  optimizer: {
     //    enabled: false,
     //    runs: 200
     //  },
     //  evmVersion: "byzantium"
     // }
   }
 }
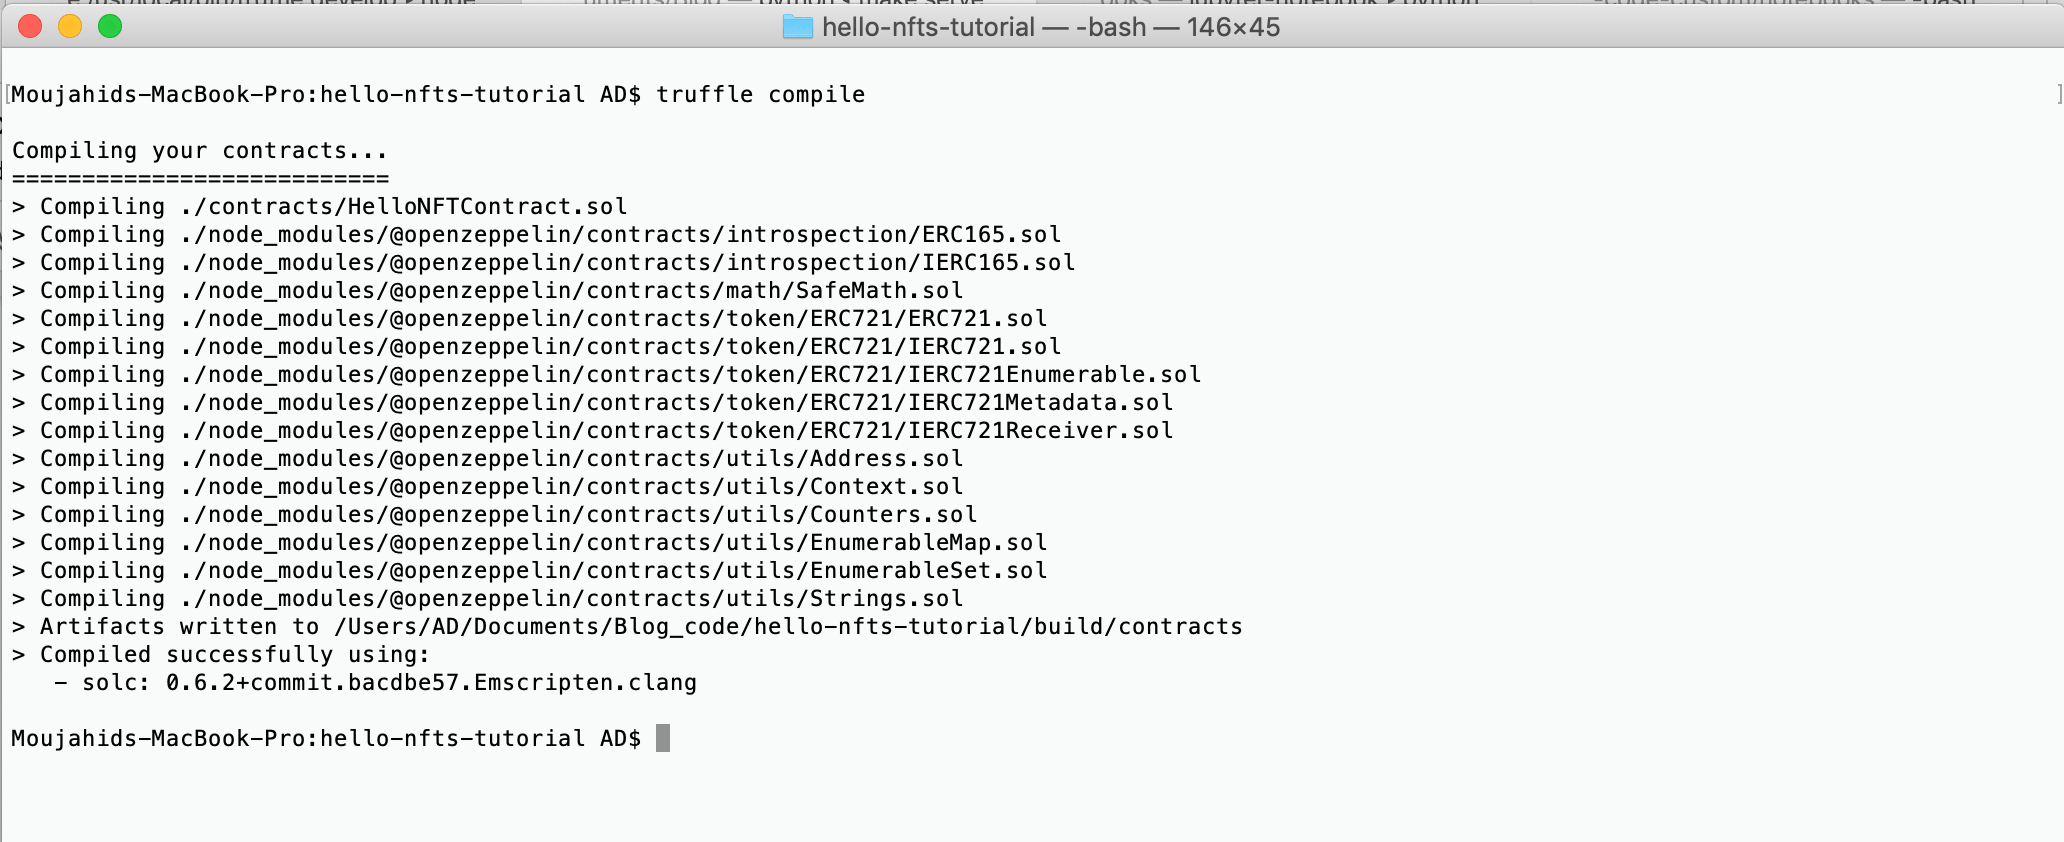
To compile our smart contract, we execute the command truffle compile from a terminal. If all goes well, we should get the following messages and a new folder named build that contains artifacts of the compilation with a JSON file for each smart contract that got compiled.
Spinning up a Local Blockchain
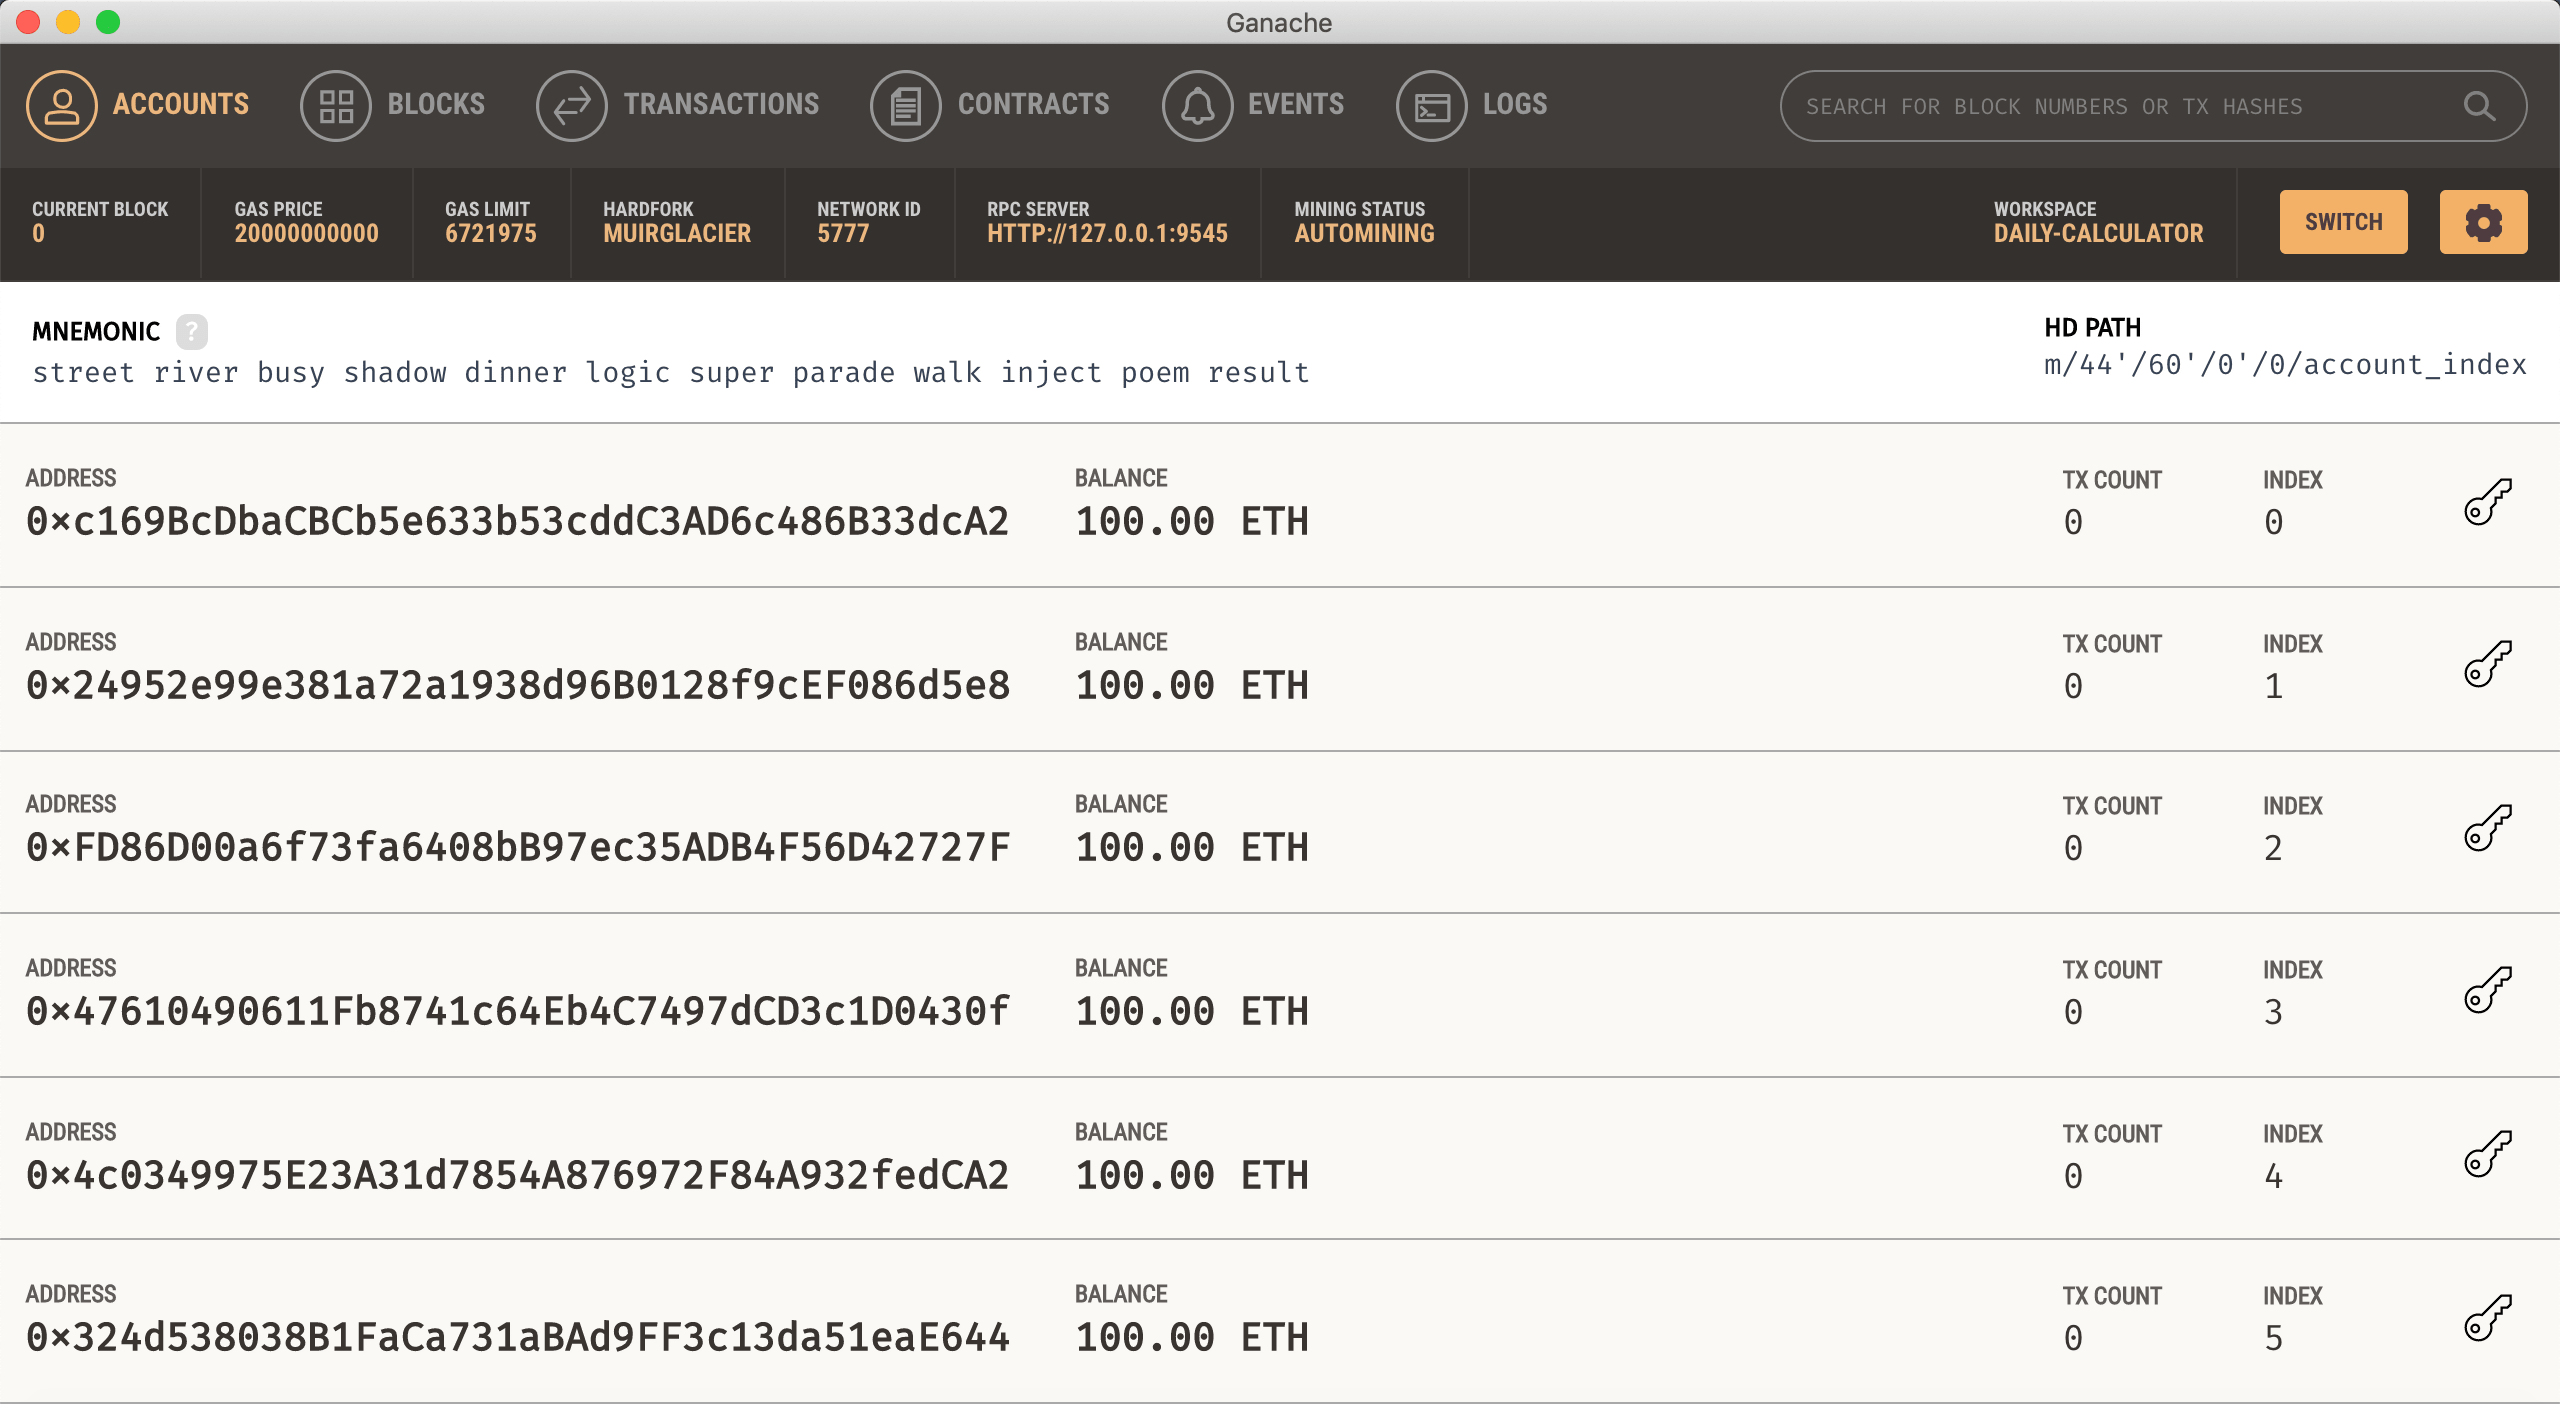
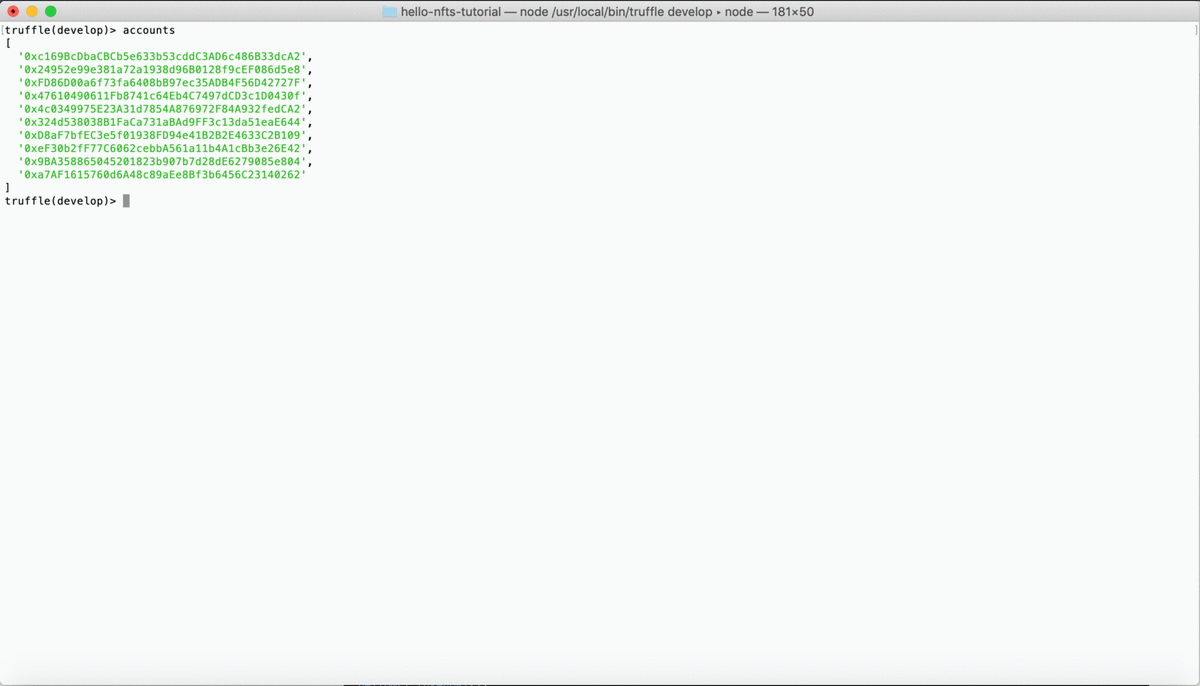
Truffle comes with a built-in local blockchain that we can use for testing our smart contract locally. We execute the command truffle develop to start the development blockchain on port 9545. Once our blockchain started, we can see on the console that truffle created a list of test accounts with their corresponding private keys and the Mnemonic that was used to create these accounts.

Now that we have a truffle local blockchain, we can connect it to Ganache GUI. To do to this:
- Start Ganache and click on: New Workspace - Ethereum.
- Click on the Server Tab and make sure that the port number is 9545
- Click on the Accounts & Keys Tab: Copy and paste the Mnemonic phrase generated by the truffle blockchain into the Mnemonic textbox.
- Click on the Save WorkSpace button.
If we go to the Accounts Tab in Ganache, we can see that the addresses are the same as the ones from the truffle local blockchain.
Deploying the Smart Contract Locally
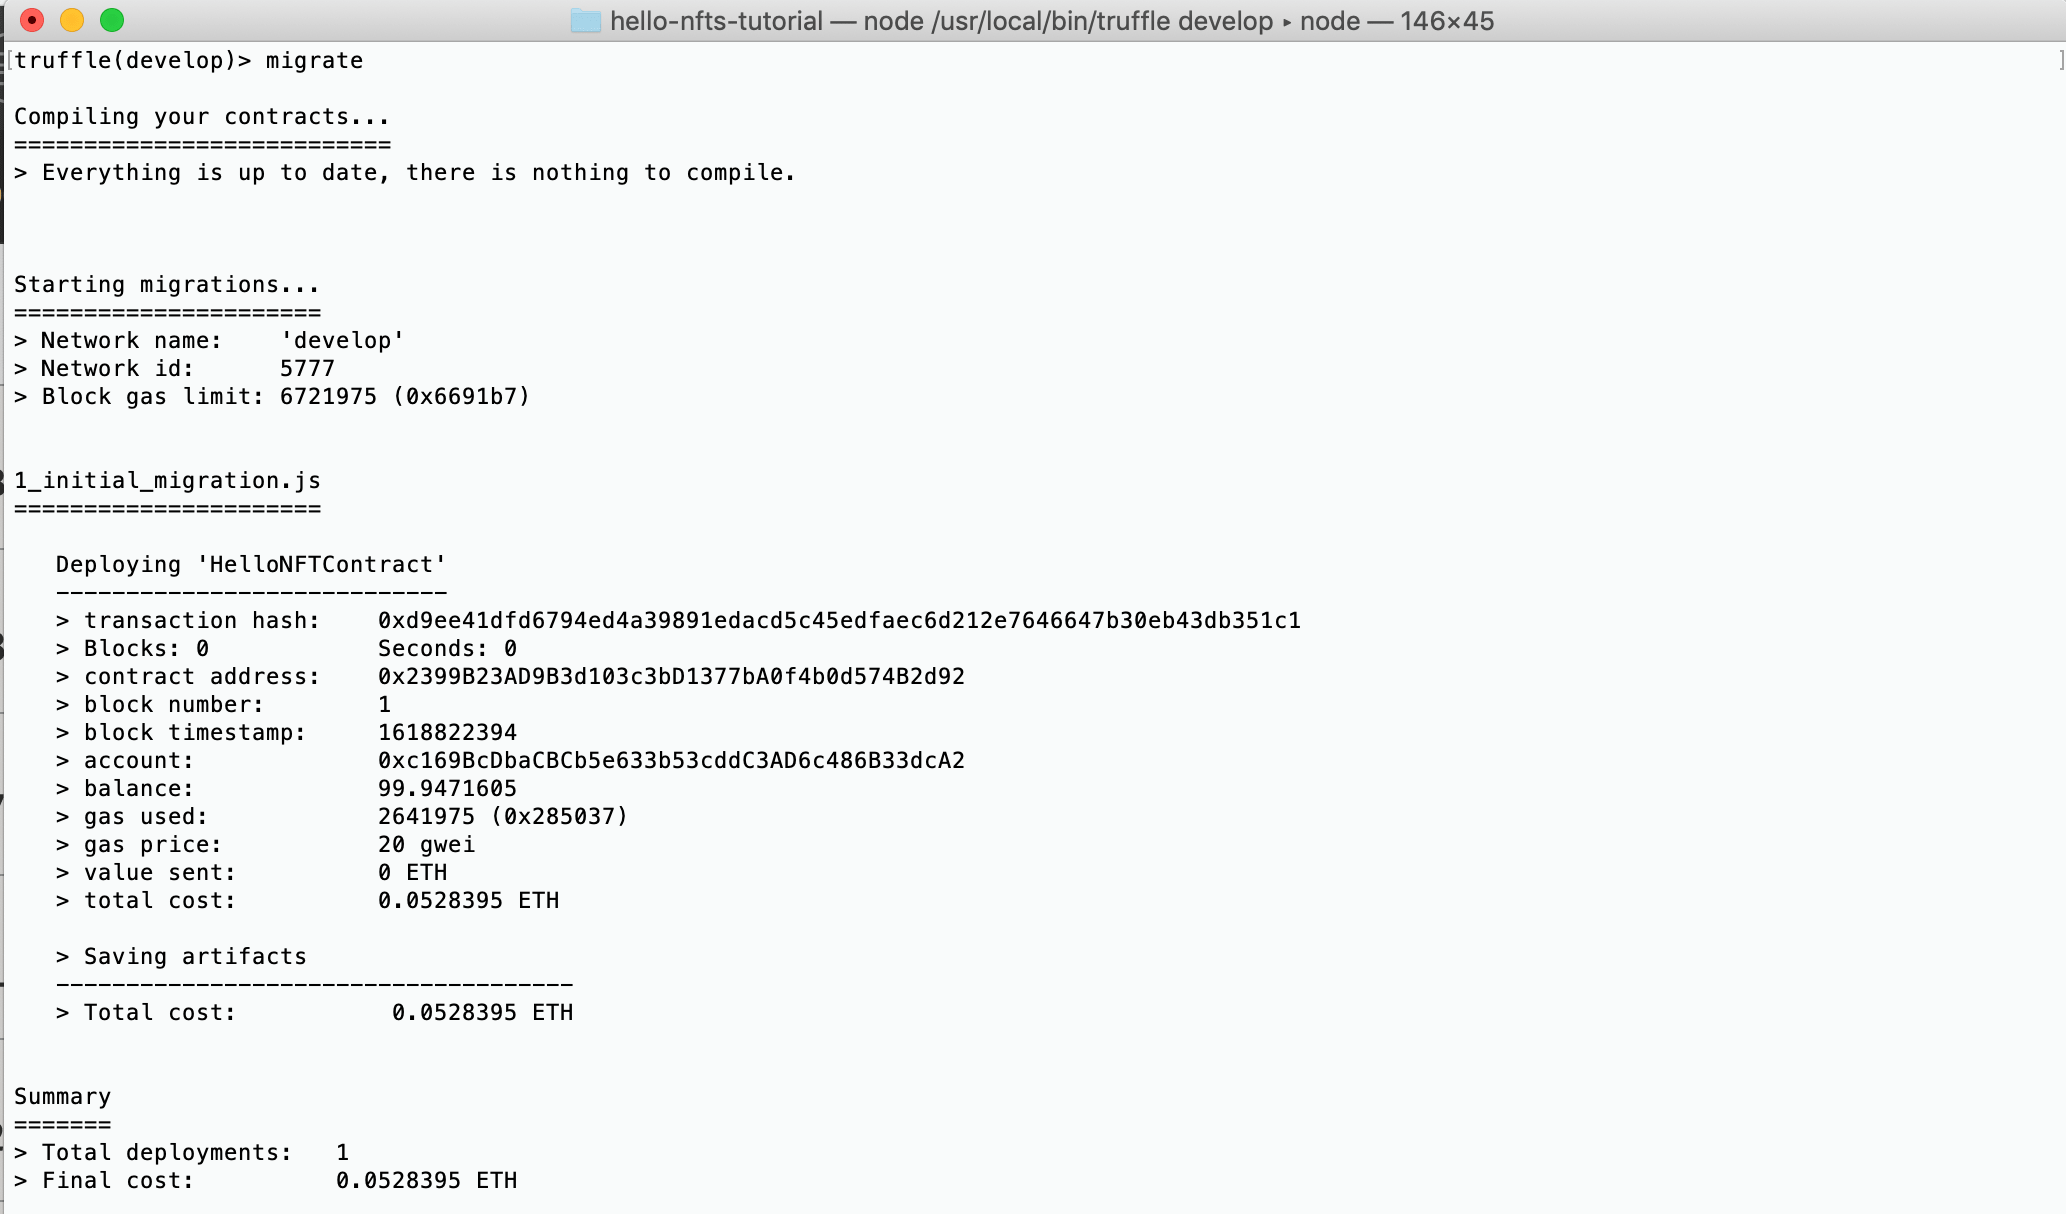
We start by specifying the smart contract we want to deploy. To do this, we open migrations/1_initial_migration.js and we modify it as follows:
const HelloNFTContract = artifacts.require("HelloNFTContract");

module.exports = function (deployer) {
  deployer.deploy(HelloNFTContract);
};
From a terminal and inside a Truffle Develop console, we execute the following command: migrate. If all goes well, we should get the following messages related to the newly deployed contract. We can see the Ethereum address that deployed the contract, the contract address, and other information about the transaction.
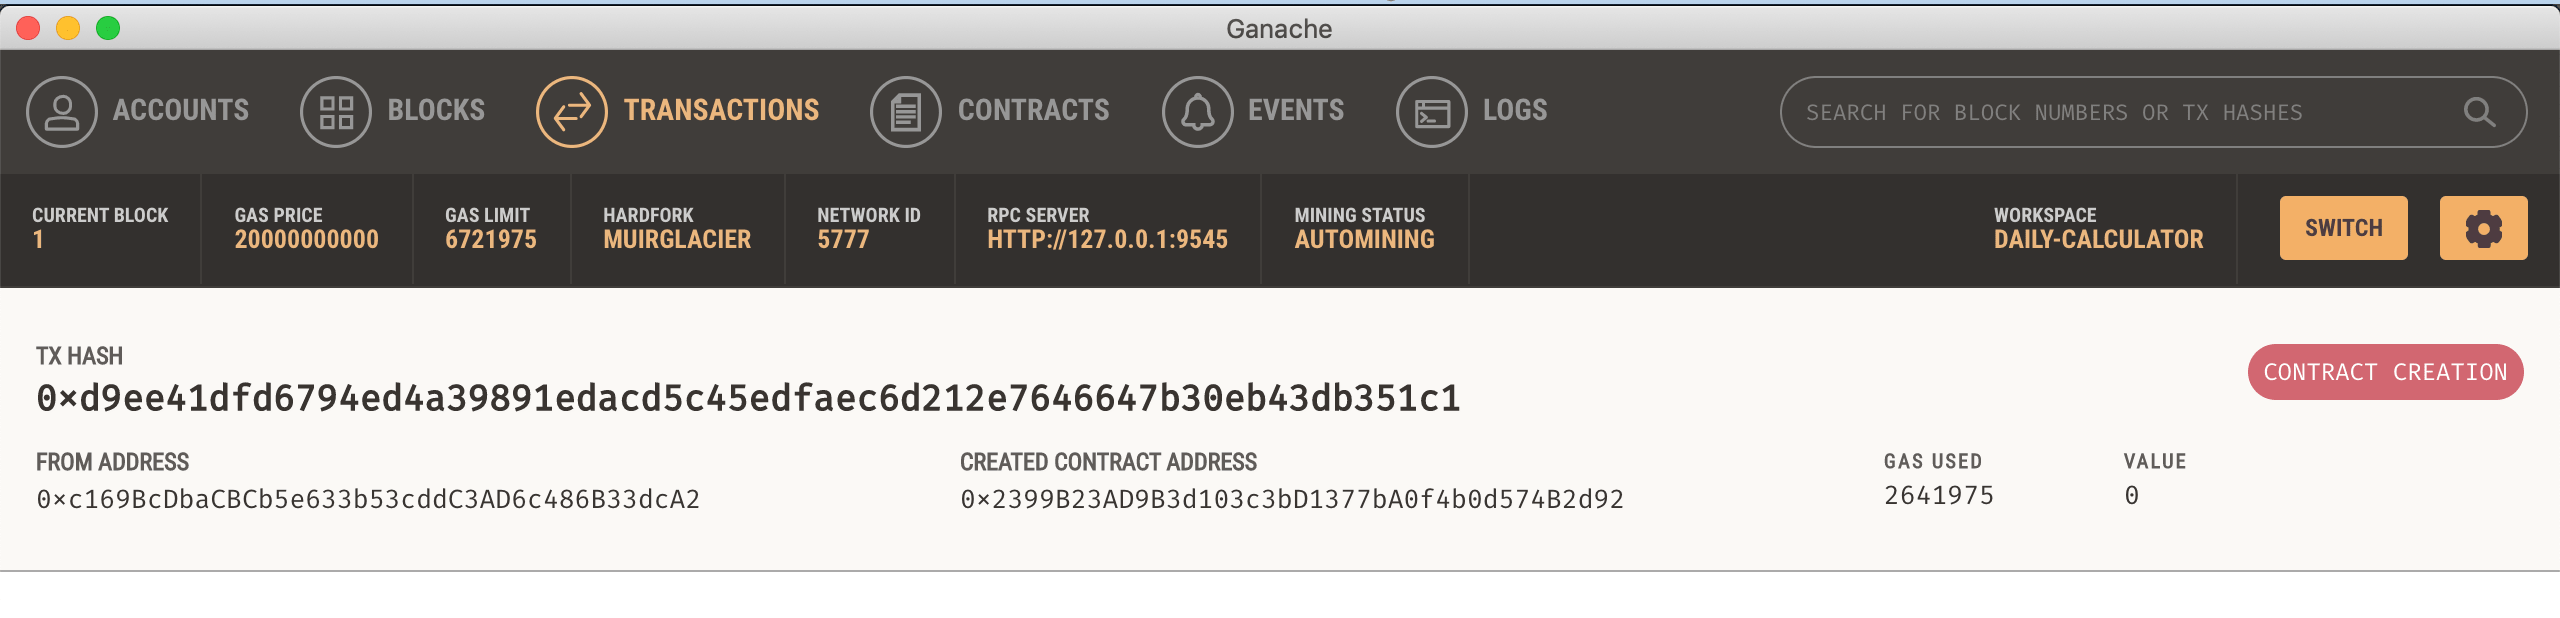
If we open the transactions tab in Ganache, we can see the transaction related to the deployment of our smart contract.
3.7. Interacting with the Smart Contract Locally
Now that we have our smart contract deployed locally, we can interact with it. As an example, from a terminal and inside a Truffle Develop console, we can try the following commands:
- Print the addresses of the Ethereum accounts that we created as part of the local blockchain.
accounts
- Initiate a new instance of the HelloNFTContract smart contract.
const helloNFT = await HelloNFTContract.deployed();
- Mint an NFT. To do this, we need to specify the url of the JSON file that contains information about the asset we want to link to the NFT.
helloNFT.mintNFT("https://someurl.com/digital_asset.json")
- Mint an NFT from a specific account (in this case the 4th Ethereum account).
helloNFT.mintNFT("https://someurl.com/another_digital_asset.json", {from: accounts[3]})
- Check the owner of the token with tokenId: 1
helloNFT.ownerOf(1)
- Check the URI of the token with tokenId: 1
helloNFT.tokenURI(1)
- Transfer the token with tokenId 1 from the address
0xc169BcDbaCBCb5e633b53cddC3AD6c486B33dcA2to the address0x24952e99e381a72a1938d96B0128f9cEF086d5e8
helloNFT.transferFrom("0xc169BcDbaCBCb5e633b53cddC3AD6c486B33dcA2", "0x24952e99e381a72a1938d96B0128f9cEF086d5e8", 1)
3.8. Deploying the Smart Contract to a Testnet
Ethereum has multiple public testing networks called testnets that operate similarly to the Ethereum mainnet. These testnets allow us to test smart contracts at no cost. We will be using the Rinkeby testnet to deploy and test our HelloNFTContract.sol smart contract.
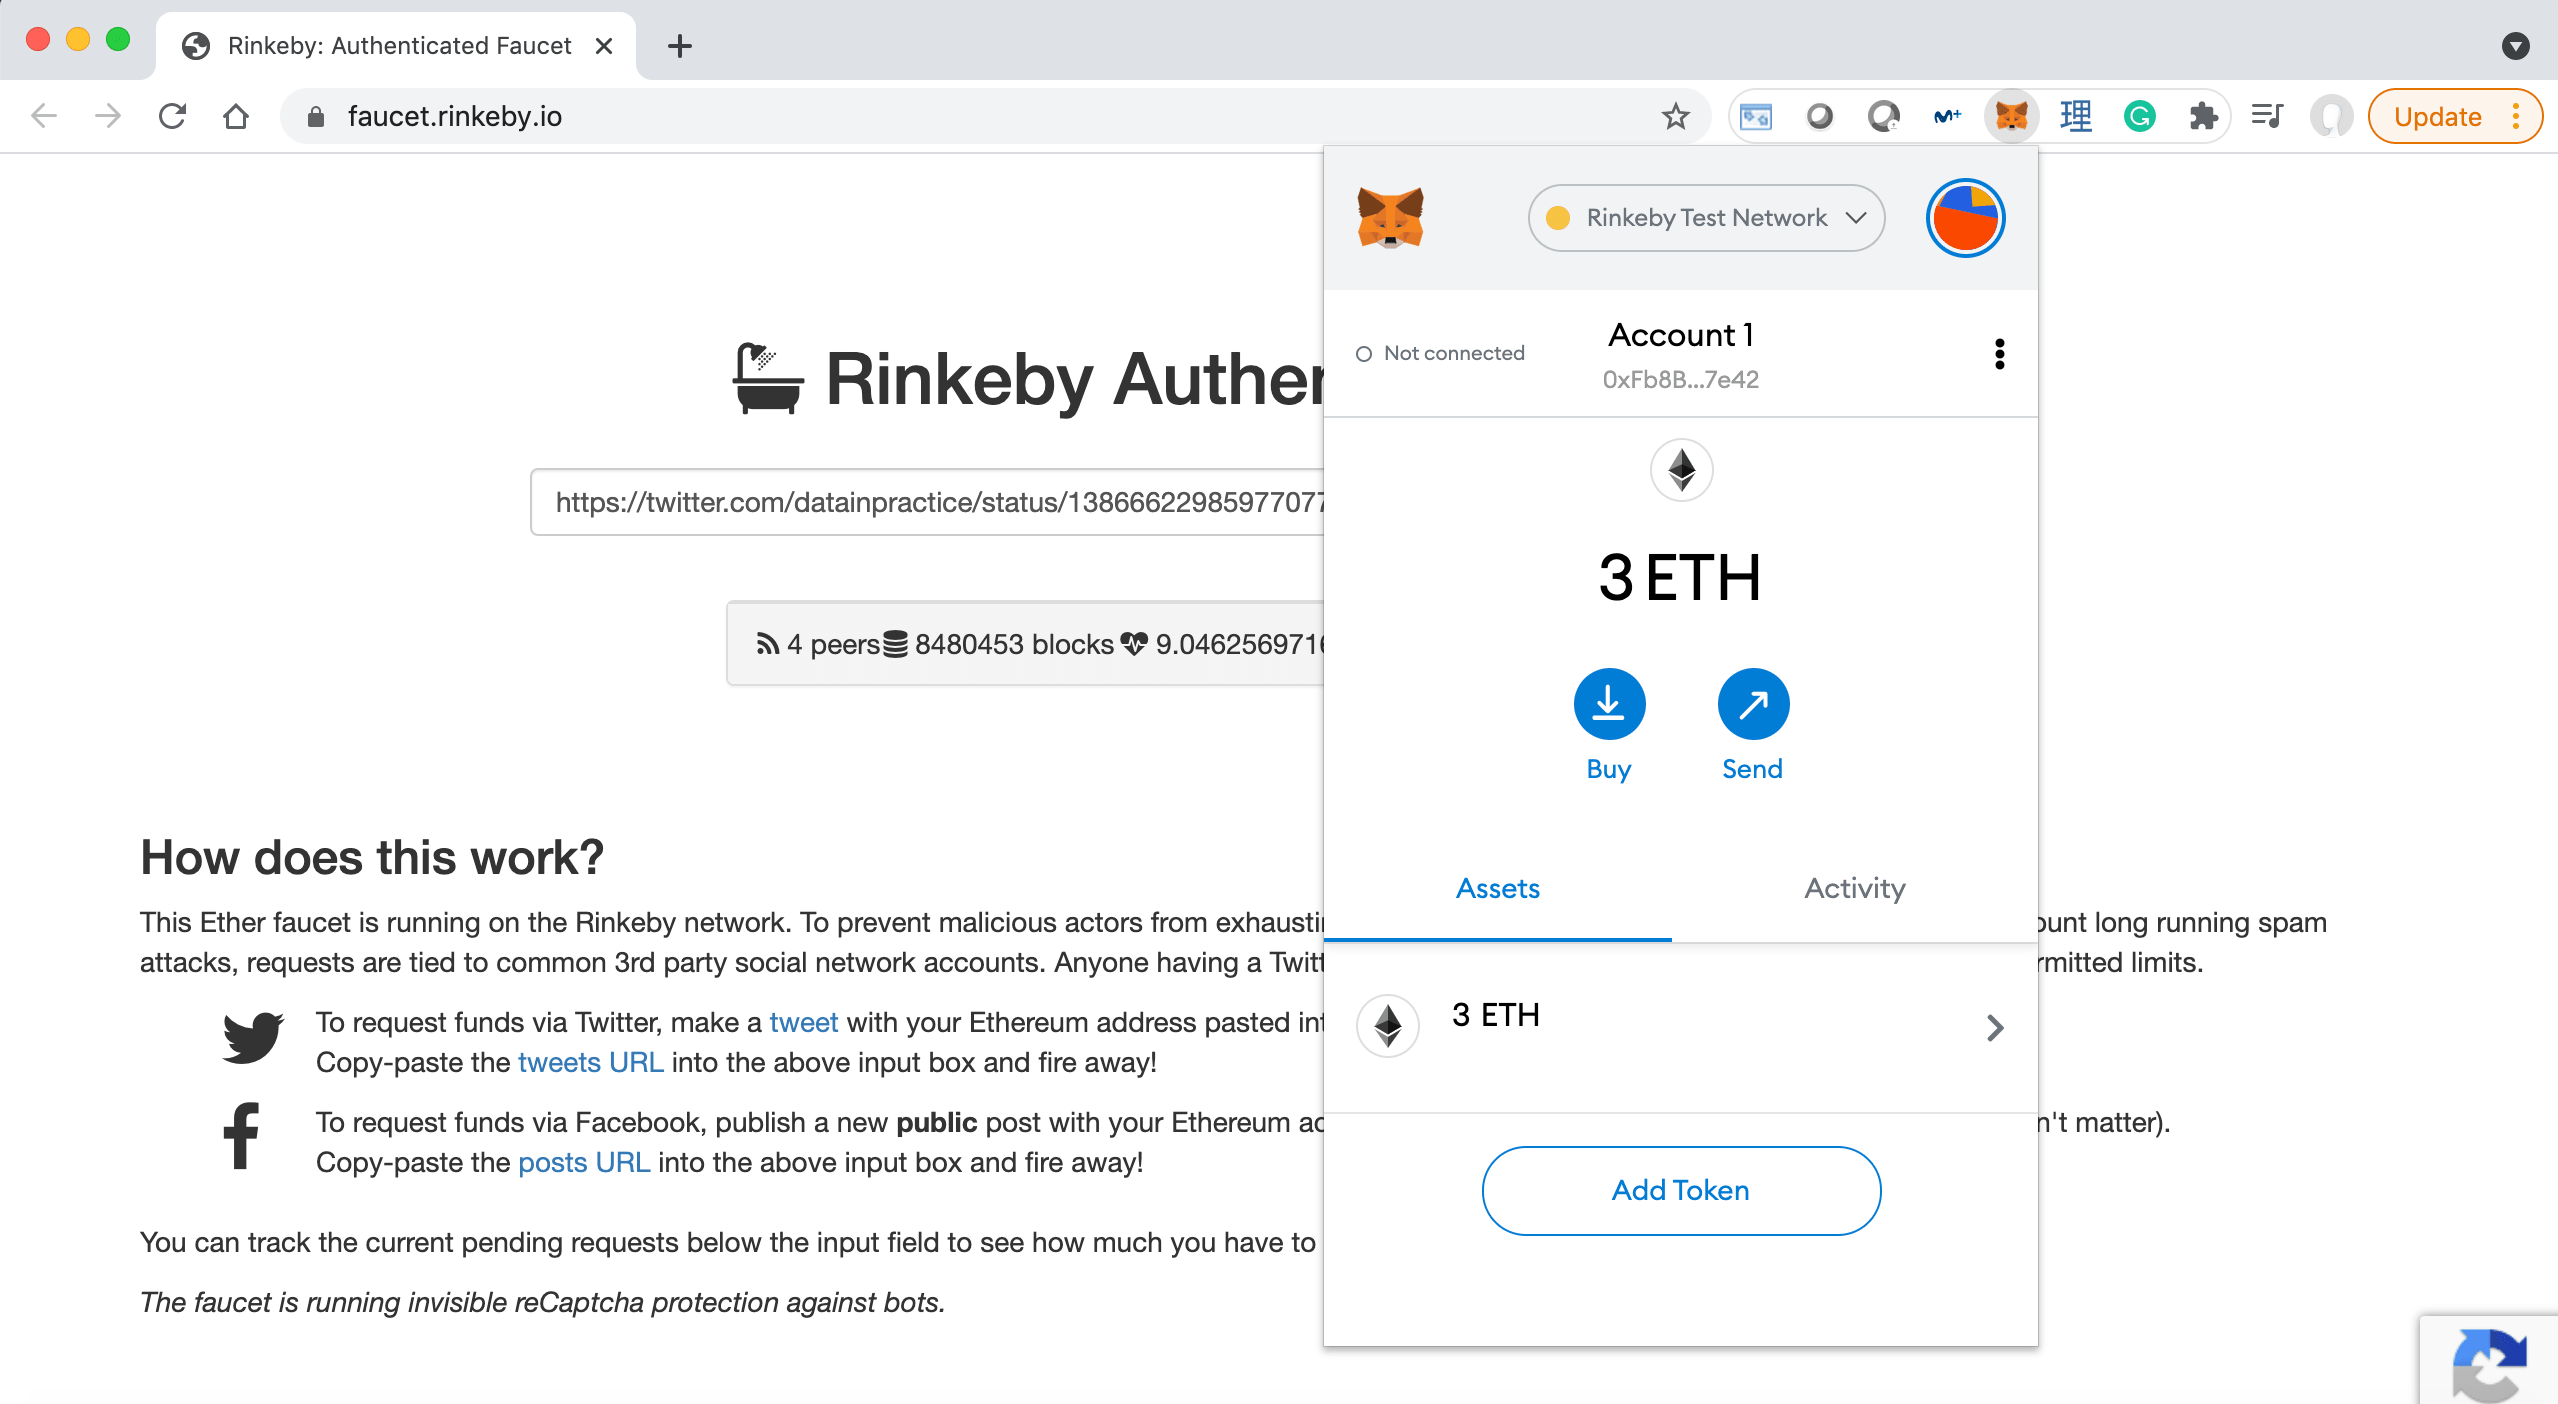
Adding Test Ether
To use the Rinkeby testnet, we should add Rinkeby test Ether to our account. To do so, we get our public Ethereum address from Metamask and we follow these instructions. Once completed, we can go to Metamask, select Rinkeby Test Network, and we can confirm that we have some Rinkeby test Ether in our account.
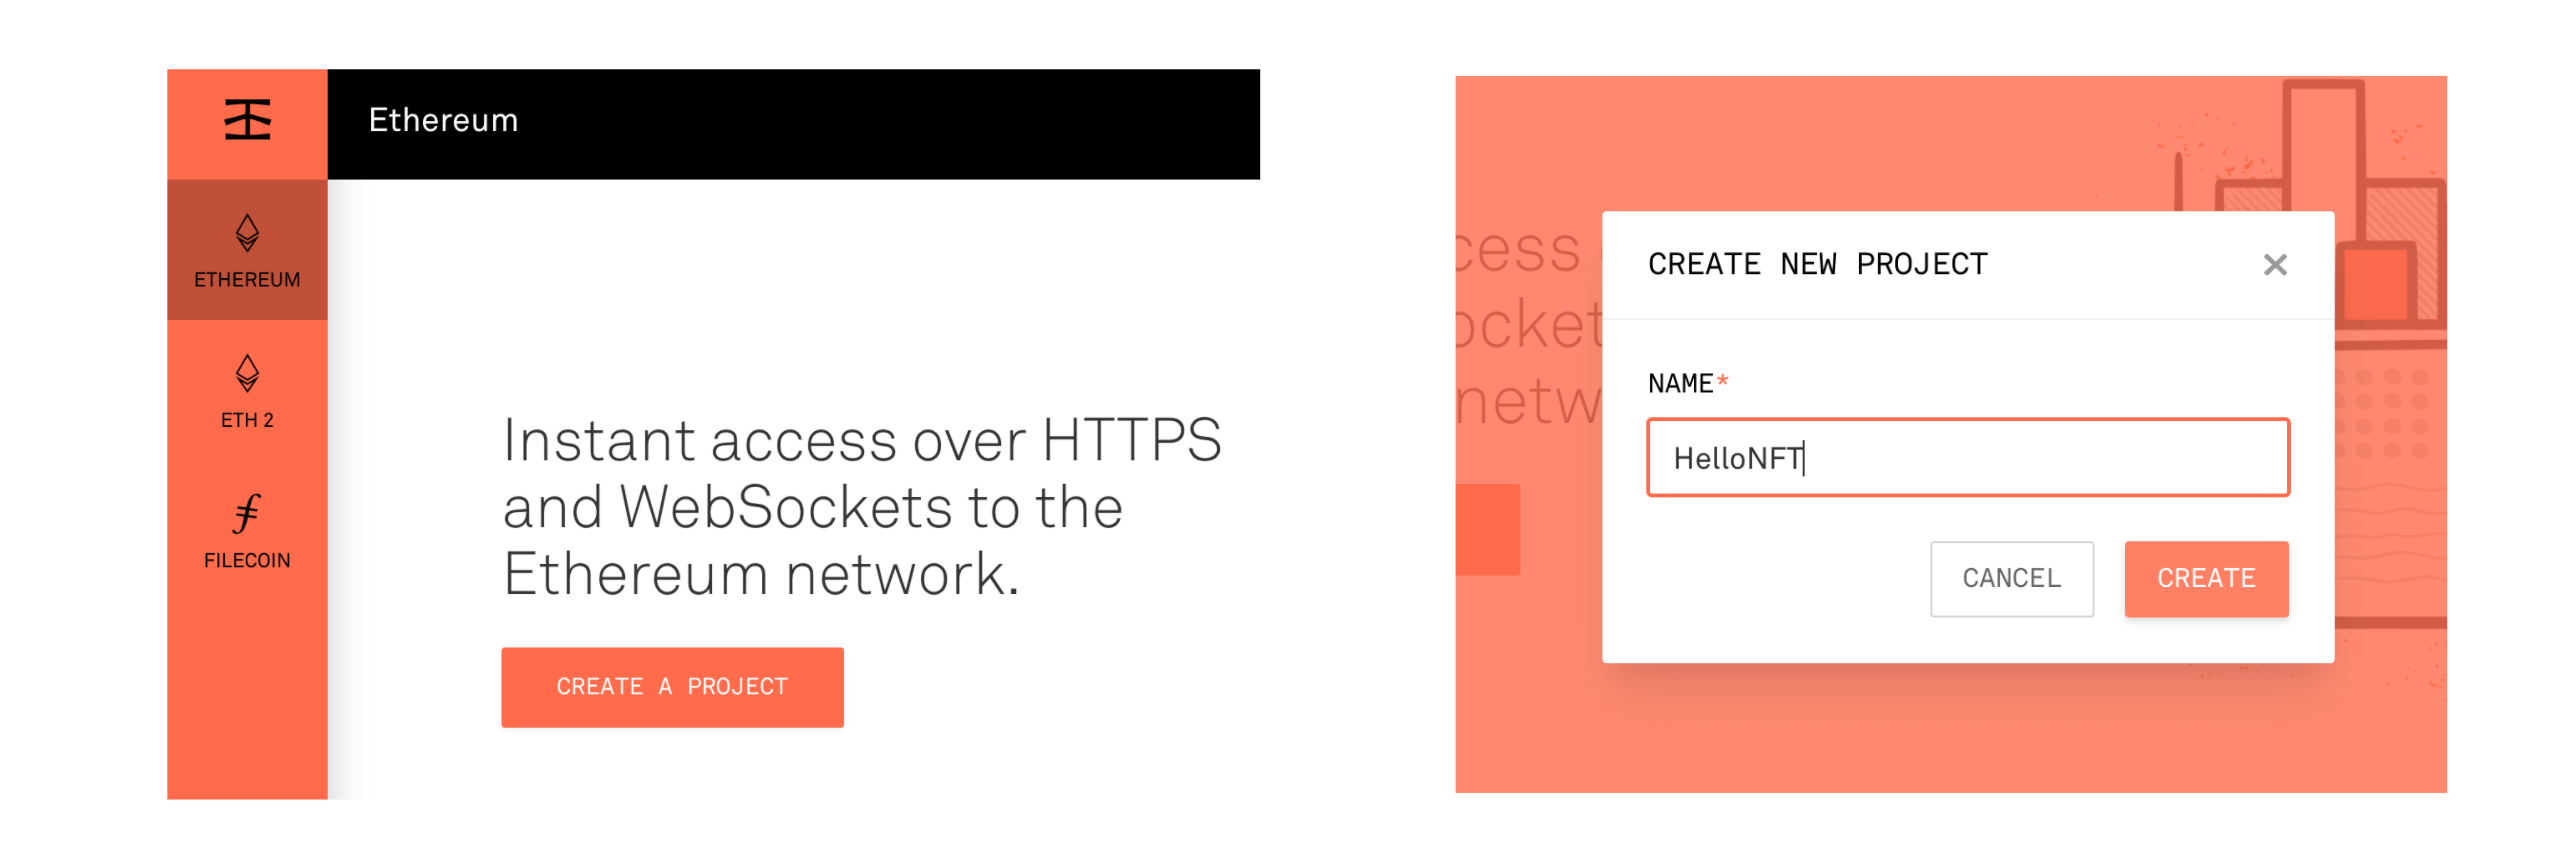
Getting Infuria API Keys
If you don’t have an Infuria account, go to Infuria’s website and create one. Once your account is created, click on Ethereum/New Project. Choose a name for your project and click on the Create button.
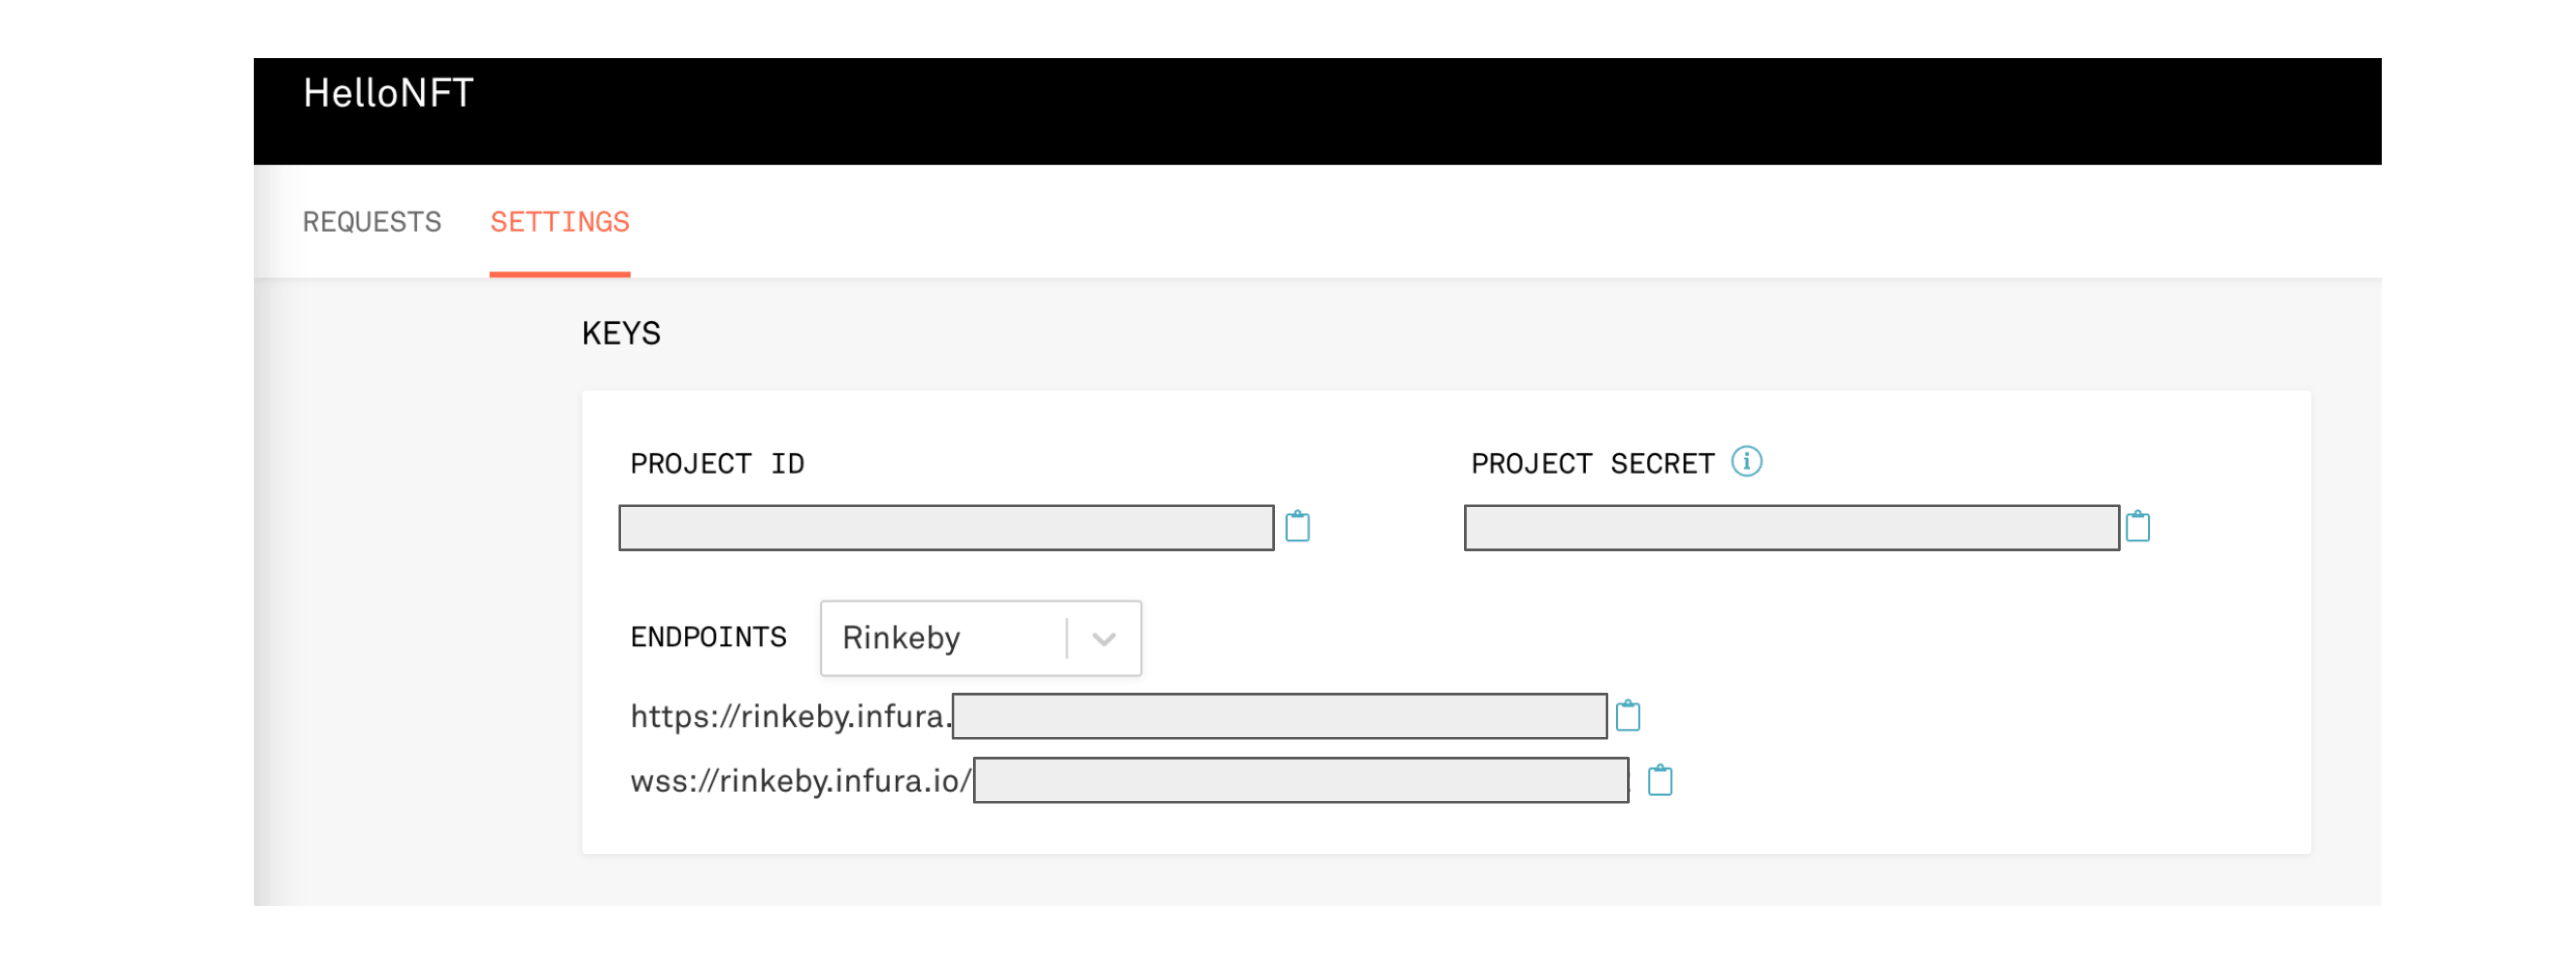
You can find your API keys, by going to the settings page of your project and select Rinkeby endpoints.
Installing HDWalletProvider and Editing the truffle-config.js File
HDWalletProvider is a truffle module that allows us to connect to the Ethereum network and execute transactions through infura.io. To install HDWalletProvider, execute the following command: npm install @truffle/hdwallet-provider@1.2.2.
Next, we need to create a new file called .secret and we store in it the mnemonic phrase we used to generate our Ethereum wallet. In this way, we won’t have to hard code the mnemonic phrase in truffle-config.js. .secret file should be added to .gitignore.
Next, we open truffle-config.js, we uncomment the following lines:
const HDWalletProvider = require('@truffle/hdwallet-provider');

const fs = require('fs');
const mnemonic = fs.readFileSync(".secret").toString().trim();
And we modify the networks configuration to:
networks: {
 rinkeby: {
     provider: () => new HDWalletProvider(mnemonic, `https://ropsten.infura.io/v3/YOUR-PROJECT-ID`),
     network_id: 3,       // Ropsten's id
     gas: 5500000,        // Ropsten has a lower block limit than mainnet
 }

}
We should replace YOUR-PROJECT-ID with your Infuria project ID.
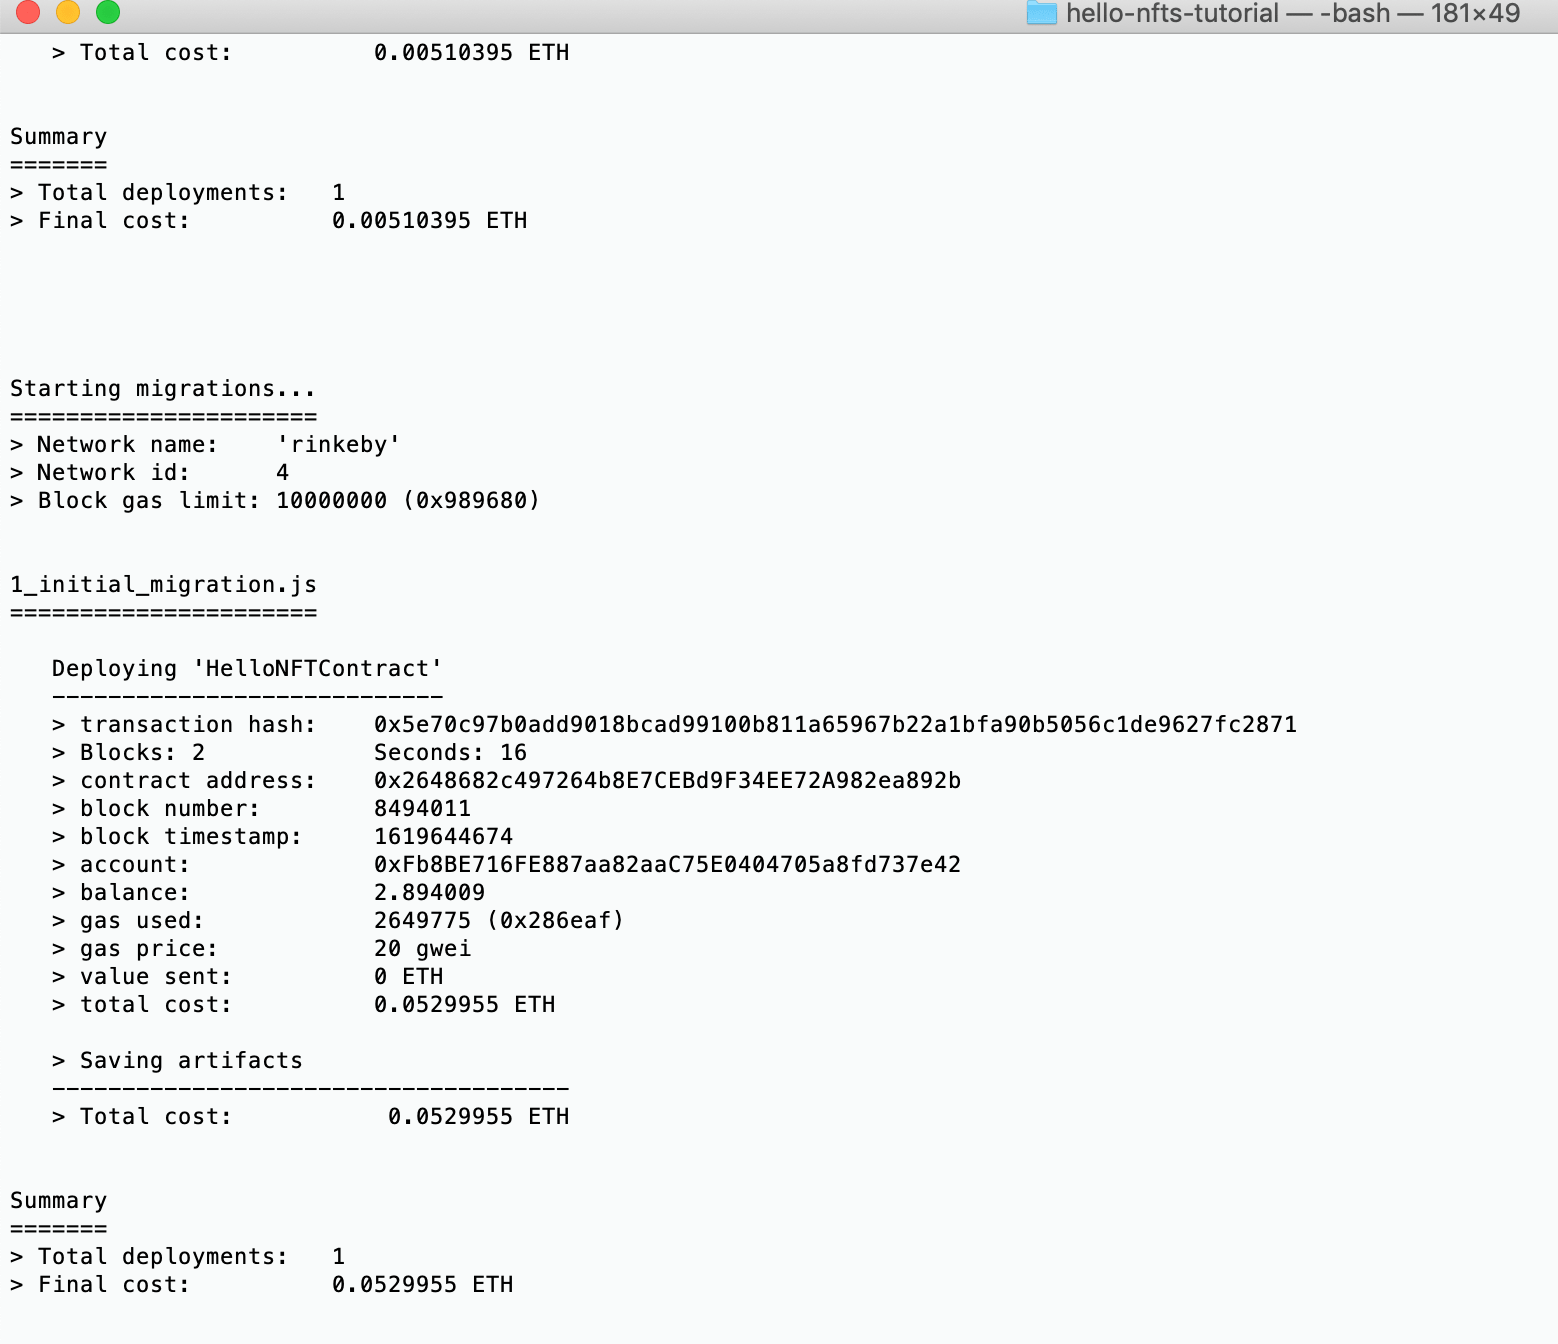
Deploying to Rinkeby Network
From a terminal, execute the command below to deploy our smart contract to Rinkeby network.
truffle migrate --network rinkeby
If everything goes well, we should get the messages below. We should keep the contract address to be able to interact with our newly deployed smart contract.
Interacting with our Smart Contract and Minting an NFT on Rinkeby Network
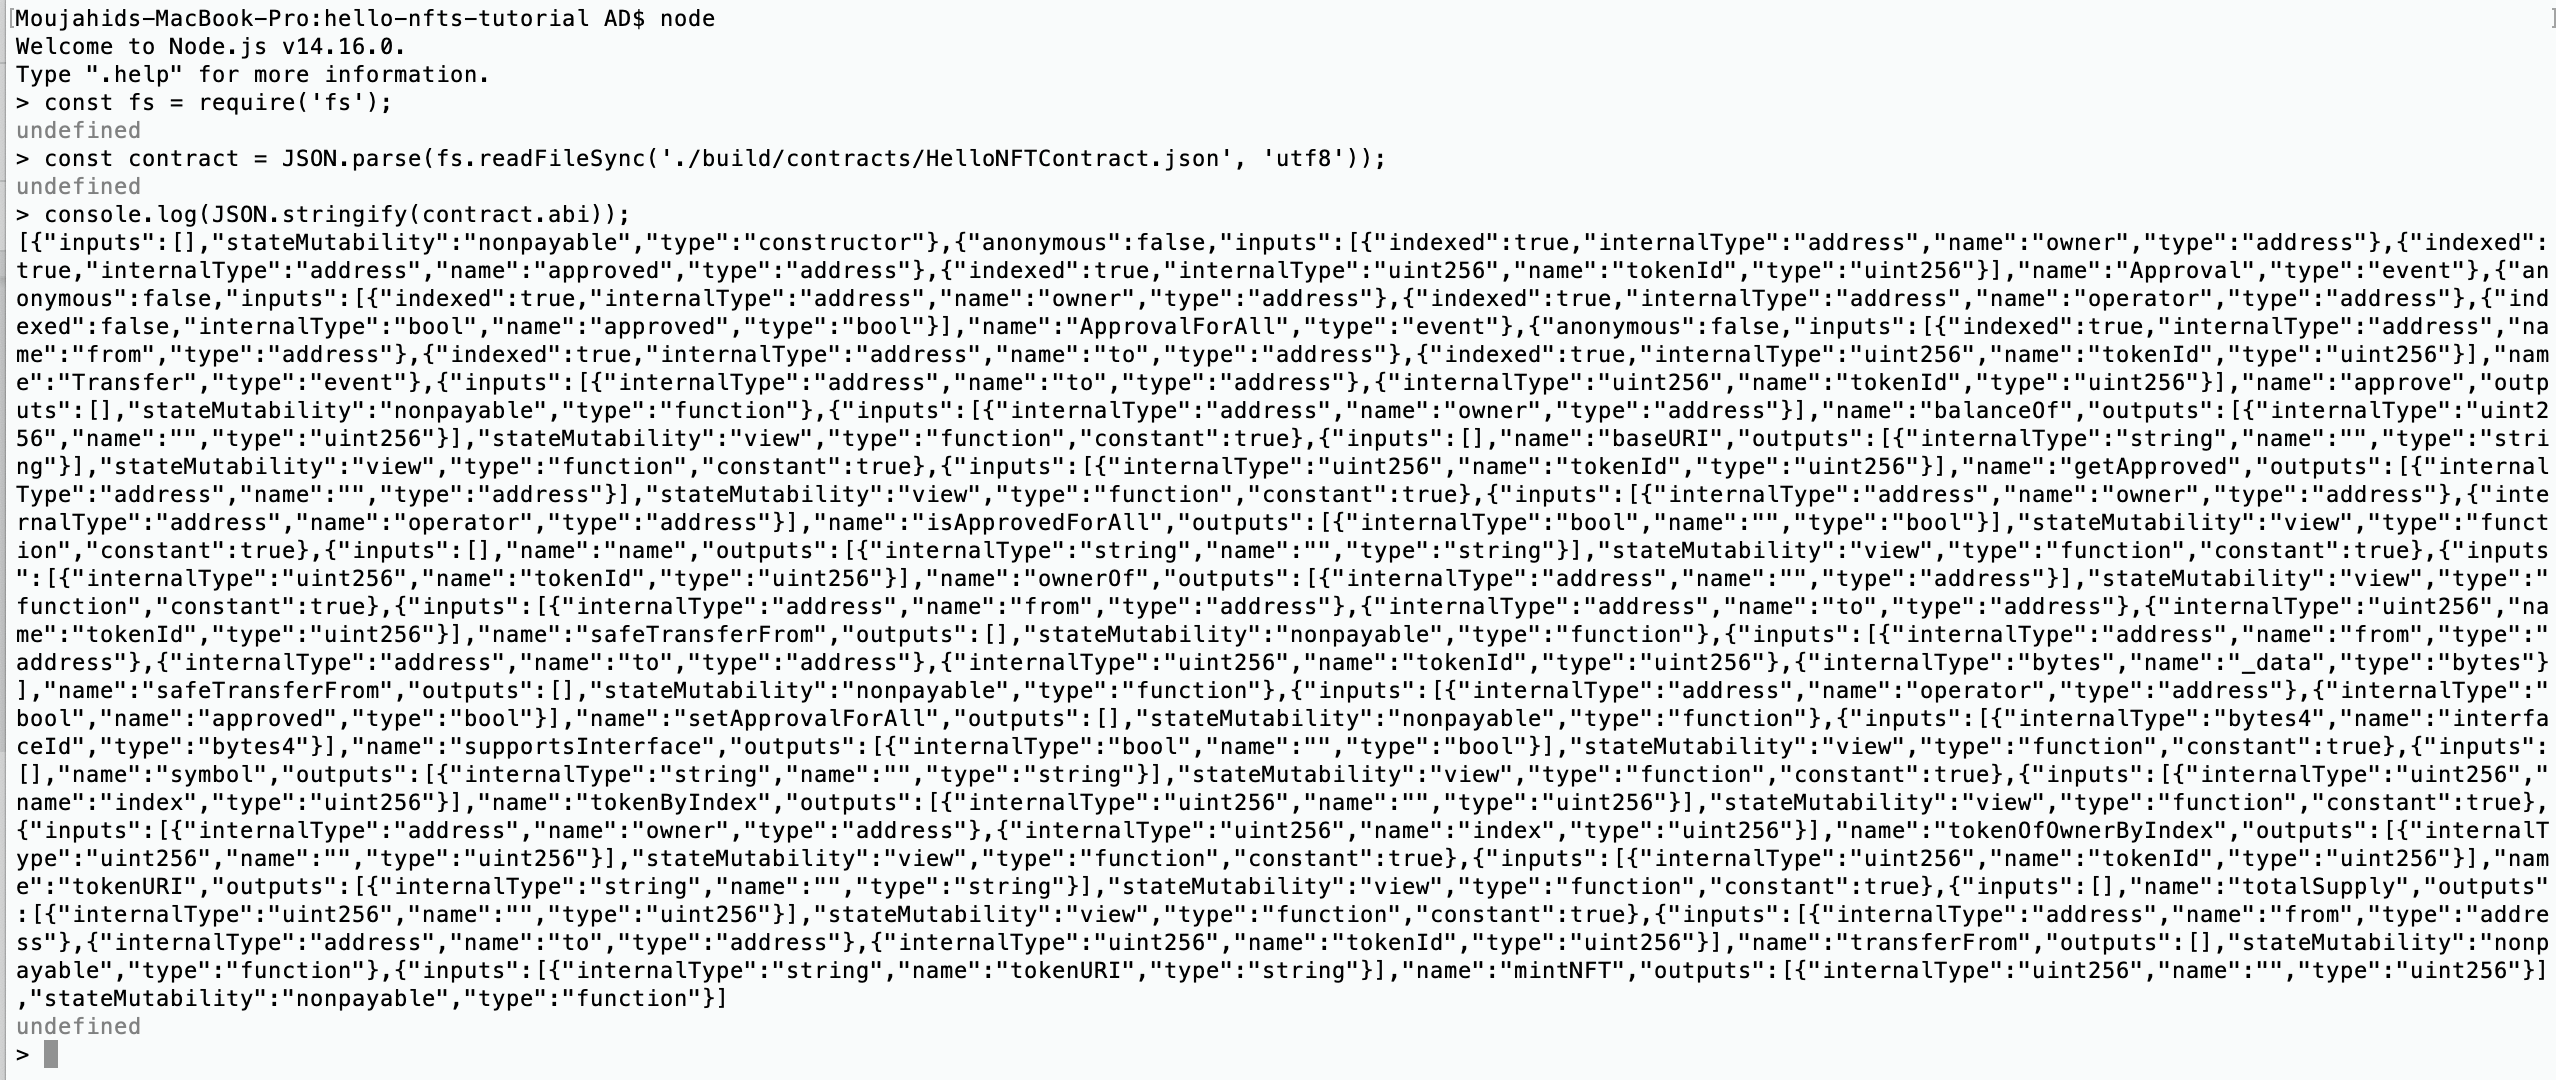
Now that we have our smart contract deployed to the Rinkeby Network, we can interact with it. To do this, we need 2 pieces of information: Contract Address that we copied from the terminal The smart contract’s ABI. ABI stands for Application Binary Interface. It’s a list of the contract's functions and arguments in JSON format.
The ABI for our smart contract is stored in ./build/contracts/HelloNFTContract.json.
To get the ABI, we can either copy it directly from the JSON file or get it from a terminal by executing the following: node , to enter the node shell and the code below to print the ABI.
const fs = require('fs');
const contract = JSON.parse(fs.readFileSync('./build/contracts/HelloNFTContract.json', 'utf8'));
console.log(JSON.stringify(contract.abi));
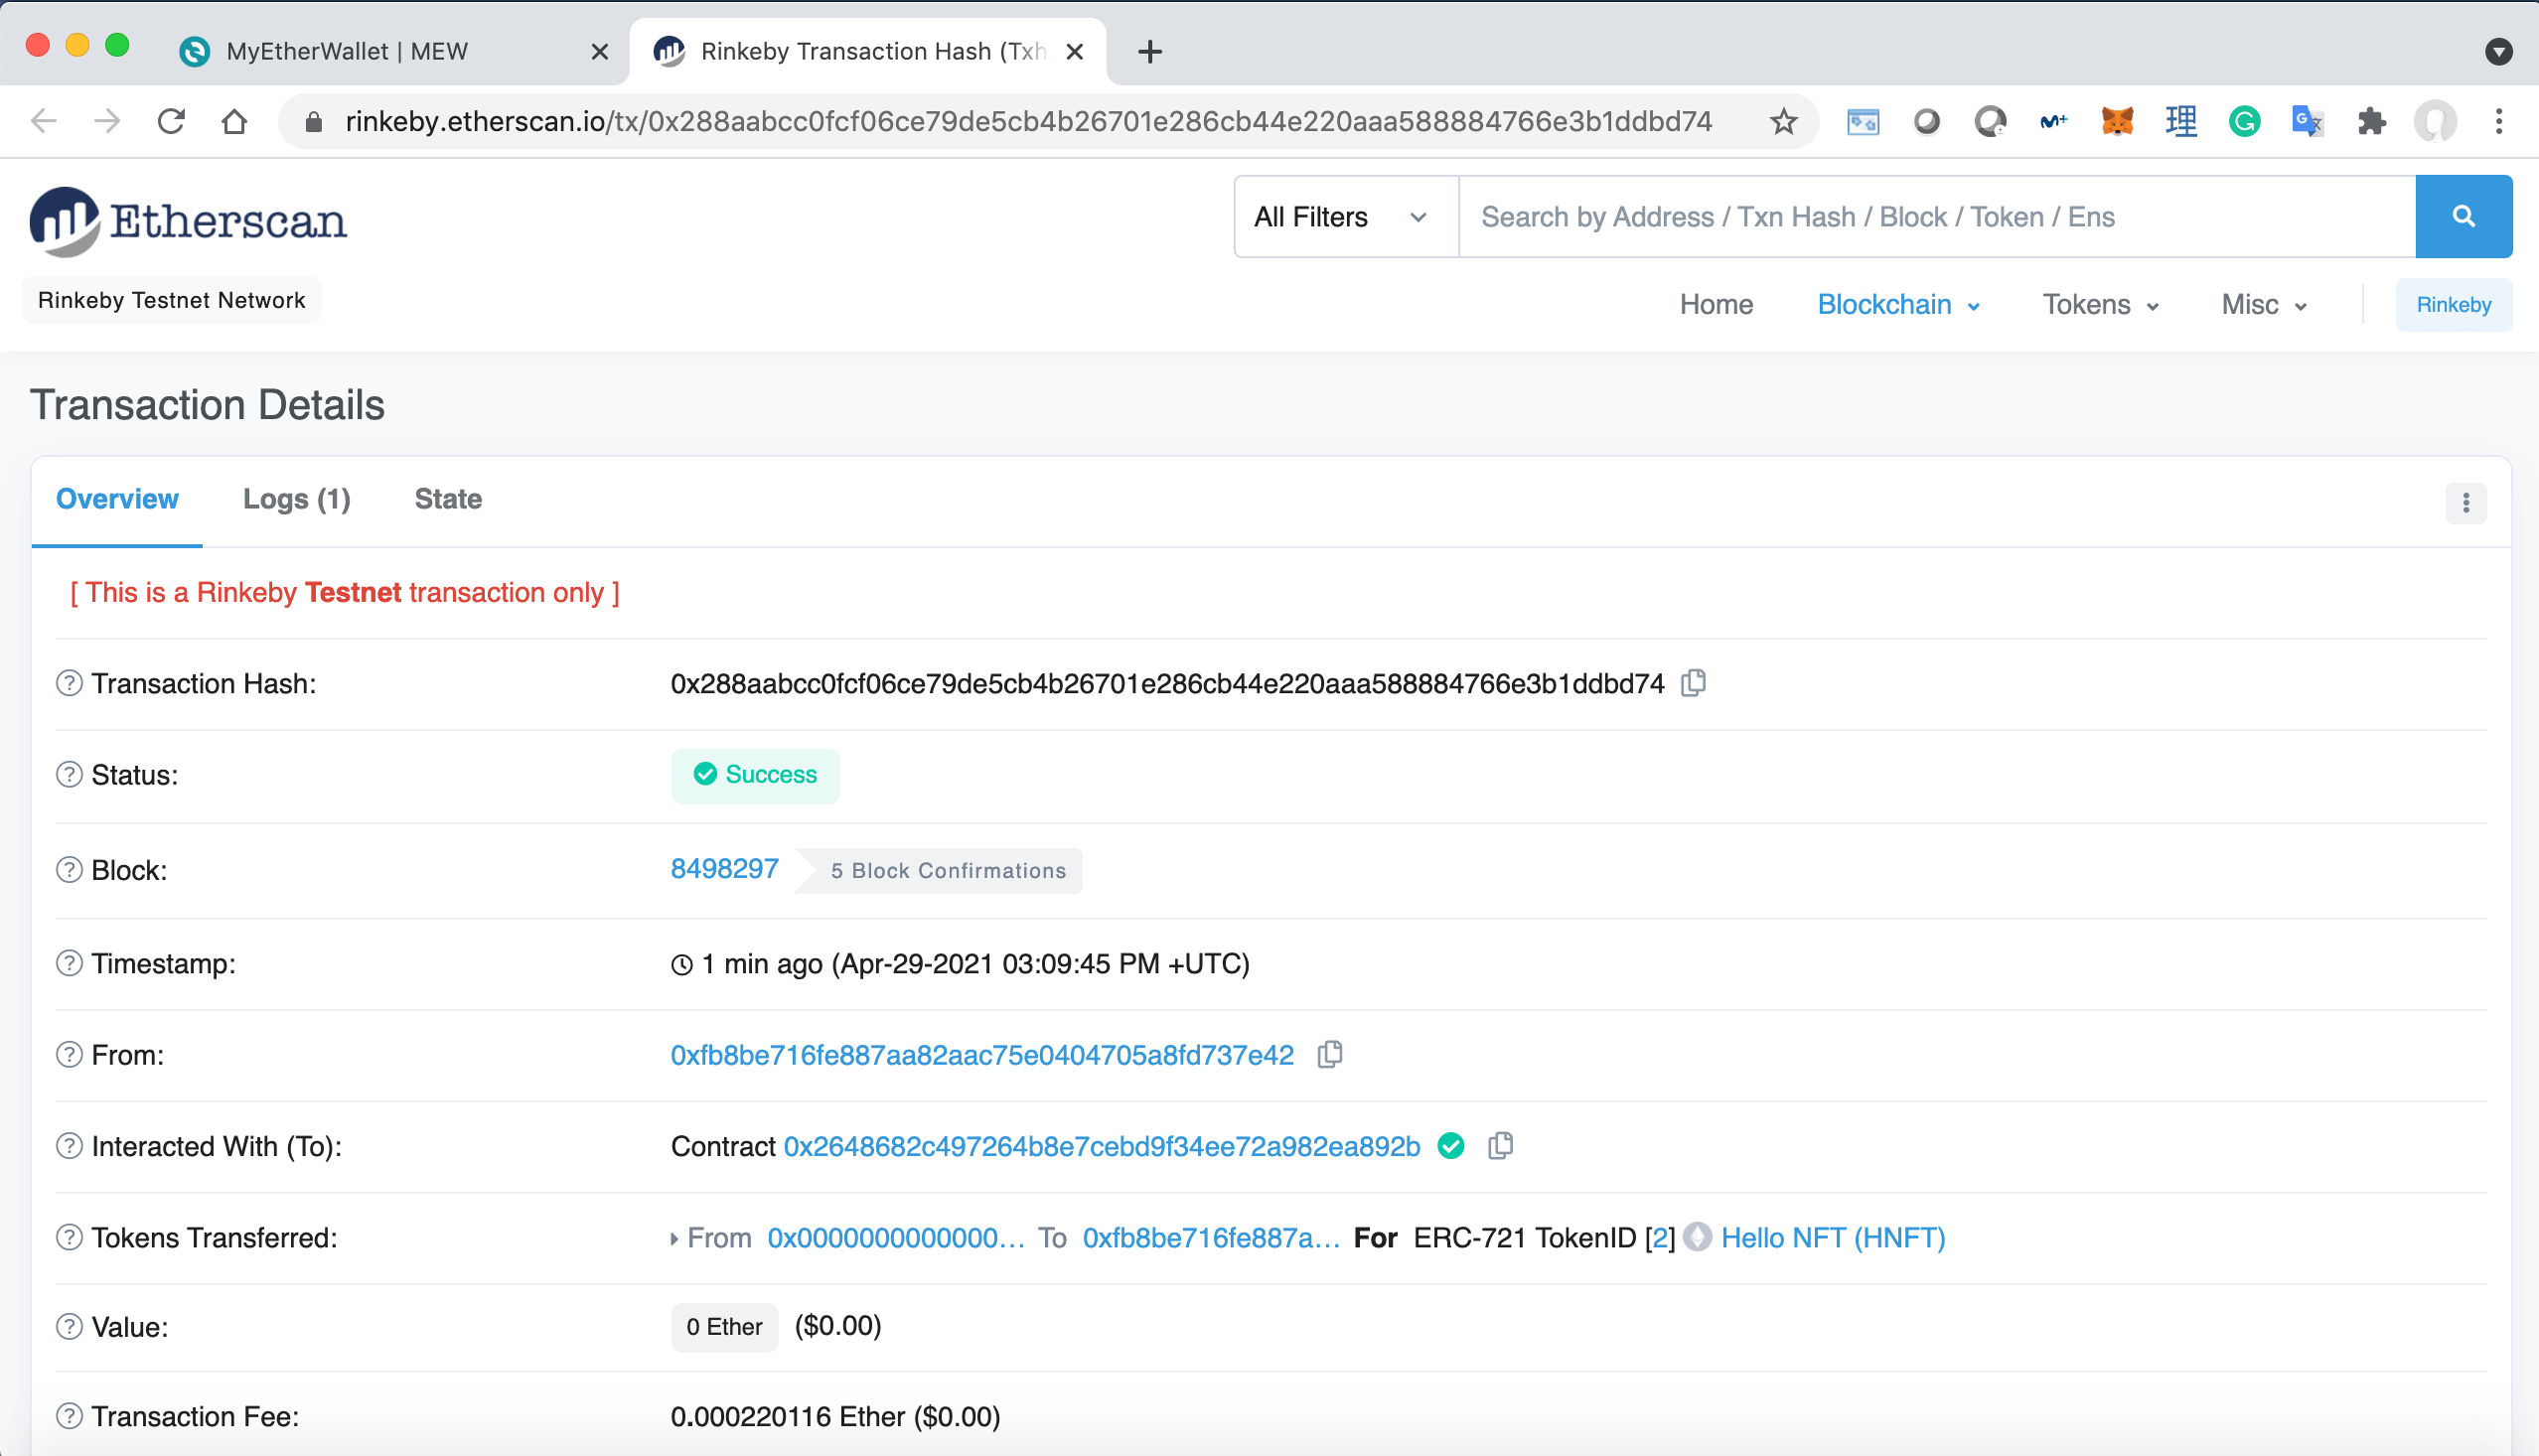
Next, we go to MEW’s website, we choose Access My Wallet and we log in using Metamask and Rinkeby Test Network. Once connected, we choose from the left-hand side menu Contract/Interact with Contract. we copy into the 2 boxes the smart contract address and the ABI, and we click on Continue.
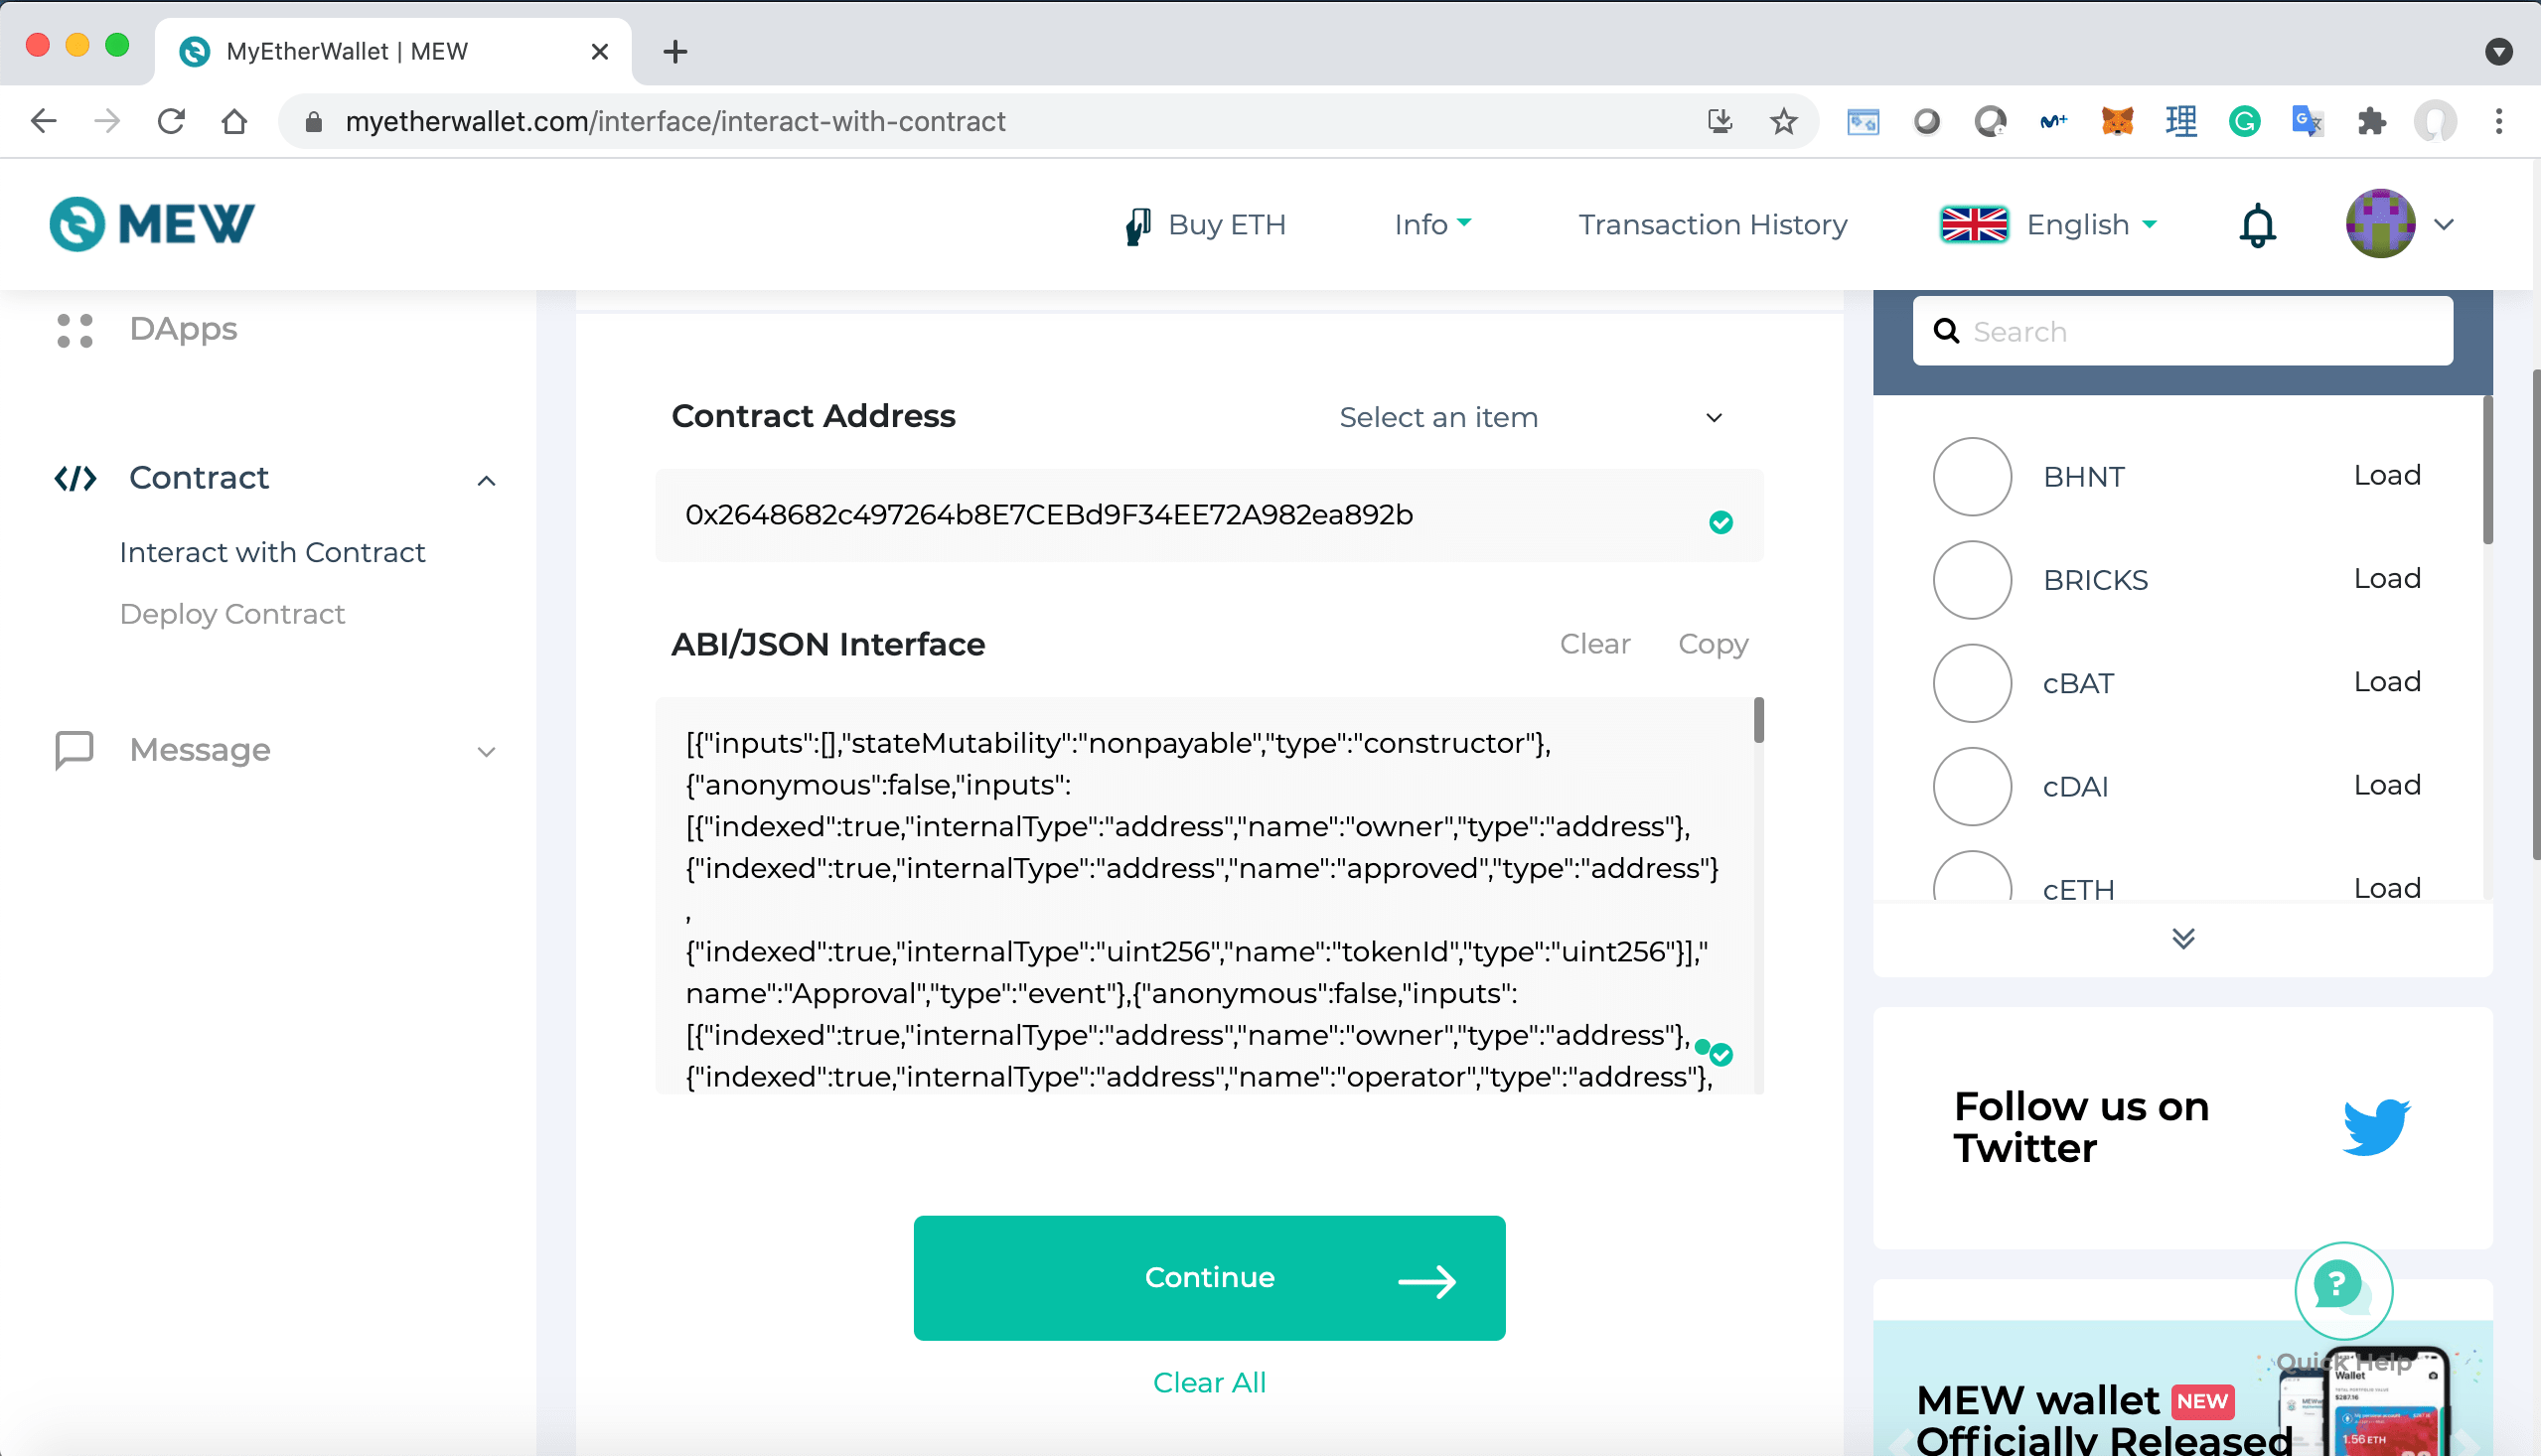
If all goes well, we should see a dropdown menu with all the available functions in our smart contract. We select mintNFT, we enter the TokenURI of the asset we want to link to the NFT, and we click on the Write button. We should get a Metamask pop-up asking to confirm the transaction. We click on the Confirm button.
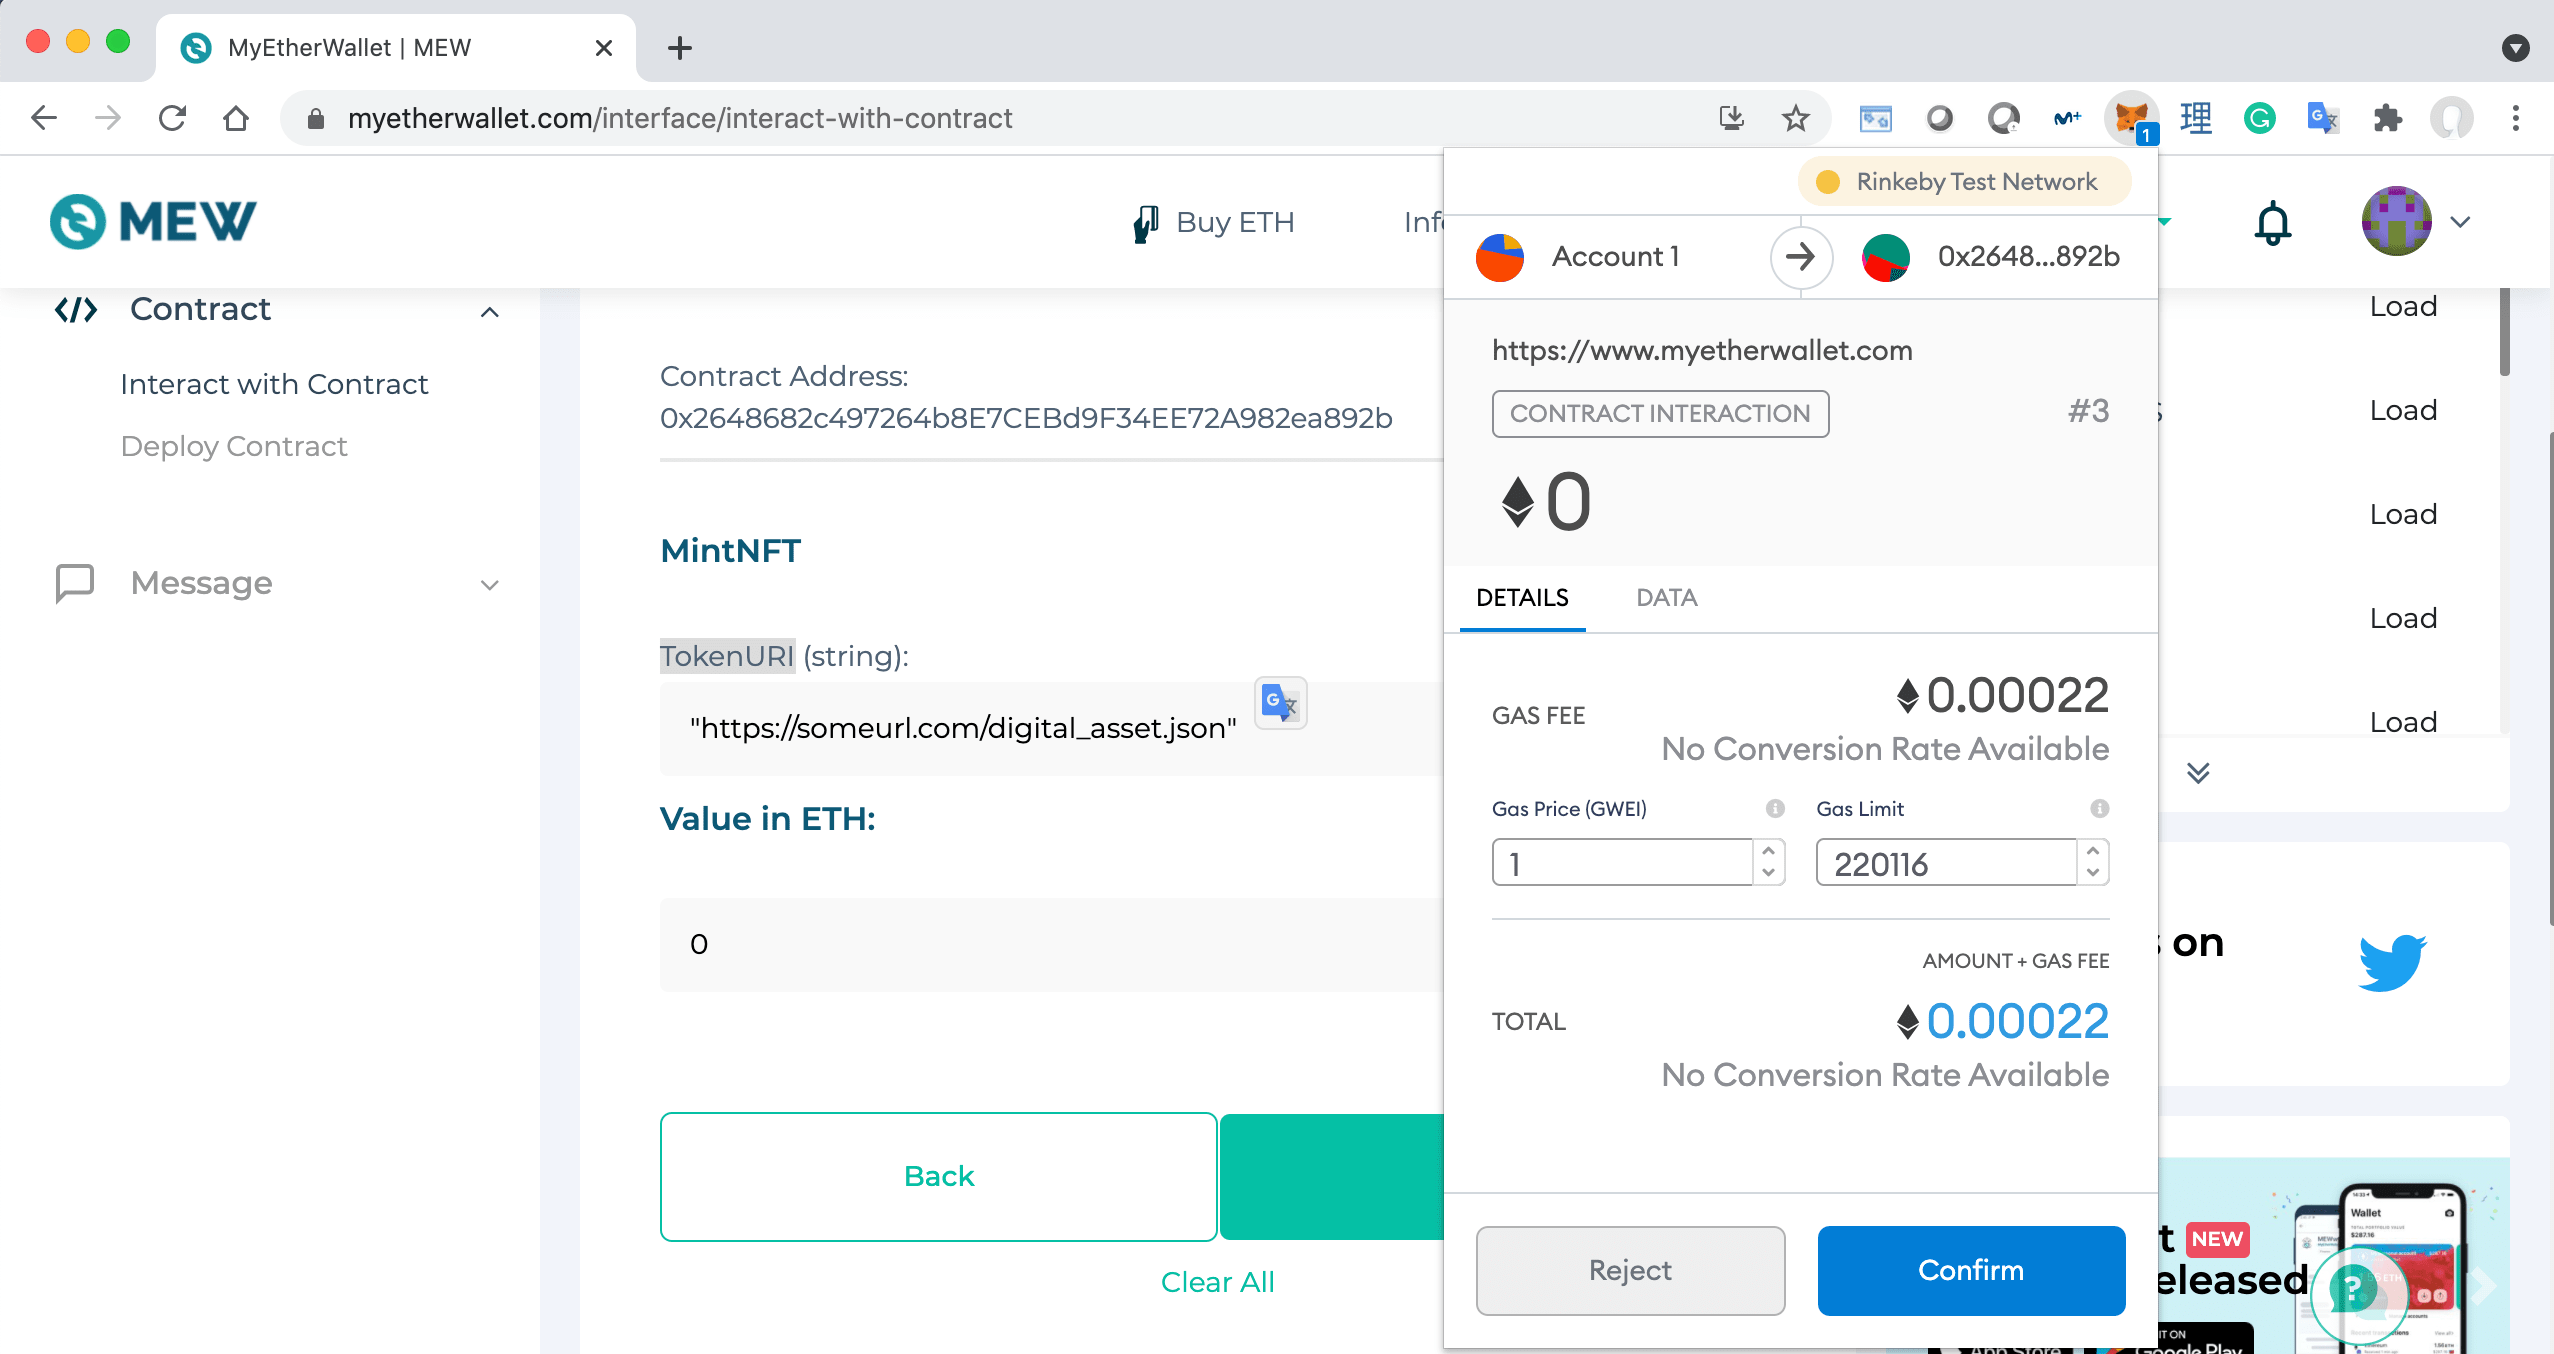
We just minted our NFT!
We can confirm the details of the transaction by going to Etherscan.
3.9. Deploying the Smart Contract to Ethereum Mainnet
In this section, we will be using truffle to deploy our smart contract to the Ethereum Mainnet. We’ll need real ETH to do the deployment, which costs money. At the time of this writing, the Ethereum gas fees are very high and you should be very careful in this step.
We start by editing the networks configuration in truffle-config.js.
networks: {
  rinkeby: {
    provider: () => new HDWalletProvider(mnemonic, `https://rinkeby.infura.io/v3/YOUR-PROJECT-ID`),
    network_id: 4,       // Rinkeby's id
    gas: 5500000,        // Rinkeby has a lower block limit than mainnet
  },
  main: {
    provider: () => new HDWalletProvider(mnemonic, `https://mainnet.infura.io/v3/YOUR-PROJECT-ID`),
    network_id: 1,       // Mainnet id
    gas: 4000000,
    gasPrice: 40000000000,
    confirmations: 2    // # of confs to wait between deployments. (default: 0)
  }
}
The Gas and gasPrice parameters are very important in this step. Please check this link for a detailed explanation.
The Gas parameter is the maximum amount of gas that we’re willing to spend on this transaction. We can get an idea about the gas amount required by looking at the testnet deployment summary.
The gas price depends on how busy the Ethereum network is. We can check Etherscan’s Gastracker to have an idea about the gasprice that we’ll need at the moment of deployment.
Next, we run the command below to deploy our smart contract to the mainnet.
truffle migrate --network main
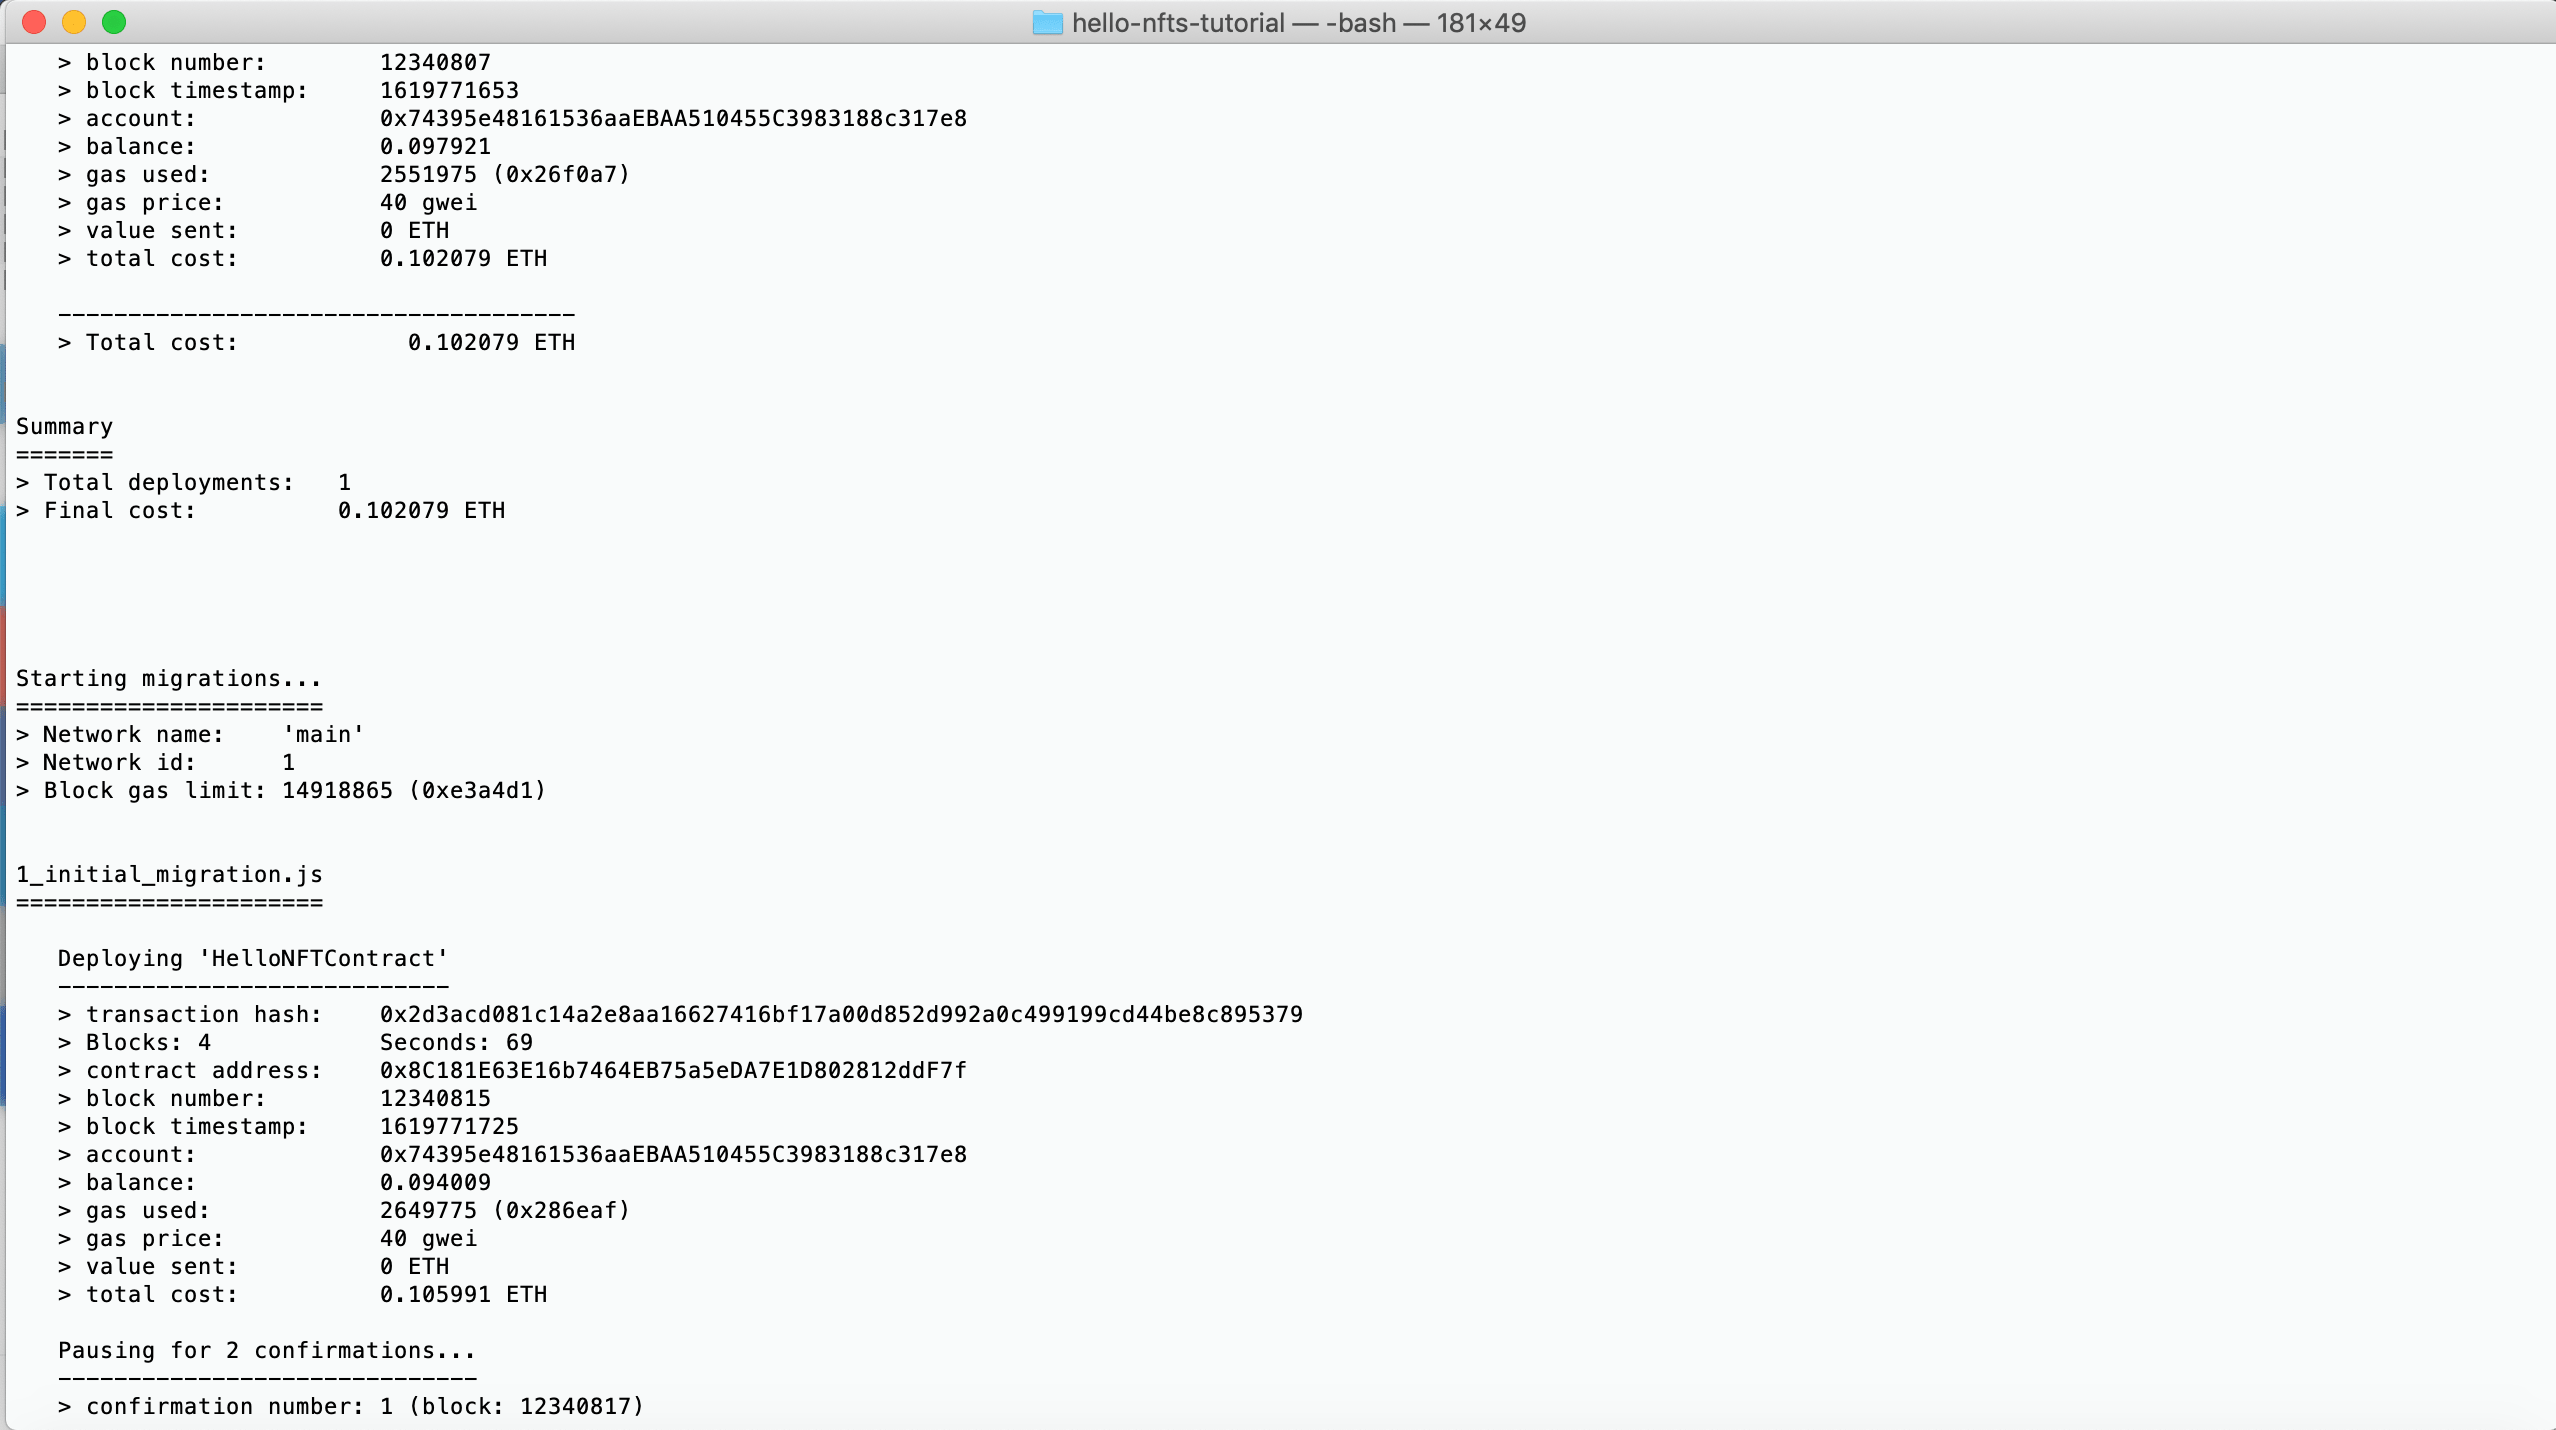
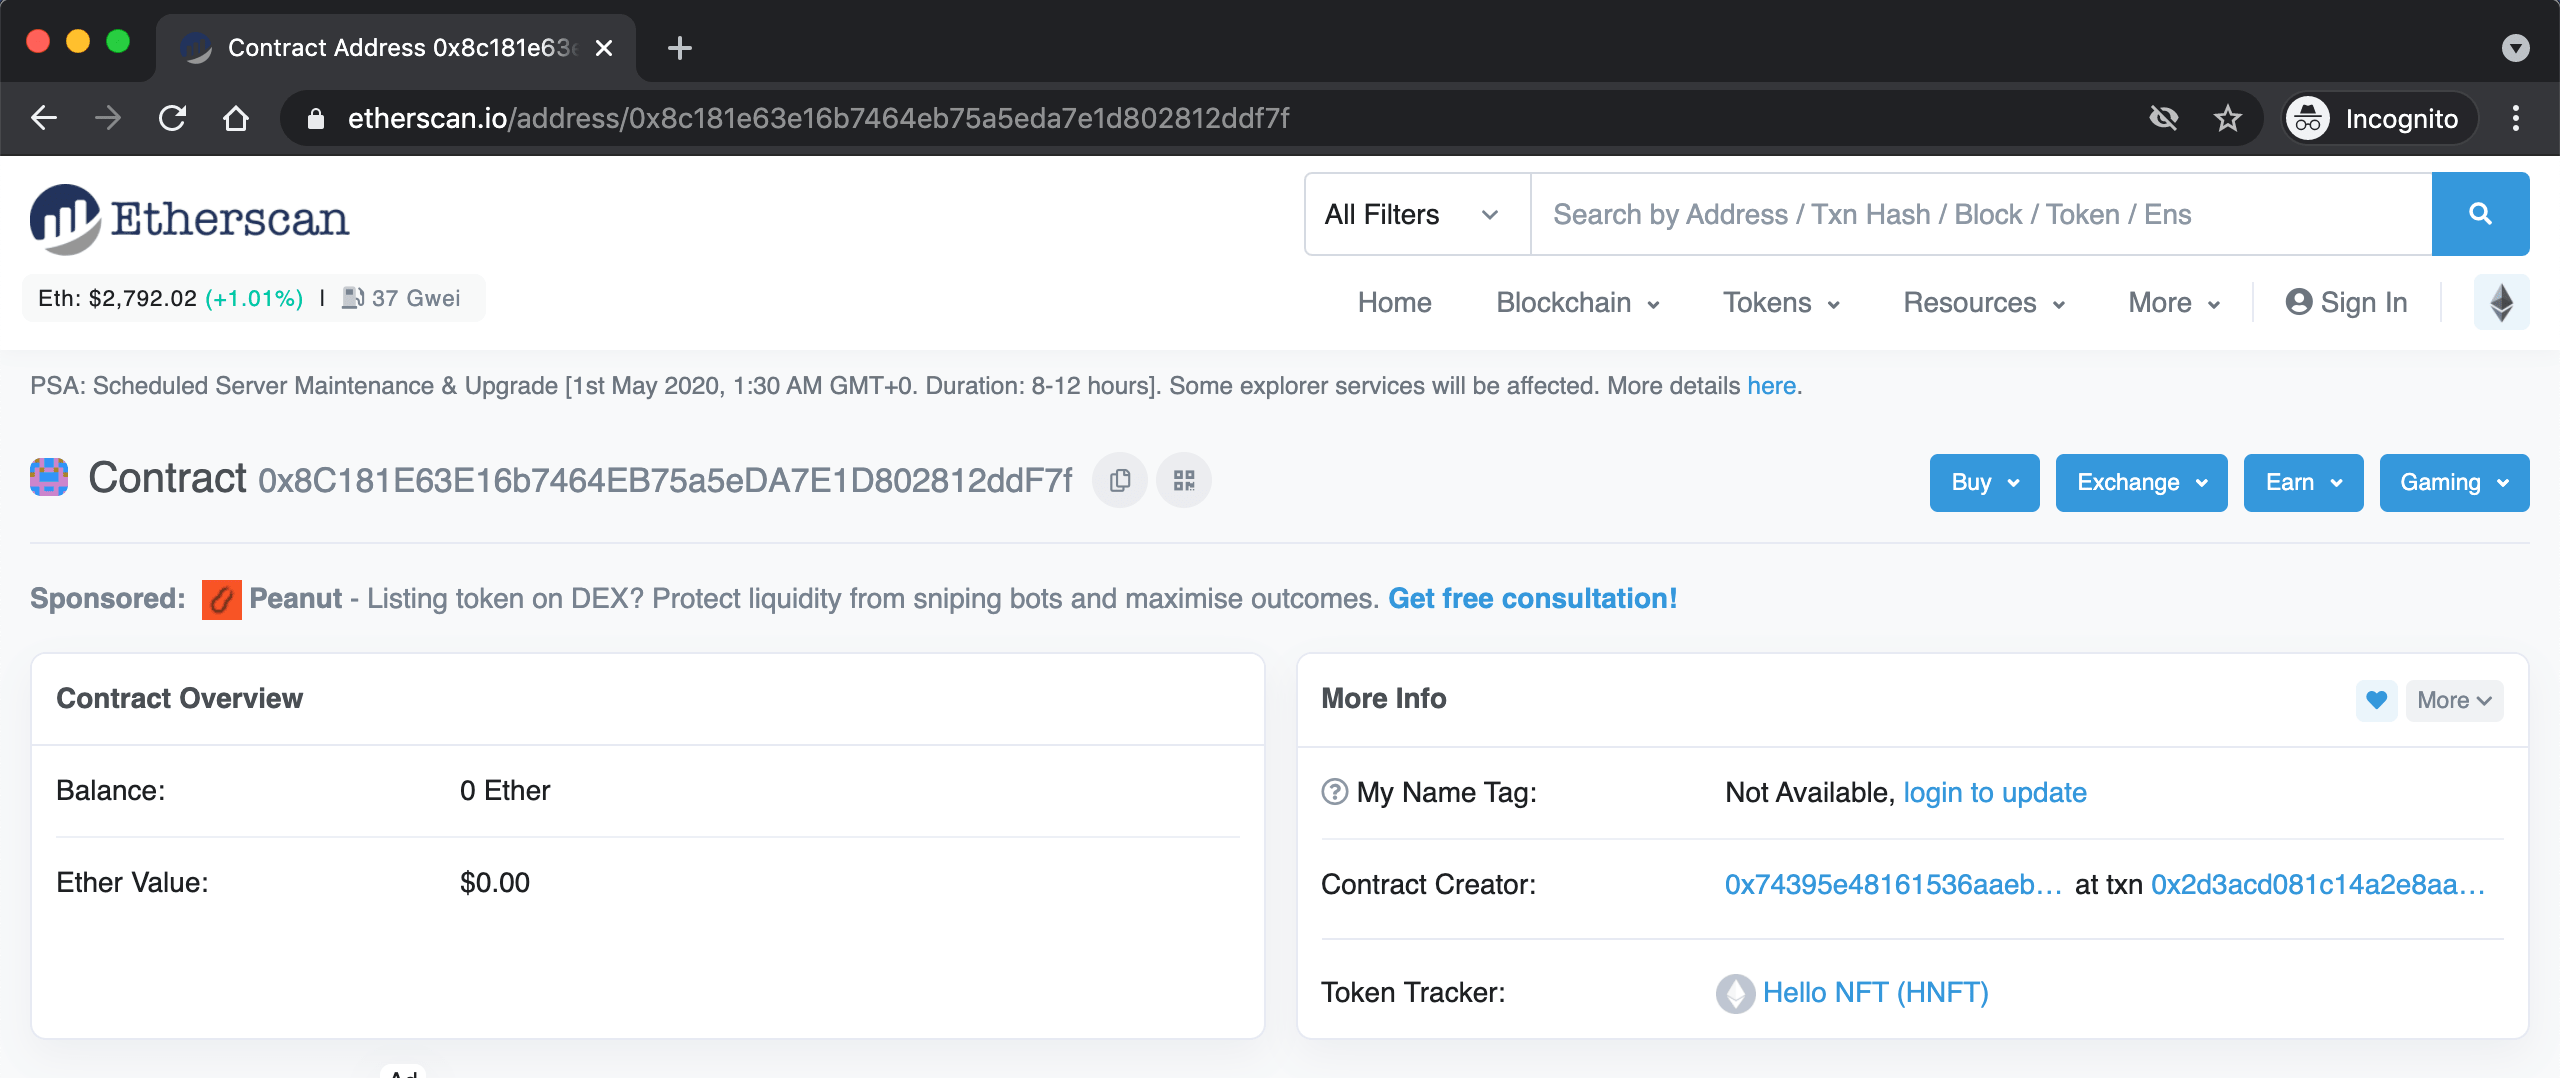
If all goes well, we should have our smart contract deployed on the mainnet. We can use the transaction hash and contract address to check the transaction’s details and information about the smart contract.
3.10. Minting our NFT to the Mainnet
Now that we have our NFT deployed, we can mint our NFT. we start by creating a JSON file that contains the metadata of our “Hello, NFTs!” GIF. We then store both the GIF file and the JSON on a server accessible to all. IPFS is a popular option for storing the digital assets that are linked to NFTs.
In this tutorial, I will be storing both files on my website.
- Link to Metadata File -> This will be the TokenURI
- Link to “Hello, NFTs!” GIF
Next, we go to MEW’s website, we choose Access My Wallet and we log in using Metamask and Mainnet Test Network. Once connected, we choose from the left-hand side menu Contract/Interact with Contract. we copy into the 2 boxes the smart contract address and the ABI, and we click on Continue.
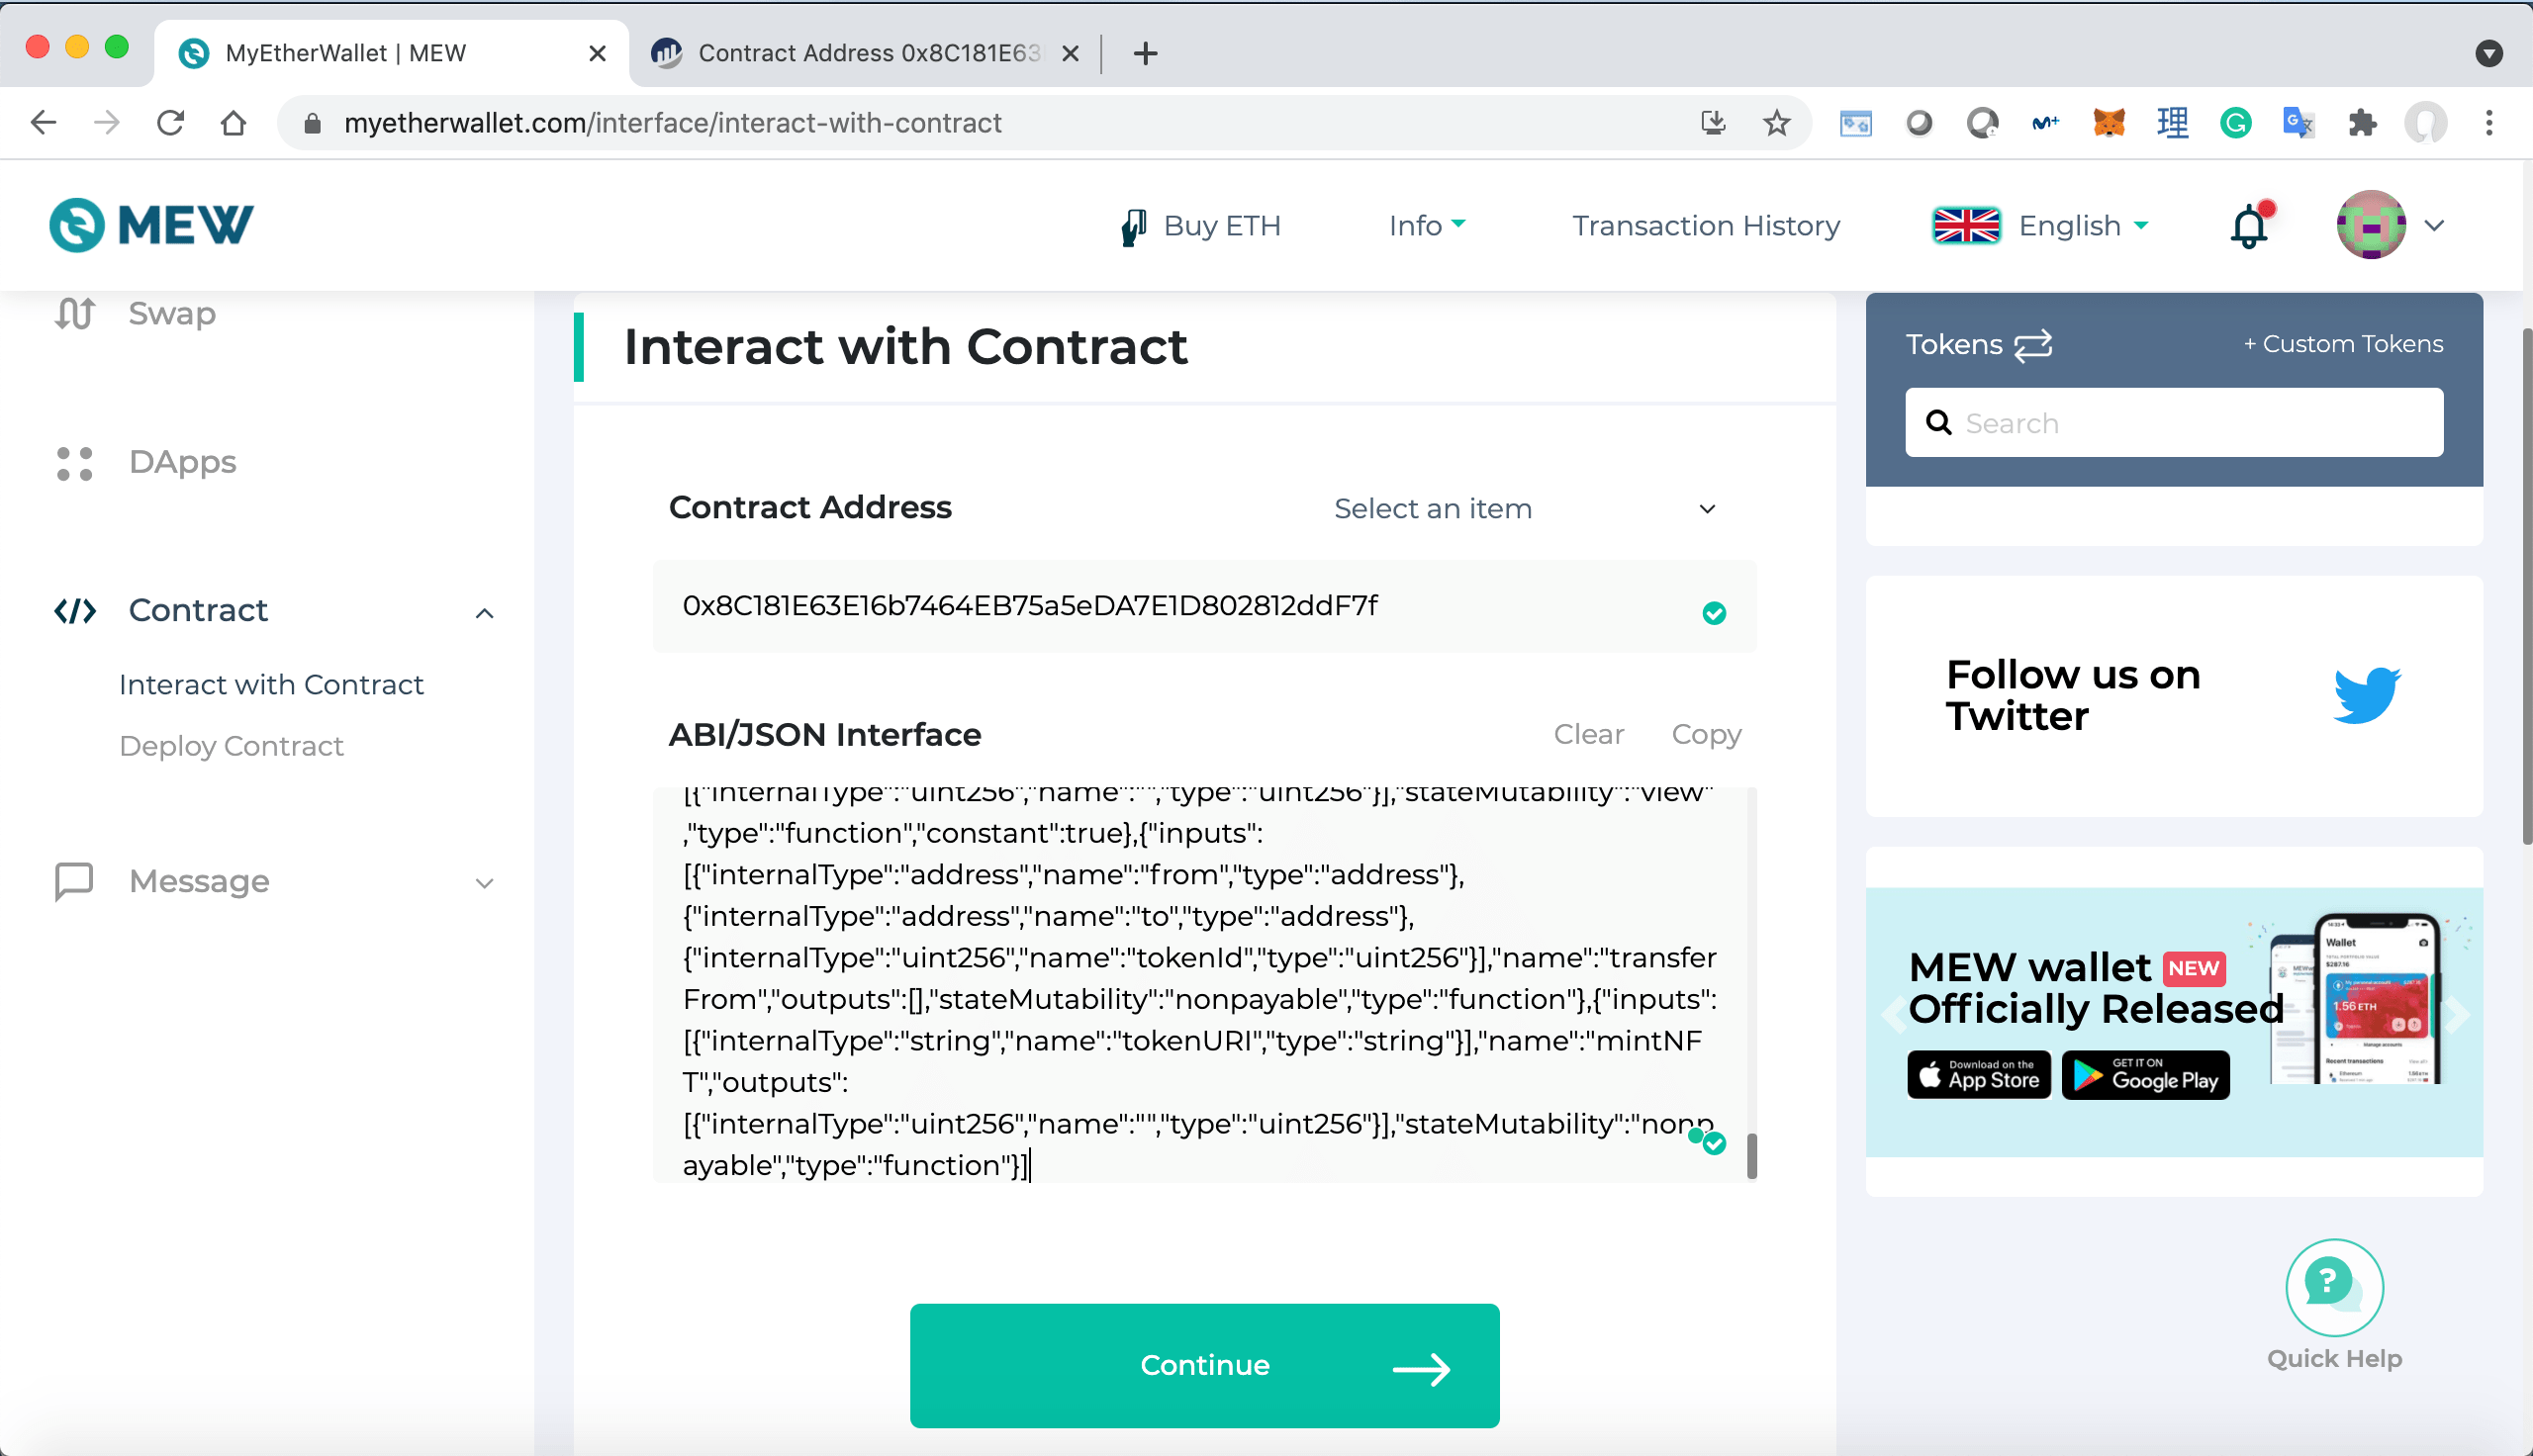
If all goes well, we should see a dropdown menu with all the available functions in our smart contract.
We select mintNFT function
We enter the TokenURI of our GIF: http://adilmoujahid.com/files/hello-nfts-rgb.json
We click on the Write button
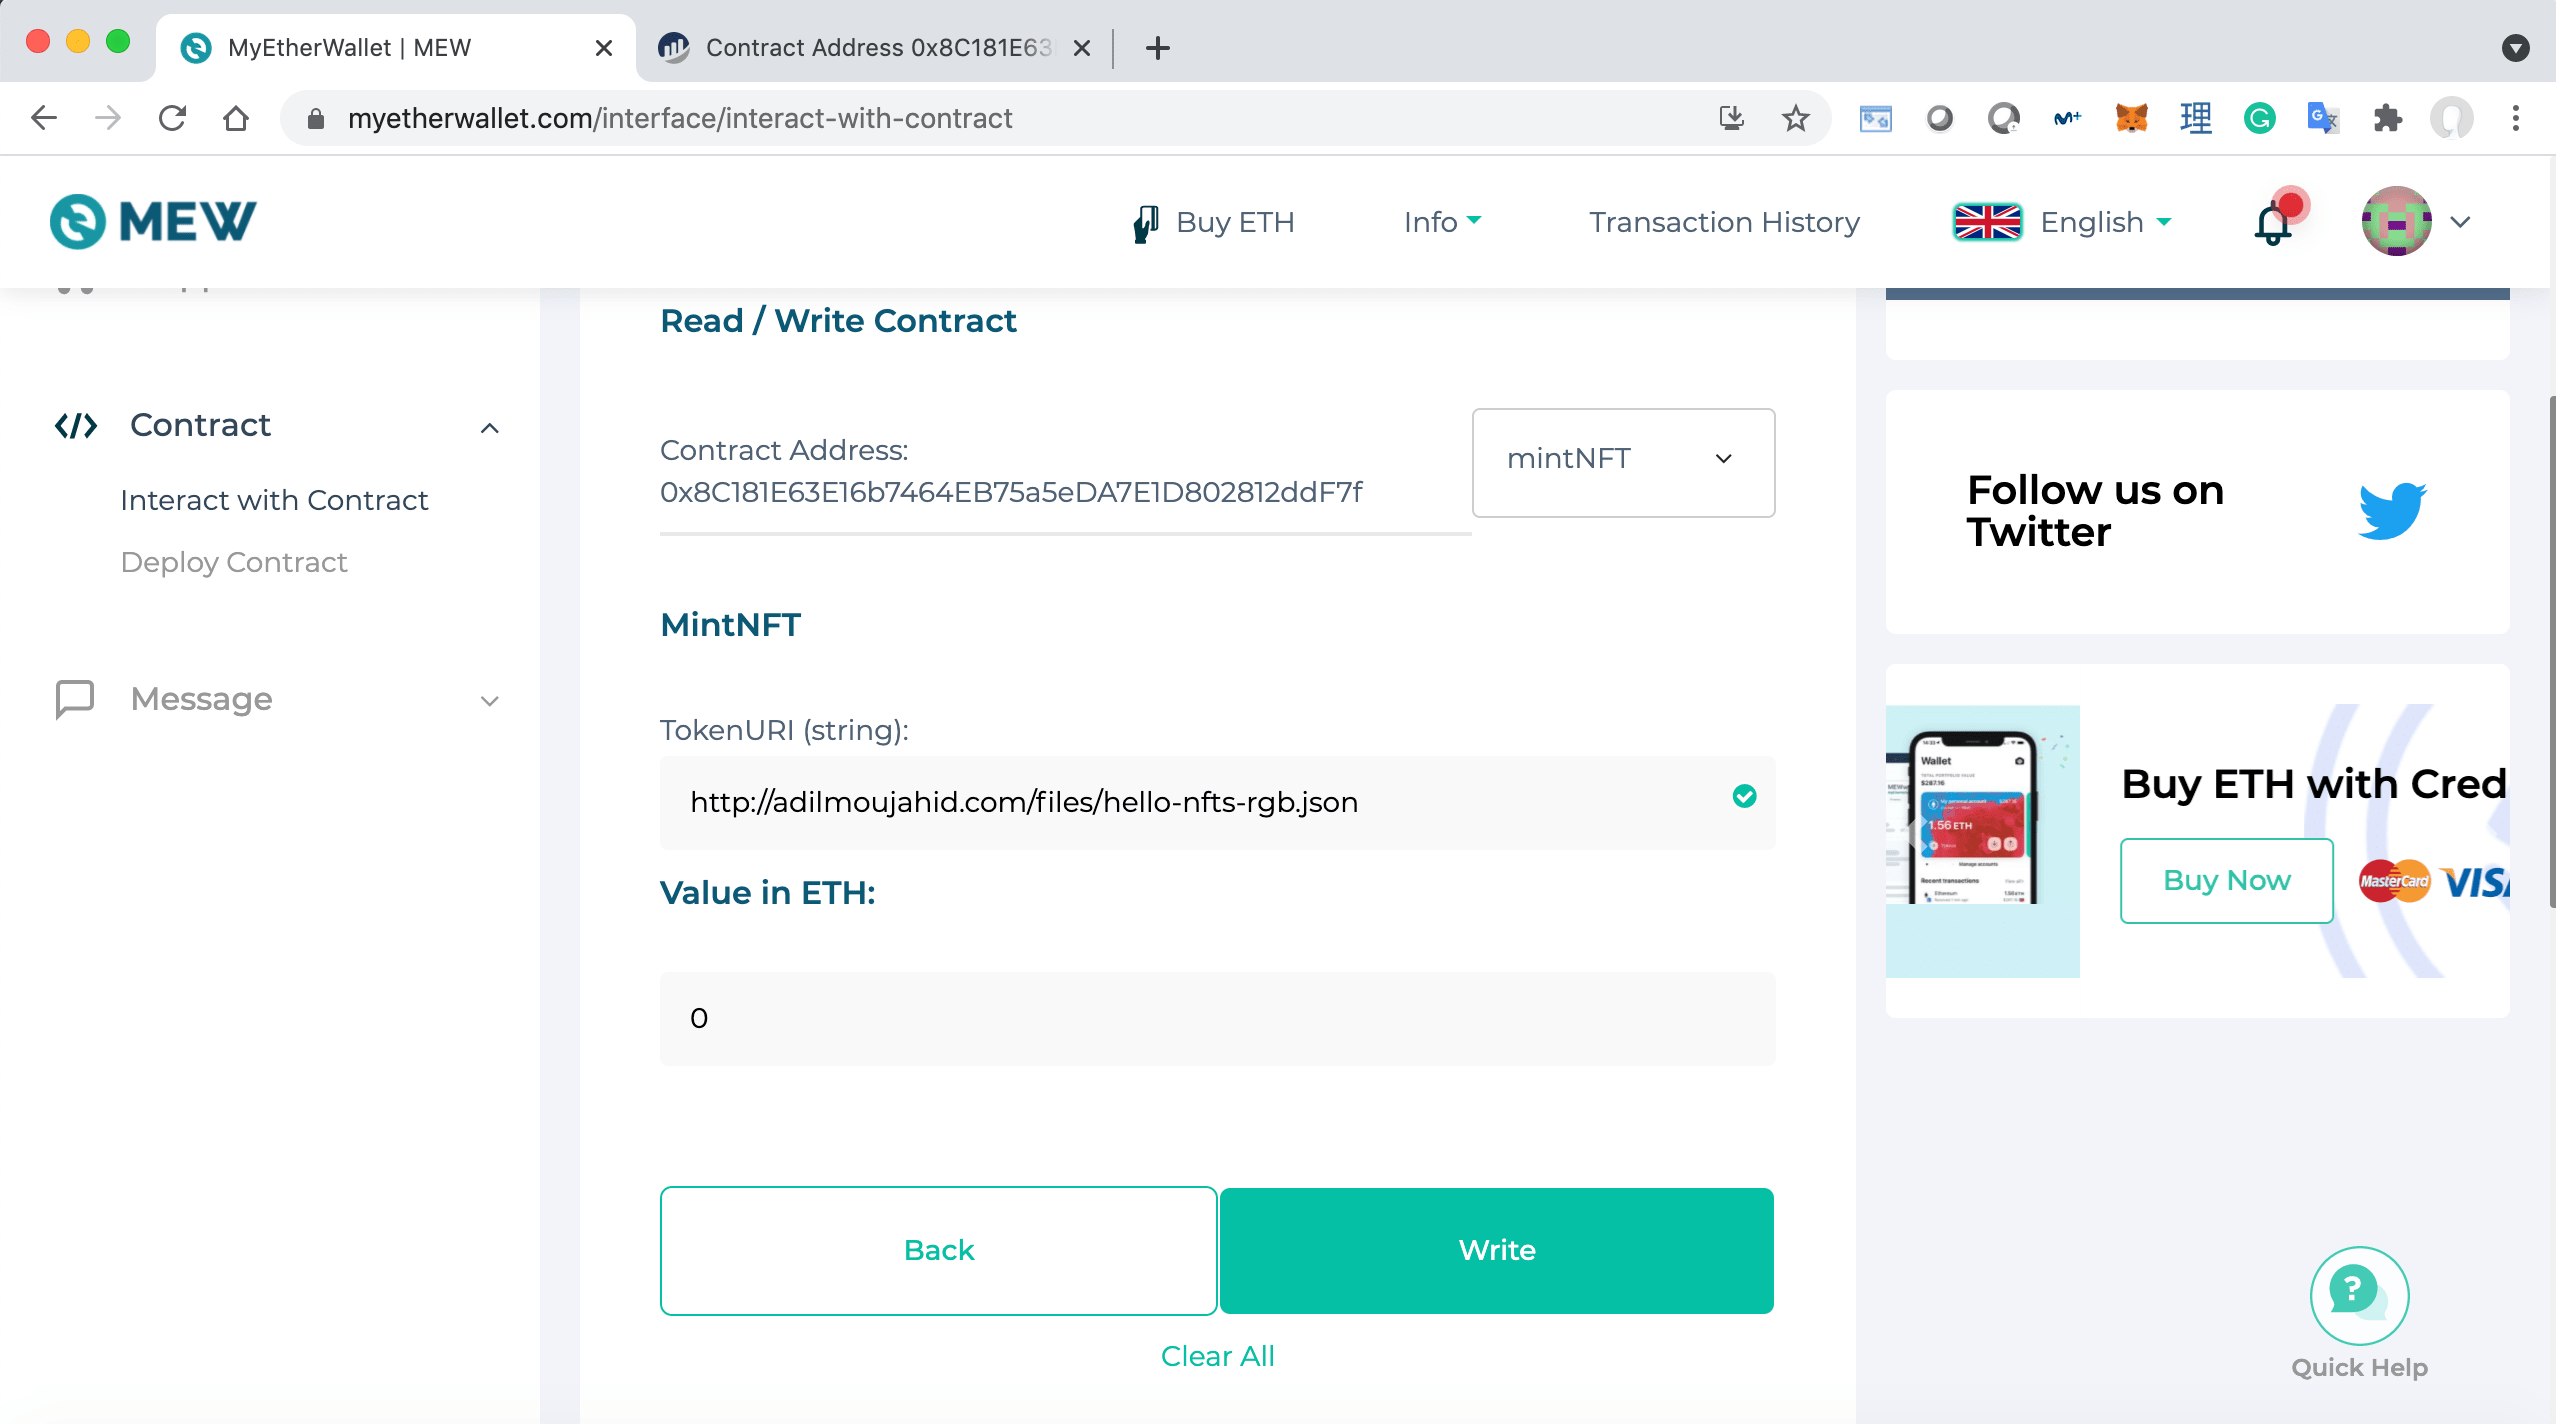
We should get a Metamask pop-up asking to confirm the transaction. We click on the Confirm button.
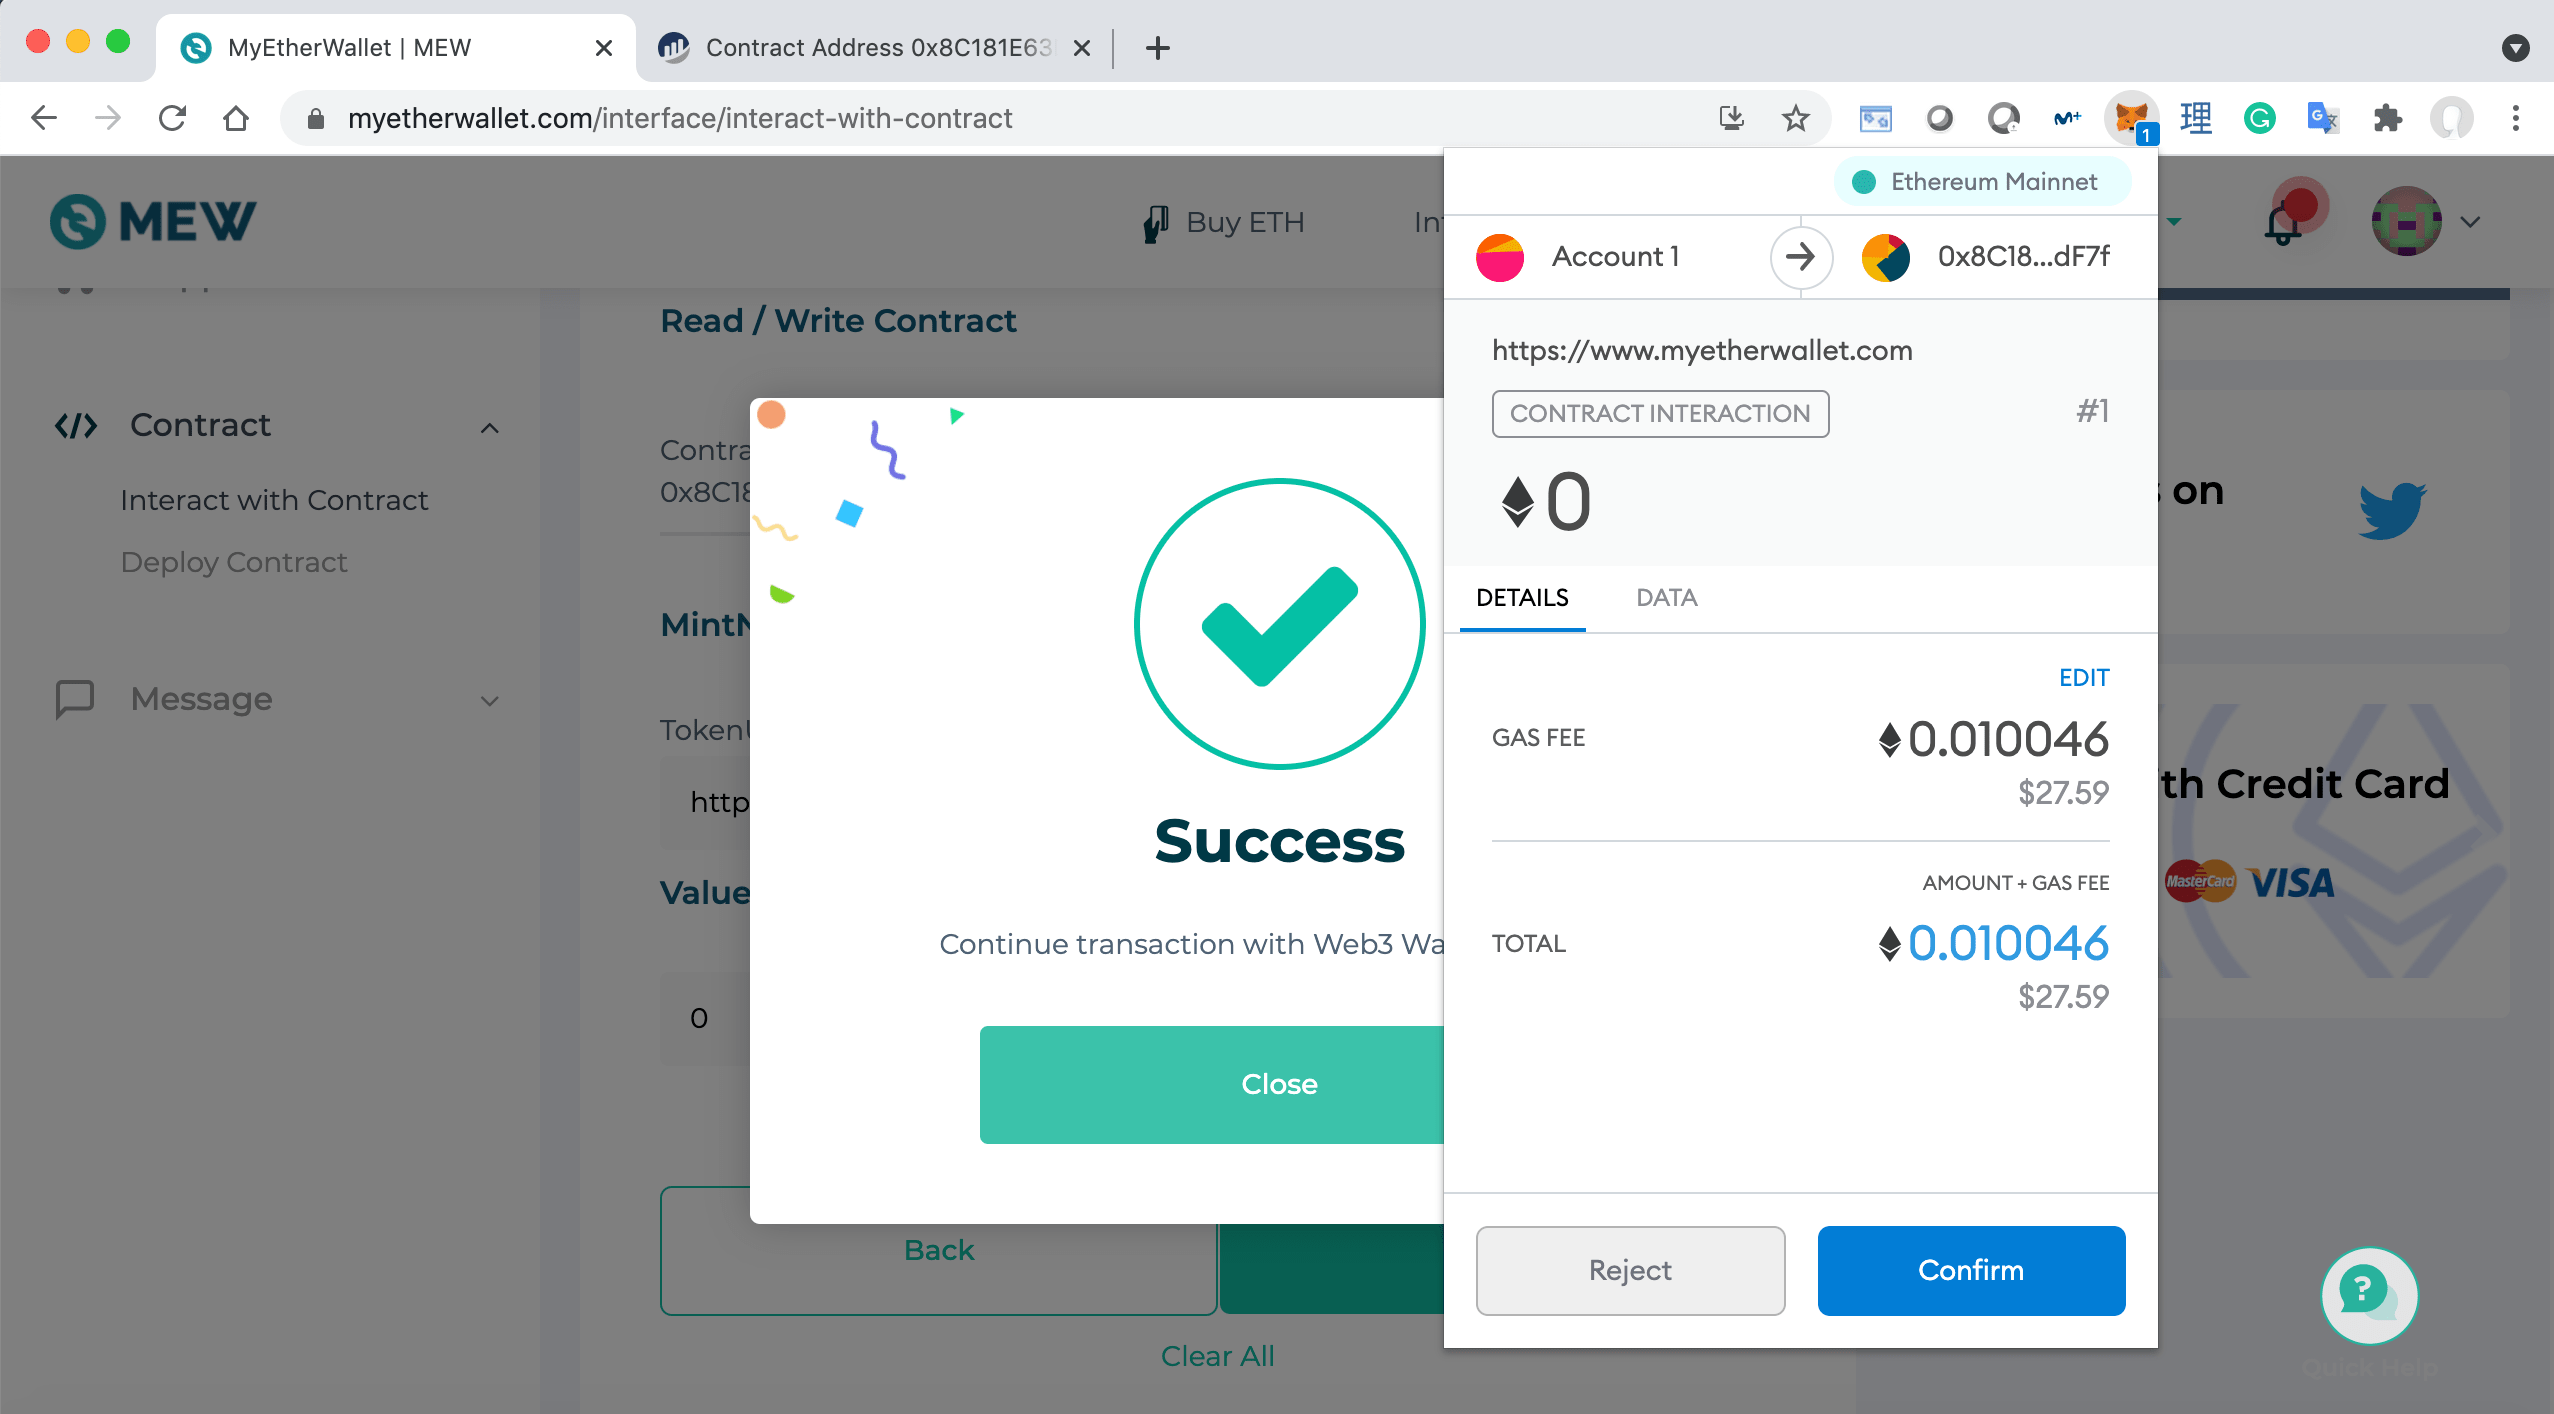
We just minted our NFT to the mainnet! We can confirm the transaction details by going to Etherscan.
3.10. Putting the NFT for Sale on OpenSea
Now that the NFT is minted on the Ethereum Mainnet, we can see its content from the OpenSea website.
As the owner of the NFT, I can login to OpenSea with my Metamask wallet, and set a price for selling the NFT.
4. NFTs and Physical Objects
In the previous sections, we learned how NFTs can uniquely identify and represent the ownership of digital assets using the blockchain. In this section, we will cover NFTs and physical objects. We will look into the limitations of representing physical objects as NFTs and how some artists are using NFTs to build new experiences combining digital and physical objects.
I personally find this topic fascinating and I wanted to create a physical object that represents the “Hello, NFTs!” NFT. After going through multiples ideas, I finally decided to create a LEGO-based QR code that is linked to a webpage that shows information about the “Hello, NFTs!” project.
4.1. Limitations of Representing Physical Objects as NFTs
As we saw in section 3.10, to mint an NFT that represents an asset, we need to pass to the smart contract a URI that contains the asset’s metadata in JSON format. For example, you can see in this link, the metadata of the “Hello, NFTs!” GIF.
In the case of a digital asset, it’s easy to store the asset and its corresponding metadata online. We can even use systems like IPFS to make sure that we can’t change the data that is linked to the NFT.
In the case of physical objects, things get a bit complicated. The best we can do to represent a physical object digitally is to have a unique identifier for the object. For example, a serial number or an authentication certificate. Even with an authentication certificate, we can’t be 100% sure that a physical object is authentic. There is also the challenge of transferability. Once the NFT that represents a physical object has been transferred from user A to user B, there is no guarantee that user A will deliver the object to user B.
One extreme example that illustrates the challenge of linking NFTs to physical objects, is the story of a group called BurntBanksy, that bought an authentic Banksy for $95,000, then burnt it in a youtube video and sold a high-resolution picture of the art as NFT. On their Twitter account, this group is claiming to be “on a mission to bridge the world of physical art with NFTs”.
4.2. Combining Digital Assets and Physical Objects
The first straightforward NFT use case that combines digital assets and physical objects, is the viewing of the NFT’s digital content in a better medium than a computer screen. Beeple for example created custom digital screens that are used to display his digital art in addition to the owner’s information. Beeple calls these digital screens, physical tokens.
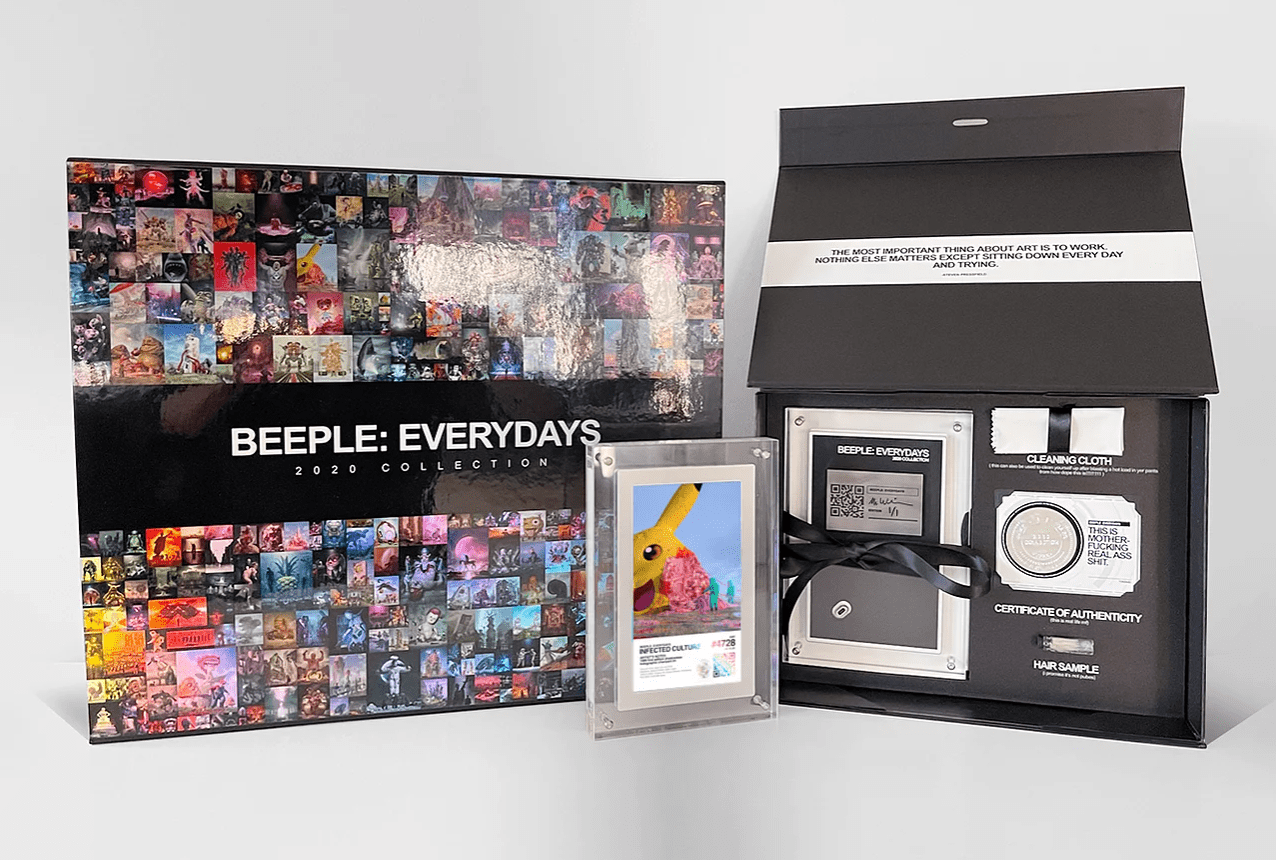
Source: https://www.beeple-collect.com/faq
Other artists and technologists are creating digital twins of physical objects and minting them as NFTs. For example, the American graphic designer Kii Arens has created an NFT-backed artwork that is being used to sell a physical house in Thousand Oaks, California.
4.3. Building the LEGO-based QR code
In this section, we will see how I built a LEGO-based QR code that is linked to a webpage that shows information about the “Hello, NFTs!” GIF and NFT.
Technical Requirements
I had 3 main requirements for my QR code:
- It had to fit inside a 32x32 LEGO Baseplate.
- It had to include the word “NFT” in the middle.
- It had to encode the URL of the “Hello, NFTs!” project page.
QR codes have error correction capability (ECC) to restore data if the code get damaged. I needed to have the highest level of ECC (Level H) in order to take out the pixels from the middle of the QR code and replace them with a pixelated version of the word “NFT”.
Looking at the specifications of QR codes, I chose version 3 with ECC level H. This version can encode an alphanumeric string of length up to 35 characters.
The URL of the “Hello, NFTs!” project page is 43 characters long. I used bitly to shorten the URL to the 23 characters long URL: http://bit.ly/hellonfts.
Generating the QR Code
To generate the QR code, I used python and the qrcode python library. Below is the source code for creating the QR code and saving it as a PNG file. You can find the same in this github repository.
#Make a QR code that encodes the value of url
qr = qrcode.QRCode(version=3, error_correction=qrcode.constants.ERROR_CORRECT_H, box_size=1, border=0)
qr.add_data("http://bit.ly/hellonfts")
qr.make(fit=True)

#Making the QR image
img_qr = qr.make_image(fill_color="black", back_color="white")
#Converting img_qr to numpy array
img_qr_array = np.array(img_qr)

#Creating a pixelated version of the word “NFT” as a numpy array
nft = np.array([[True, True,  True, True, True, True, True, True, True, True, True, True, True, True, True],
                [True, False, True, True, False, True, False, False, False, False, True, False, False, False, True],
                [True, False, False, True, False, True, False, True, True, True, True, True, False, True, True],
                [True, False, True, False, False, True, False, False, False, True, True, True, False, True, True],
                [True, False, True, True, False, True, False, True, True, True, True, True, False, True, True],
                [True, False, True, True, False, True, False, True, True, True, True, True, False, True, True],
                [True, True,  True, True, True, True, True, True, True, True, True, True, True, True, True]])
# Changing the middle of the QR code with a pixelated version of the word “NFT”
img_qr_array[12:19, 7:22] = nft

nft_qr_img = im.fromarray(img_qr_array)
nft_qr_img.save('nft_qr.png')
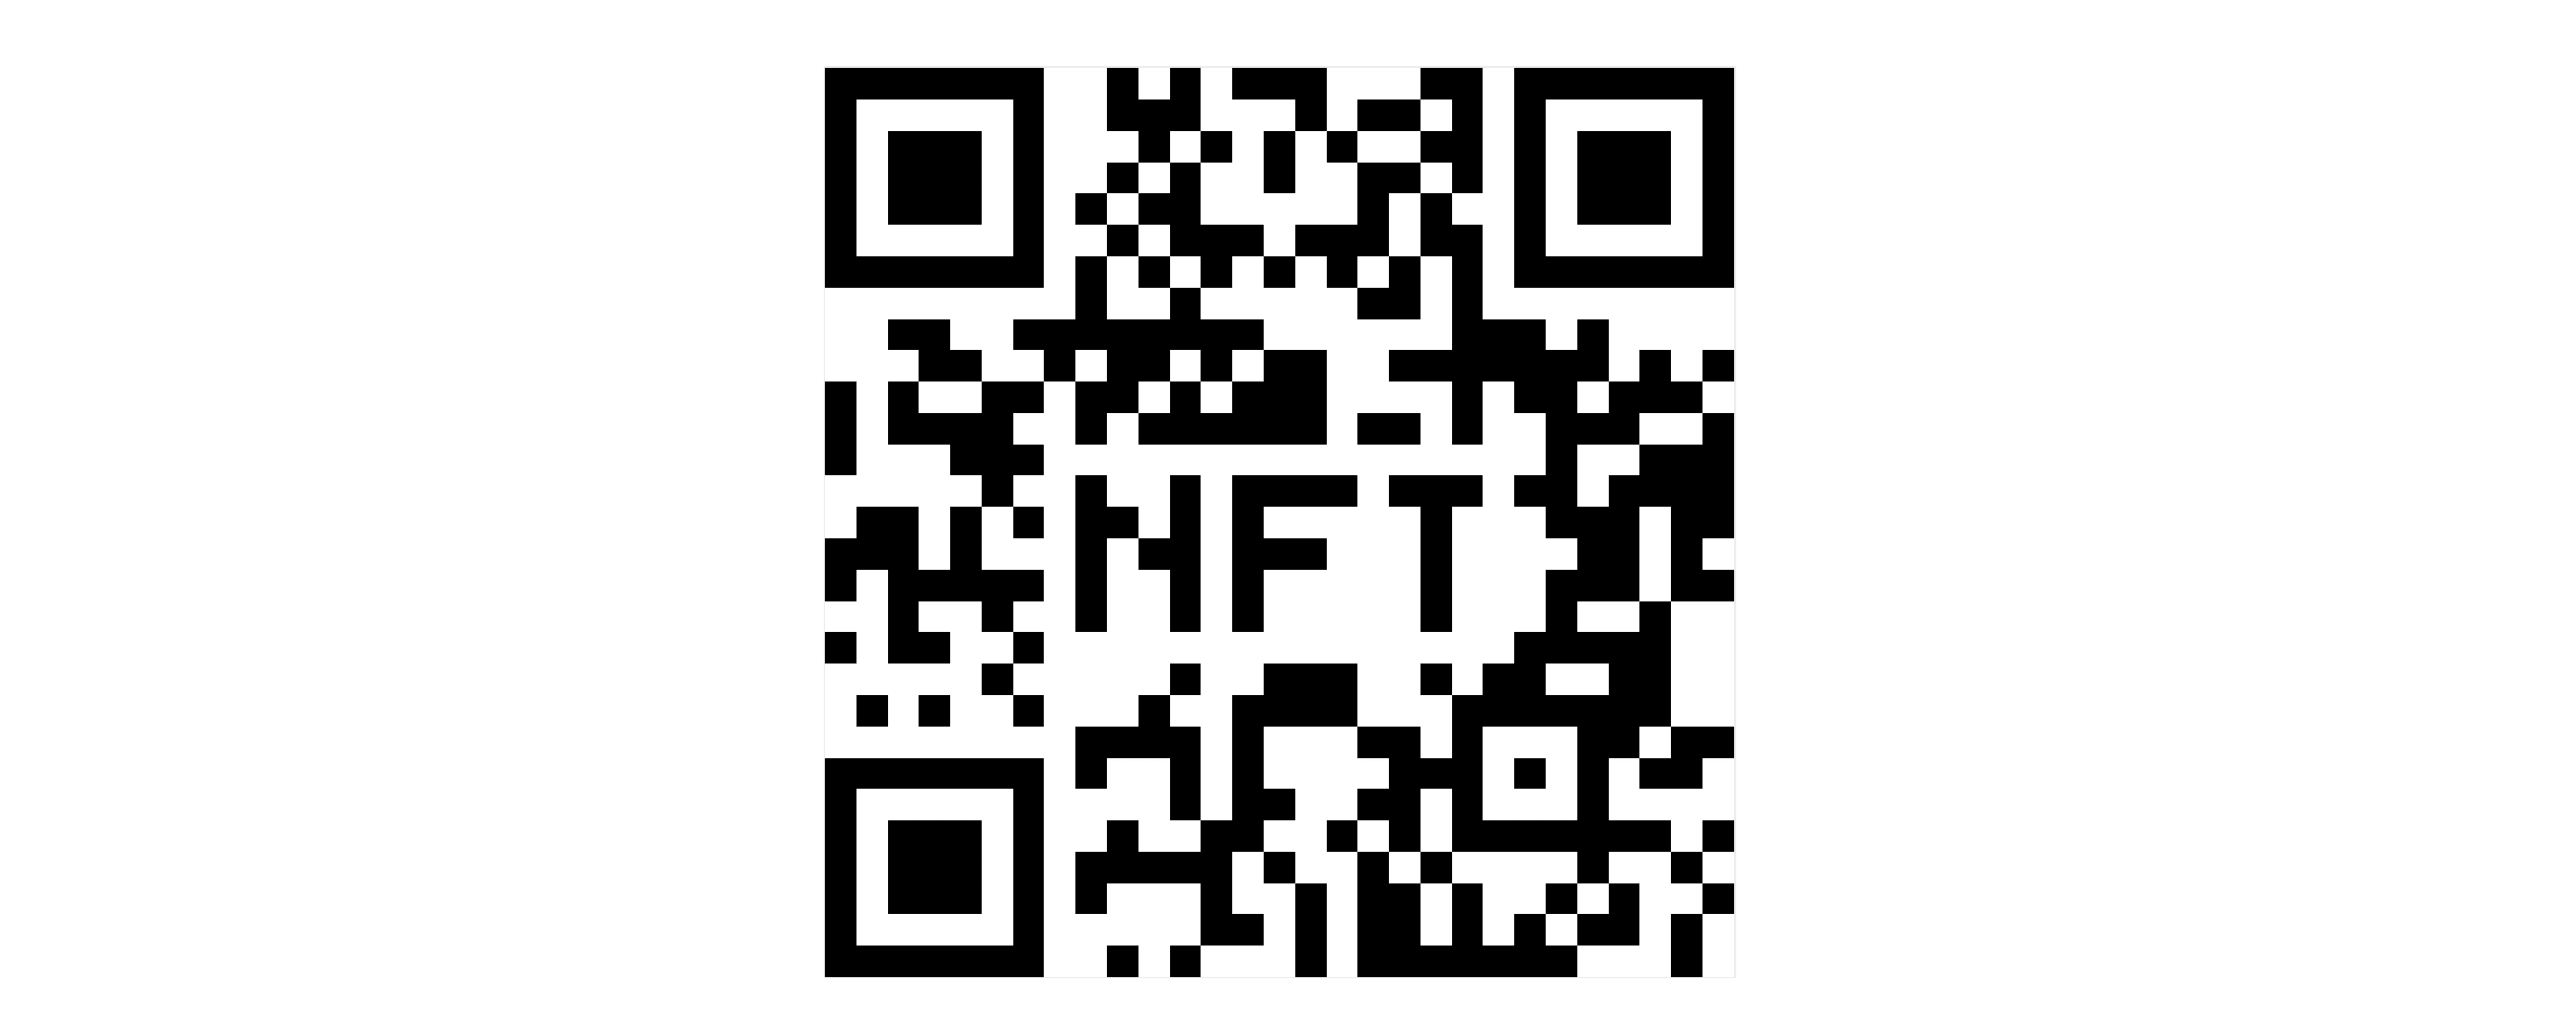
Building the LEGO-based QR Code
I used a 32x32 LEGO Baseplate with standard black 1x1 and 1x2 LEGO bricks to build the LEGO version of the QR code generated in the previous section. The LEGO QR code is working perfectly and is linked to “Hello, NFTs!” project page.
Conclusion
In this blog post, we covered the basics of NFTs, their history, and their ecosystem. We also learned how to develop and deploy an NFT smart contract on the Ethereum mainnet. NFTs are still in an early stage of maturity and adoption, but the technology has a lot of potentials and I’m confident that we will see more NFTs use cases in the short to mid-term.
References
[1] Smart contract - Wikipedia
[3] Counterparty - Bitcoinwiki
[6] Rare Pepe Gets Blockchained, Made Into Tradable Counterparty Tokens
[10] What is NBA Top Shot? Explaining the Blockchain NBA highlight collectables
[11] Everydays: the First 5000 Days - Wikipedia
[12] OpenZeppelin ERC721
[13] Reddit post about NFTs for Physical art
Go Top
comments powered by Disqus