
Model Context Protocol (MCP) servers are having a moment. Every developer on Twitter seems to be building one, and for good reason — they let you plug your own logic directly into LLMs like Claude. But most examples I've seen are basic: weather APIs, file readers, simple calculators.
I wanted to see how far I could push this technology. What if you could sketch with prompts instead of code?
That question led me down a rabbit hole that resulted in building a complete p5.js editor controlled entirely through natural language via Claude Desktop. Instead of typing ellipse(50, 50, 80, 80), I can now tell Claude "draw a bouncing ball" and watch it happen in real-time.
This isn't another "Hello World" MCP demo. It's a full-featured creative coding environment with file management, live preview, console output, and 13 different AI tools that let Claude control every aspect of the editor. I wanted to stress-test what's possible when you give Claude real control over real software.
The full source code for this project is available on GitHub.
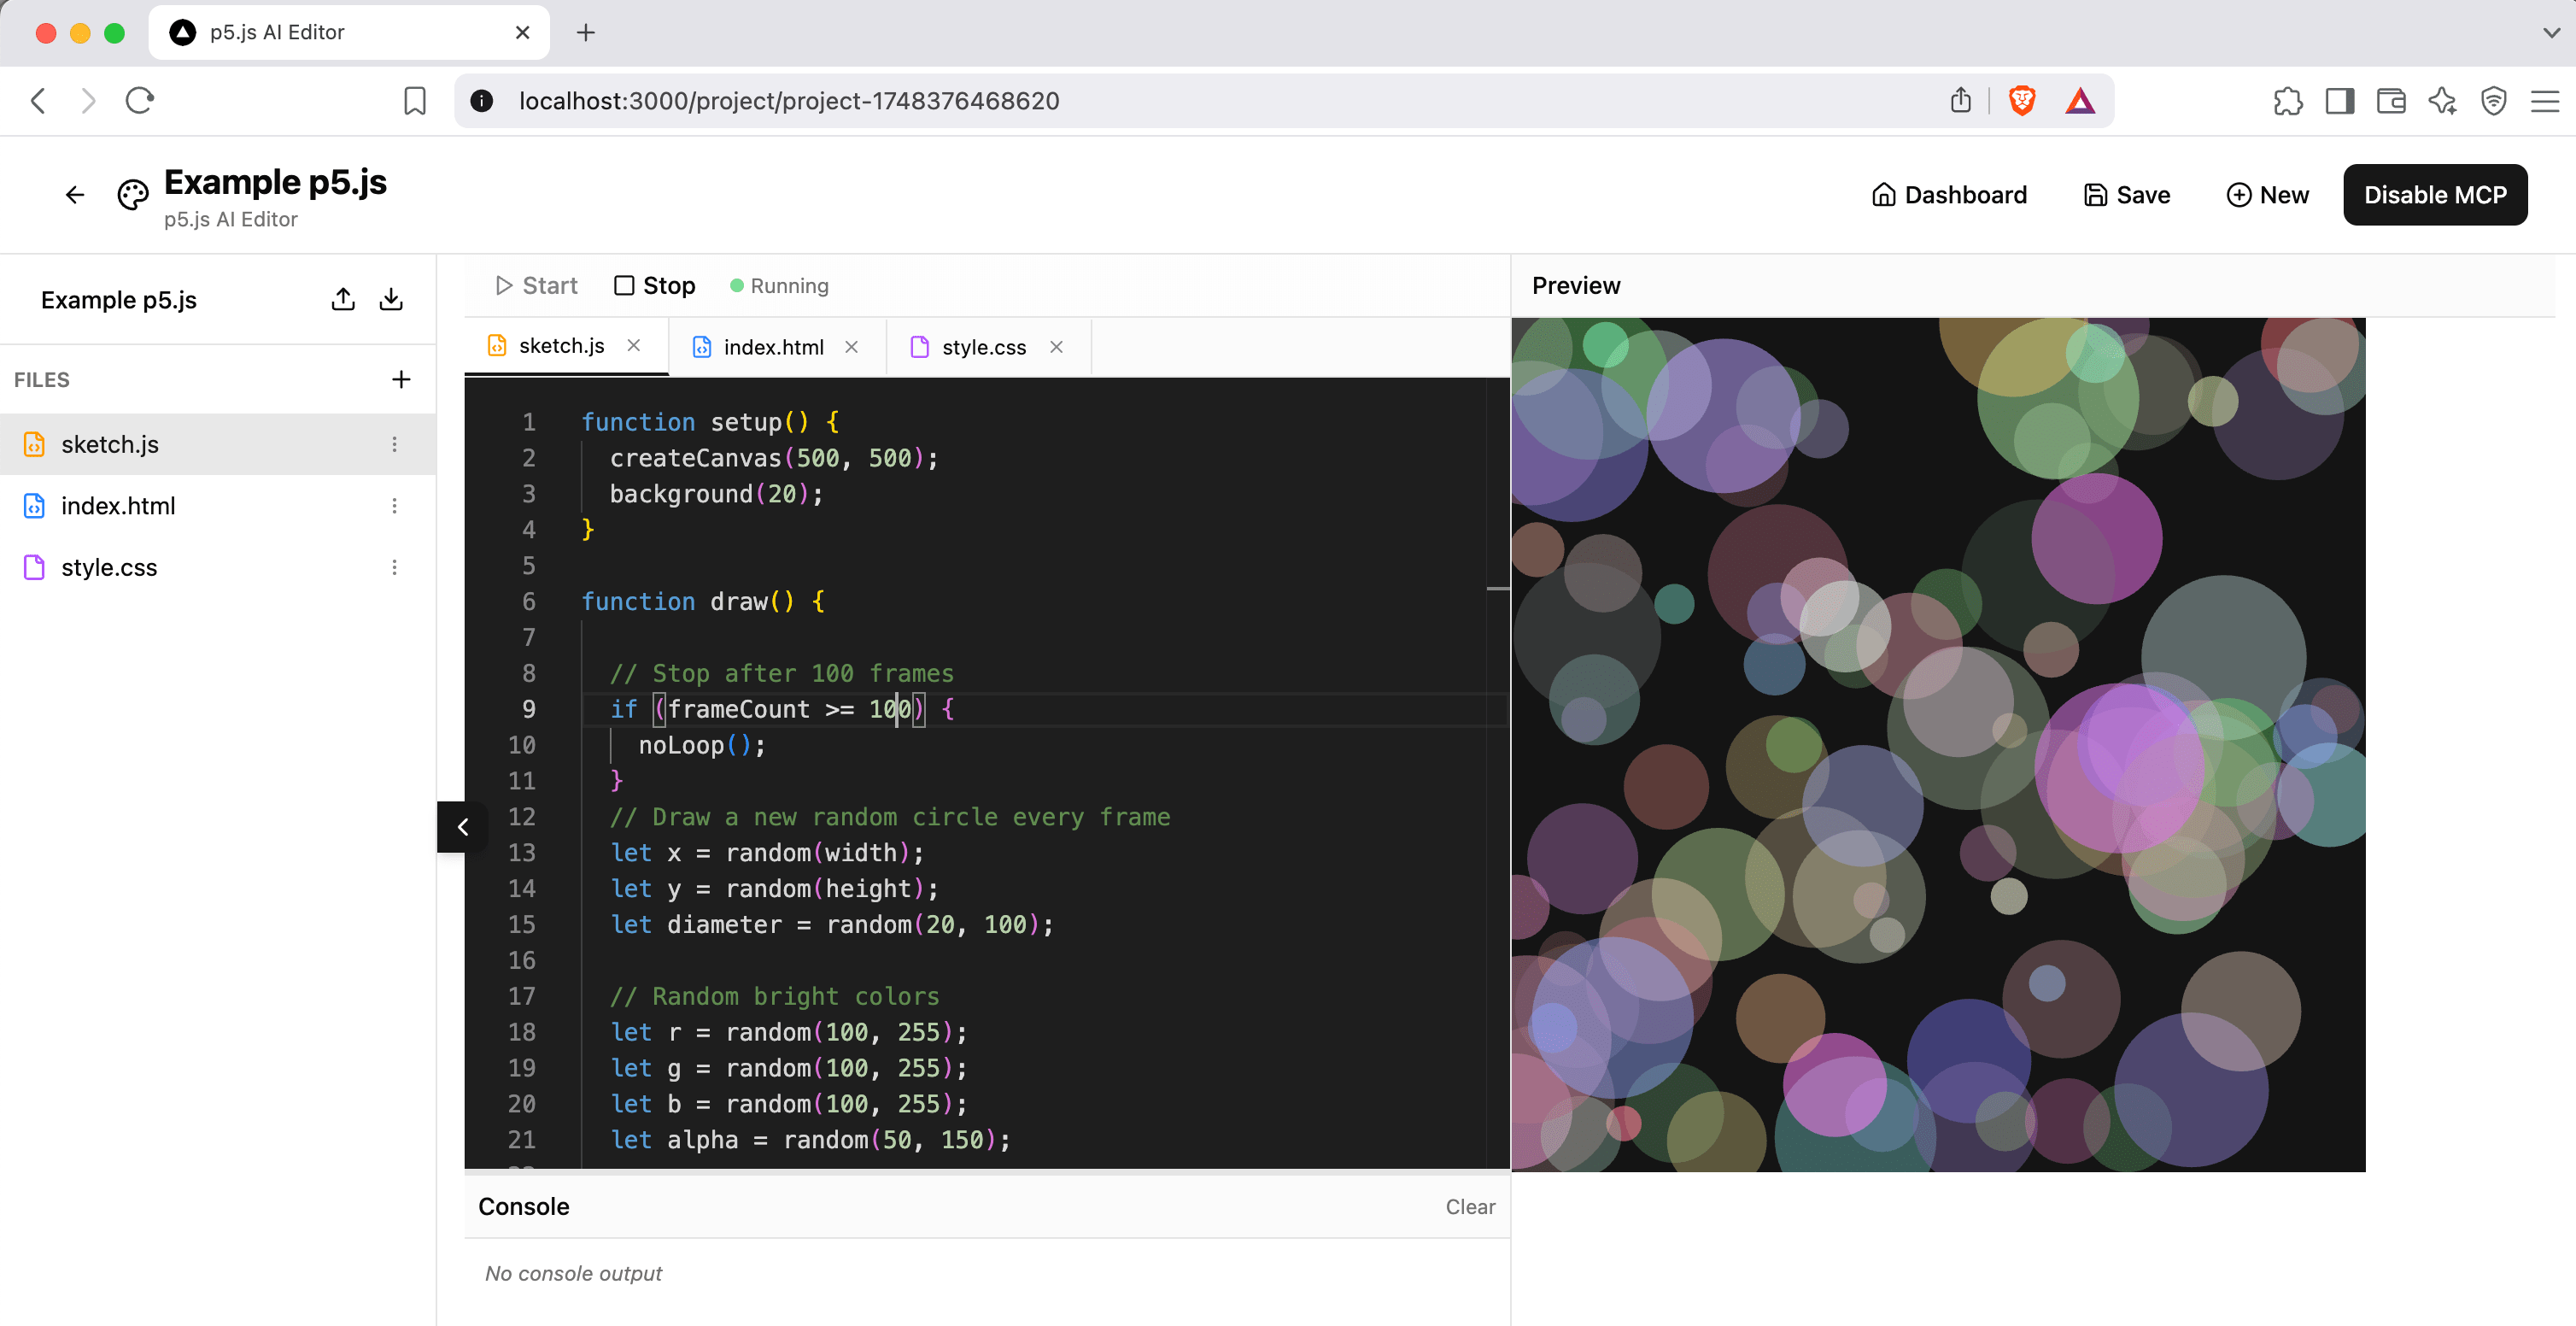
Demo: Claude Desktop controlling the p5.js editor through natural language prompts via MCP server
The Vision
Prompts control Claude → Claude controls code → code creates sketches
1. The Use Case: Creative Coding Meets AI
I've been using p5.js for my generative art projects, including my Genuary 2024 series. p5.js is a JavaScript library that makes coding accessible for artists, designers, and beginners by providing simple functions for drawing, animation, and interaction.
But here's the thing: even with p5.js's beginner-friendly API, there's still a barrier between having a creative idea and seeing it come to life. You need to remember function names, parameter orders, and coordinate systems. What if that barrier could be removed entirely?
That's exactly what I set out to explore using Claude Desktop and the Model Context Protocol (MCP).
Claude Desktop is Anthropic's native app that brings Claude's conversational AI directly to your computer. Its most powerful feature is tool use — Claude can connect to MCP (Model Context Protocol) servers running locally and interact with them through defined tools and resources.
2. MCP Servers 101: Plugging Your Logic into LLMs
Model Context Protocol (MCP) is an open standard created by Anthropic in November 2024 that's rapidly being adopted across the AI industry. Think of MCP as "a USB-C port for AI applications" — just as USB-C provides a standardized way to connect devices to peripherals, MCP provides a standardized way to connect AI models to different data sources and tools.
MCP vs Function Calling: What vs How
Before diving into the implementation, it's worth understanding how MCP differs from traditional function calling — and why this distinction matters for building AI-controlled applications.
Function Calling is what developers used when building AI workflows before the release of MCP. Here's the typical flow:
- User asks a question
- LLM decides which function it needs
- Developer manually sets up logic to handle the tool call
- Function gets executed via backend services
- Response is routed back to the LLM and user
Function calling is powerful, but everything is hardwired into your application. You stay in control, but you also have to handle function routing, parameter parsing, security, error handling, retries, authentication, and scaling logic.
MCP changes the game by standardizing how tools are discovered, described, and used across agents, models, and applications. Instead of wiring every tool manually, MCP creates a protocol layer that handles it all:
-
Tool Discovery: Functions are hardcoded into your app. With MCP, Claude can dynamically discover "what tools are available?" Add a new MCP server, and Claude instantly knows about its capabilities without code changes.
-
Standardized Schemas: Function calling requires custom parameter parsing for each tool. MCP provides standardized schemas that work consistently across all tools and models.
-
Modular Architecture: Functions are tightly coupled to your application. MCP servers are independent, reusable modules that can be shared across different applications and agents.
-
Enterprise Controls: Function calling offers basic execution. MCP enables workflows like approval processes, auditing, governance, and cross-model orchestration.
-
Error Handling: When a function fails, you get basic error messages. MCP servers provide context-aware errors that help Claude try alternative approaches.
The key insight: Function calling answers "what should I do?" while MCP answers "how do I do it at scale?" Function calling lets Claude decide which tool to use, but MCP provides the standardized framework for discovering, executing, and orchestrating those tools across different applications and agents. They're complementary technologies that work together to enable tool marketplaces, modular agent workflows, and enterprise-grade AI systems.
MCP Core Concepts
MCP defines three core concepts:
- Resources: Read-only data sources (like REST GET endpoints)
- Tools: Actions LLMs can perform (like REST POST endpoints)
- Prompts: Reusable templates for structuring LLM interactions
Here's what this looks like in practice:
import { McpServer } from "@modelcontextprotocol/sdk/server/mcp.js";
import { StdioServerTransport } from "@modelcontextprotocol/sdk/server/stdio.js";
import { z } from "zod";

const server = new McpServer({
  name: "simple-demo",
  version: "1.0.0"
});

// RESOURCE: Claude can read this data (read-only)
// Like a GET endpoint - provides information
server.resource(
  "current_time",
  "Current server time",
  async () => ({
    contents: [{
      type: "text",
      text: `Current time: ${new Date().toISOString()}`
    }]
  })
);

// TOOL: Claude can perform this action (with parameters)
// Like a POST endpoint - does something and returns a result
server.tool(
  "add_numbers",
  {
    a: z.number().describe("First number"),
    b: z.number().describe("Second number")
  },
  async ({ a, b }) => ({
    content: [{
      type: "text",
      text: `${a} + ${b} = ${a + b}`
    }]
  })
);

// PROMPT: Template that guides Claude's responses
// Reusable instruction with placeholders
server.prompt(
  "math_helper",
  "Template for solving math problems",
  [
    {
      role: "system",
      content: {
        type: "text",
        text: "You are a helpful math tutor. Solve this problem step by step: {{problem}}. Show your work clearly."
      }
    }
  ]
);

const transport = new StdioServerTransport();
await server.connect(transport);
Now that we understand how MCP servers work, let's see how I applied these concepts to build something ambitious: an AI-controlled creative coding environment.
3. Putting MCP to Work: Building an AI-Controlled p5.js Editor
The solution was to recreate the p5.js web editor experience, but powered entirely by AI. Instead of typing code manually, you'd describe what you want in natural language and watch it appear.
The architecture I envisioned was straightforward:
Claude Desktop ──stdio──► MCP Server ──WebSocket──► WebSocket Bridge ──WebSocket──► p5.js Editor
Claude would use natural language to invoke tools on my MCP server, which would translate those into WebSocket commands sent to a bridge server (more on this later). The bridge would then relay these commands to the live web-based p5.js editor. The editor would update in real-time, creating a seamless prompt-to-sketch experience — all the power of the official p5.js editor, but driven by conversation instead of code.
4. Building the p5.js Editor
I started with the frontend: a modern Next.js application with a full-featured p5.js IDE.
Core Features
The editor needed to be production-ready, not just a demo. Here's what I built:
- Multi-file support: Create, edit, and manage JavaScript, HTML, and CSS files
- Live preview: Iframe-based canvas with instant code execution
- Real-time console: Capture
console.log, errors, and warnings from the running sketch - Project management: Save/load projects with localStorage persistence
- Tabbed interface: Work with multiple files simultaneously
Vibe Coding the Editor
Building the editor was surprisingly straightforward thanks to "vibe coding" — an AI-assisted programming technique where you describe tasks in natural language and AI generates the corresponding code. The term was officially coined by Andrej Karpathy in February 2025:
There's a new kind of coding I call "vibe coding", where you fully give in to the vibes, embrace exponentials, and forget that the code even exists. It's possible because the LLMs (e.g. Cursor Composer w Sonnet) are getting too good. Also I just talk to Composer with SuperWhisper…
— Andrej Karpathy (@karpathy) February 2, 2025
Using Cursor IDE with Claude, I described what I needed: a modern p5.js editor with file management, live preview, console output, and tabbed interface. With a few iterations and minimal debugging, I had a working editor that looked and felt like the official p5.js editor, but with a more modern aesthetic.
The beauty of vibe coding is that you focus on what you want rather than how to build it. Instead of wrestling with React state management or iframe sandboxing details, I could describe the desired functionality and let Claude handle the implementation. This let me iterate quickly on the user experience while the AI handled the technical complexity.
WebSocket Integration
The editor includes a WebSocketListener component that connects to a bridge server and listens for MCP commands:
// Handle incoming MCP commands
newSocket.on('codeUpdate', (data: { code: string }) => {
  console.log('📝 [MCP] Received code update');
  onCodeUpdate(data.code);
});

newSocket.on('startExecution', () => {
  console.log('▶️ [MCP] Received start execution command');
  onExecutionControl?.('start');
});

newSocket.on('clearConsole', () => {
  console.log('🧹 [MCP] Received clear console command');
  onConsoleControl?.('clear');
});
5. Building the MCP Server
The MCP server is the brain of the operation. It exposes 13 different tools that Claude can use to control the editor:
Code Management Tools
server.tool(
  "update_code",
  {
    code: z.string().describe("The p5.js code to update in the editor"),
    description: z.string().optional().describe("Optional description of changes")
  },
  async ({ code, description }) => {
    const success = await sendToEditor('codeUpdate', { code });
    return {
      content: [{
        type: "text",
        text: success
          ? `✅ Code updated successfully${description ? `: ${description}` : ''}`
          : "❌ Failed to update code"
      }]
    };
  }
);
Execution Control Tools
server.tool("start_execution", {}, async () => {
  const success = await sendToEditor('startExecution');
  return {
    content: [{ type: "text", text: success ? "▶️ Started execution" : "❌ Failed to start" }]
  };
});

server.tool("stop_execution", {}, async () => {
  const success = await sendToEditor('stopExecution');
  return {
    content: [{ type: "text", text: success ? "⏹️ Stopped execution" : "❌ Failed to stop" }]
  };
});
File Management Tools
server.tool(
  "create_file",
  {
    name: z.string().describe("Name of the new file"),
    content: z.string().describe("Initial content for the file")
  },
  async ({ name, content }) => {
    const success = await sendToEditor('createFile', { name, content });
    return {
      content: [{ type: "text", text: success ? `📄 Created file: ${name}` : `❌ Failed to create file` }]
    };
  }
);
The complete list includes tools for console management, layout control, navigation, and connection status checking.
From MCP Tools to WebSocket Commands
Now that we've seen the MCP tools, how do they actually communicate with the editor? The tools call a sendToEditor() function, but where does that send the commands?
Since the MCP server can't directly communicate with a web browser, it connects to our bridge server using Socket.IO. Here's the communication layer that powers all those MCP tools (we'll dive deeper into the bridge server implementation shortly):
import { io, Socket } from "socket.io-client";

let editorSocket: Socket | null = null;
const EDITOR_WEBSOCKET_URL = "http://localhost:3001"; // Bridge server port

function connectToEditor() {
  editorSocket = io(EDITOR_WEBSOCKET_URL, {
    transports: ['websocket'],
    reconnection: true,
    reconnectionDelay: 5000
  });

  editorSocket.on('connect', () => {
    console.error("✅ Connected to bridge server");
  });
}

async function sendToEditor(event: string, data?: any): Promise<boolean> {
  return new Promise((resolve) => {
    if (!editorSocket?.connected) {
      resolve(false);
      return;
    }

    editorSocket.emit(event, data); // Sent to bridge, which forwards to editor
    resolve(true);
  });
}
Deploying to Claude Desktop
The MCP server is built using the TypeScript SDK for the Model Context Protocol. To make Claude Desktop aware of your server, you need to build and configure it:
cd p5js-mcp-server-ts
npm run build
node setup-claude.cjs  # Generates Claude Desktop configuration
Copy the generated configuration and add it to Claude Desktop's settings (Developer tab → Edit Config). Once configured and restarted, Claude Desktop will automatically connect to your MCP server and make all 13 tools available.
Full setup instructions and troubleshooting are available in the GitHub repository.
6. The WebSocket Bridge: Connecting MCP Server to Editor
We've built the MCP server that Claude can control, but there's still a missing piece: how does the MCP server actually communicate with our web-based editor? This is where the WebSocket bridge comes in.
The Bridge Server: Connecting Two Worlds
The bridge server solves a fundamental compatibility problem: Claude Desktop uses stdio streams while web browsers use WebSocket connections.
How it works: The bridge runs as a separate Node.js process that accepts connections from both the MCP server and the web editor, then forwards commands between them. When Claude invokes an MCP tool, the command flows: MCP server → bridge → web editor.
Implementation
Now let's implement the bridge server. This is a simple Node.js script that creates a Socket.IO server on port 3001, accepts connections from both the MCP server and web editor, and forwards events between them.
The websocket-bridge-server.js acts as a relay between the MCP server and the web editor:
const { Server } = require('socket.io');

// Create Socket.IO server on port 3001
const io = new Server(3001, {
  cors: {
    origin: "http://localhost:3000", // Next.js dev server
    methods: ["GET", "POST"]
  }
});

io.on('connection', (socket) => {
  console.log(`✅ Client connected: ${socket.id}`);

  // Forward MCP commands to webapp
  socket.on('codeUpdate', (data) => {
    console.log('📝 [MCP→WebApp] Code update received, forwarding...');
    socket.broadcast.emit('codeUpdate', data);
  });

  socket.on('startExecution', () => {
    console.log('▶️ [MCP→WebApp] Start execution command, forwarding...');
    socket.broadcast.emit('startExecution');
  });

  // ... handle all other MCP events
});
This bridge server logs every command for debugging and forwards them between the MCP server and any connected web clients.
7. Running the Complete System
Now that we understand how all the pieces work together, let's see how to run the complete AI-controlled p5.js editor. You need to start all components in the correct order:
Step 1: Start the p5.js Editor
npm run dev # Runs on http://localhost:3000
Step 2: Start the WebSocket Bridge
node websocket-bridge-server.js # Runs on port 3001
Step 3: Open Your Project
- Navigate to http://localhost:3000
- Create a new project or open an existing one
- Click the "Enable MCP" button in the editor interface
Step 4: Use Claude Desktop
- Open Claude Desktop (make sure you've configured the MCP server)
- Look for the adjusters icon (🎚️) in the chat input — this indicates MCP tools are available
- Try natural language commands:
- "Update the code to create a bouncing ball animation"
- "Clear the console and start execution"
- "Create a new file called 'utils.js'"
Important: The order matters! The editor must be running with MCP enabled before Claude can control it.
8. Using the System: Prompts → Sketches
Once everything is wired up, the experience is magical.
9. Lessons Learned and Next Steps
What Worked Well
MCP is incredibly powerful: The ability to give Claude real tools that affect real software opens up possibilities I hadn't considered. It's not just about code generation — it's about creating AI-controlled workflows.
WebSocket bridges are essential: Most real applications need real-time communication, not just stdio. The bridge pattern works well for connecting MCP servers to web applications.
Debugging complexity: With four moving parts (Claude Desktop, MCP server, WebSocket bridge, webapp), debugging requires careful logging at each layer. The bridge server's verbose logging was essential.
Next Steps
There are several directions this could evolve:
- Enhanced AI prompts: Add MCP prompts for common p5.js patterns (animations, interactions, generative art)
- Code analysis: Let Claude read and understand existing code before making changes
- Asset management: Tools for uploading images, sounds, and other assets
- Better storage: Replace localStorage with a proper database (PostgreSQL, SQLite) for project persistence and sharing
- Native MCP client: Develop an MCP client directly in the webapp instead of relying on Claude Desktop - this could dramatically improve UI/UX with custom interfaces, faster responses, and tighter integration
Conclusion
Building this p5.js editor taught me that MCP servers aren't just about connecting Claude to APIs — they're about creating entirely new ways to interact with software. When you remove the friction between creative ideas and their implementation, you unlock new possibilities for both learning and creating.
The code is available on GitHub with full setup instructions. Try it out, and let me know what you build!
Go Top
comments powered by Disqus